


BREAK-IN PROCEDURE
Note: The XL .25ARNV thru .36ARNV are ABC engines. The cylin-
der sleeve is tapered at the top, causing severe resistance when the piston
moves through the top of the stroke. This is normal. When the engine
heats up to operating temperature, this resistance will decrease and the
proper clearance will be achieved. The break-in procedure will guide you
through the steps necessary to properly break-in your new ABC engine.
Please follow the steps closely.
The break-in process allows the engine parts to perfectly fit to each
other and properly protect each part from premature wear. The engine
should be broken in using a fuel that contains no more than 10% nitro
methane and no less than 20% Castor Oil lubricant. Synthetic lubricant
fuels should not be used during the break-in procedure. For the break-in
procedure we recommend mounting the engine into the airplane it will be
used in. This way the muffler, fuel tank and throttle linkage can all be
tested in combination with the engine. If your airplane uses a cowling, it
should be removed during the break-in procedure.
q
1)
Turn the high speed needle valve out 2-1/2 turns from the fully
closed position.
STARTING PROCEDURE
The XL .25ARNV thru .36ARNV can be started using an electric starter or
they can be started by hand. For safety and ease of starting, especially
when the engine is new, we recommend using an electric starter. The fol-
lowing two procedures should be done with the power to the glow plug off.
q
Starting with an Electric Starter
When using an electric starter it is not necessary to prime the engine. The
starter turns the engine over fast enough that the engine draws fuel on it’s
own. Priming the engine prior to using an electric starter can cause the
engine to “hydro-lock” or flood. This is a result of too much fuel in the
engine before it actually fires. Turning the engine over with an electric
starter while the engine is flooded can cause extreme damage to the engine
and/or cause your propeller assembly to come loose. Turn the propeller
through the compression stroke one time by hand to check for a hydro-
locked state before applying the starter.
q
Starting by Hand
When starting the engine by hand always use a chicken stick. Never just use
your hand or serious injury could result. To make the engine easier to start
by hand it should be primed. This is done by opening the carburetor com-
pletely and choking the engine by putting your finger over the carburetor
opening. With the carburetor choked, “pull” the propeller through the com-
pression stroke 2 - 3 times. This will draw fuel into the engine. Remove
your finger and pull the propeller through the compression stroke once to
check for a hydro-locked condition.
PROPELLER, FUEL & GLOW PLUG
q
Propeller Recommendation
The diameter and pitch of the propeller needed for the XL .25ARNV thru
.36ARNV will vary greatly depending on the application the engine is used
in. The weight, drag and the type of model and how you intend to fly it are
all factors in determining the correct size propeller to use. Experimenta-
tion will be necessary to find the optimal size propeller for your particular
application. Ideally you want a propeller that the engine will turn in the
10,000 - 14,000 R.P.M. range, yet power the airplane sufficiently. Using a
propeller that is too small will cause the engine to run at too high an R.P.M.
Using a propeller that is too large will cause the engine run at too low an
R.P.M. and cause it to lug down too much. In both instances this can lead
to premature engine wear and eventual failure.
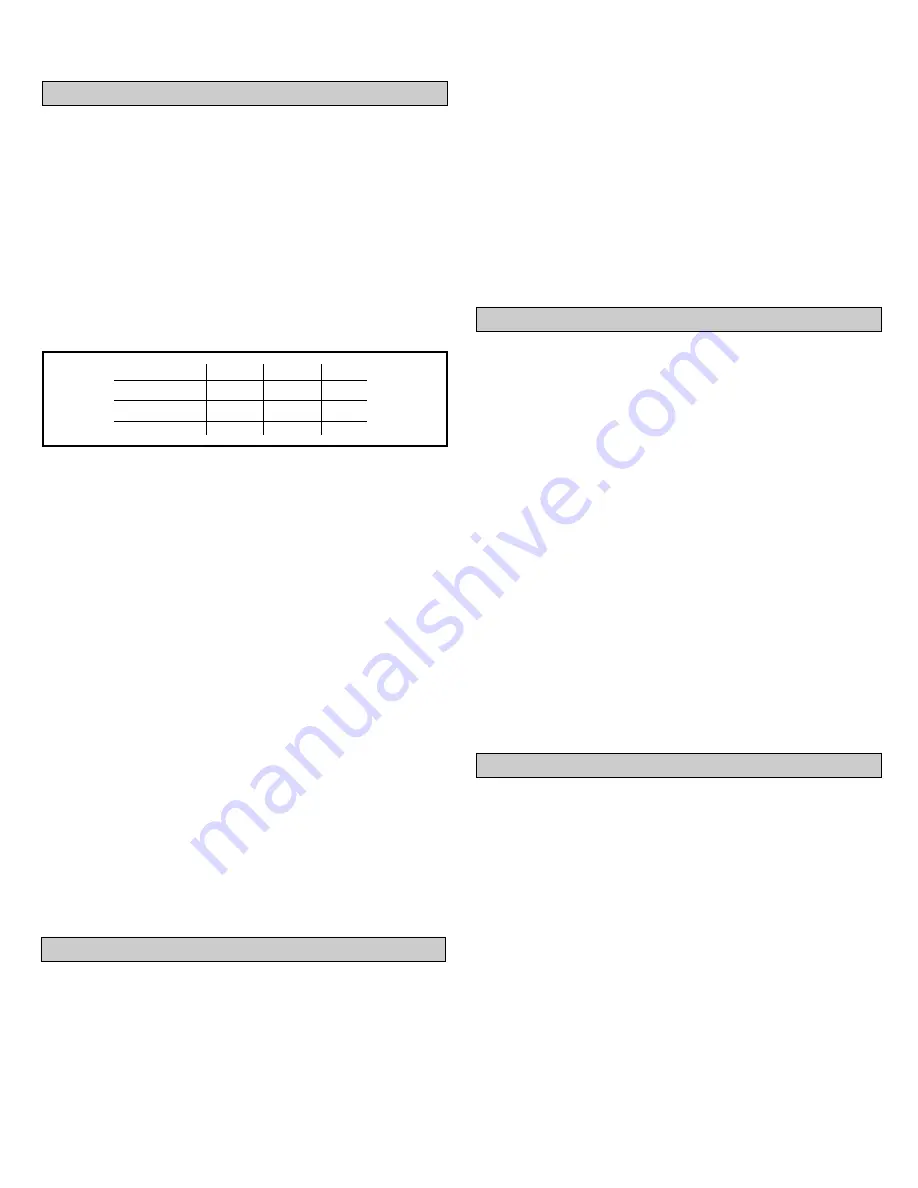
Propeller Size Recommendations
q
Glow Plug Recommendation
Glow plugs can also make a big difference on the performance of your
engine. For the XL .25ARNV thru the .36ARNV we recommend using a
hot heat range glow plug intended specifically for two cycle engines. Do
not use a cold heat range plug. This can lead to erratic engine runs and
eventual engine wear and failure.
q
Fuel Recommendation
Fuel can make a big difference in the way your engine performs. We rec-
ommend using two types of fuel with the XL .25ARNV thru .36ARNV
engines. For the break-in period you must use a fuel containing no more
than 10% nitro methane and no less than 20% Castor Oil lubricant. Use of
fuel containing more than the recommended percentage of nitro methane
or any synthetic lubricants will cause the engine to run too hot and result in
excessive wear and engine failure in a very short period of time. Once the
engine has been adequately broken in (about 1/2 gallon of the recommended
break-in fuel), a fuel containing up to, but no more than 15% nitro methane
and no less than 16% Castor Oil and synthetic lubricant blended fuel can
be used.
Note: We do not recommend using fuels that contain only synthetic
lubricants. Synthetic lubricants have a much lower flash point than Cas-
tor Oil lubricants. Flash point is the point at which the lubricant begins to
actually burn and loses it’s lubricating qualities. Using fuels containing a
blend of Castor Oil and synthetic lubricants results in an engine that runs
cooler and lasts longer. One lean run using a fuel containing only syn-
thetic lubricants can cause engine failure. Using fuels with a Castor Oil
and synthetic blend of lubricants greatly reduces this chance.
HIGH & LOW SPEED NEEDLE VALVES
q
High Speed Needle Valve
The high speed needle valve is used to meter the air/fuel mixture at full
throttle. Turn the needle clockwise to lean the mixture or turn the needle
counterclockwise to richen the mixture. When you start the engine for the
very first time the needle valve should be turned in completely, then backed
out 2-1/2 turns. When you start the engine after that, leave the needle
valve in the same position it was in when you shut down the engine.
q
Low Speed Needle Valve
The low speed needle valve regulates the air/fuel mixture at idle and dur-
ing transition from idle to full throttle. Turn the idle mixture screw clock-
wise to lean the mixture. Turn it counterclockwise to richen the mixture.
The idle mixture screw is preset from the factory, but minor adjustments
may need to be made. To reset the mixture screw to the factory setting
open the carburetor barrel completely. While holding the barrel open, for
the XL .25ARNV and .28ARNV turn the mixture screw in until it stops.
From this point, turn the mixture screw out 3 turns. For the XL .32ARNV
and .36ARNV turn the mixture screw out until it stops. From this point,
turn the mixture screw in 3 turns. These are the factory settings for each
engine. These adjustments should be made with the carburetor barrel held
firmly open.
XL .25ARNV
9 x 5
9 x 6
XL .28ARNV
9 x 5
9 x 6
9 x 7
XL .32ARNV
9 x 6
9 x 7
10 x 5
XL .36ARNV
9 x 7
10 x 5
10 x 6


