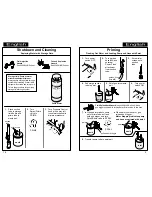
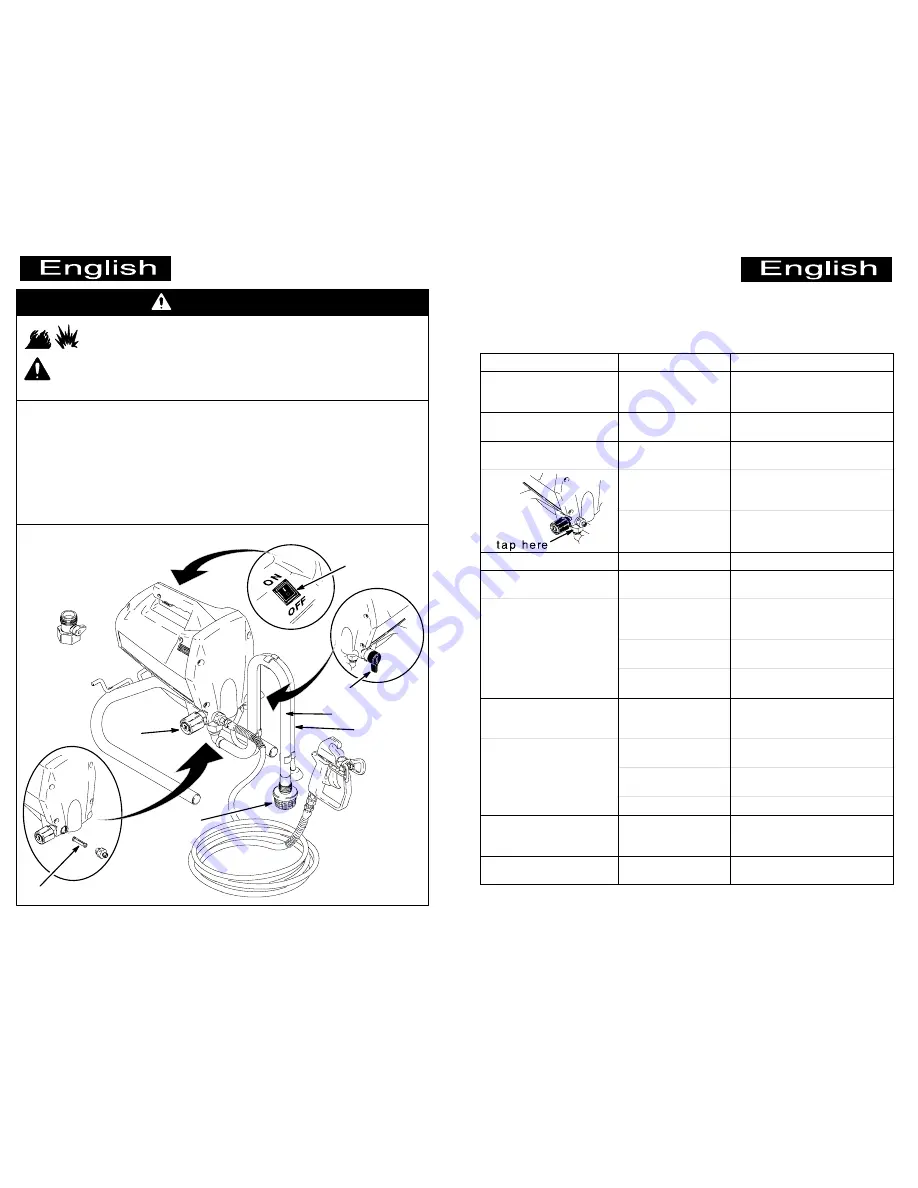
background image

Pressure
Control
knob

2

WARNING

Instructions in this guide are for water-base coatings. Read
Fire and Explosion Hazard on enclosed WARNINGS sheet.

To prevent injury and equipment damage and to maximize sprayer
performance, read all Warnings, Cautions, and procedures in enclosed
Operating Instructions.

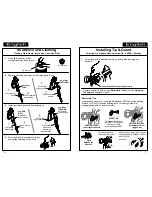
Required Tools and Accessories

n

Two 8-in. (20 cm) adjustable wrenches

n

Strainer bag to strain paint before it is sprayed

n

Drop cloths, spray shield, and other site preparation supplies

n

Respirator and safety glasses

n

Paint pail for coating to be sprayed

n

Waste pail to catch drainage during priming

n

Garden hose for flushing with Power Flush

t

 attachment

n

Pump Armor

t

 or mineral spirits/paint thinner for sprayer storage
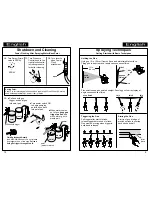
(M

AGNUM

 XR5 shown)

suction tube

prime tube

inlet screen

power switch

Power Flush

attachment

InstaClean

t

 filter

airless spray gun

(see gun filters on
page 14)

System Components

Spray/Prime valve

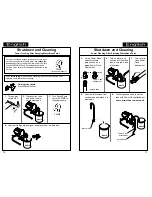
Basic Troubleshooting

Resolving Common Airless Sprayer Difficulties

For detailed troubleshooting, see enclosed Operating Instructions.

Problem

Cause

Solution

Power switch is ON and
sprayer is plugged in, but
pump does not cycle.

Pressure is set at
minimum.

Turn Pressure Control knob to
the right (clockwise) to increase
pressure.

Cannot pull gun trigger.

Trigger safety is in
SAFETY ON position.

Put trigger safety in SAFETY
OFF position.

Pump will not prime.

Spray/Prime valve is
at SPRAY.

Turn Spray/Prime valve to
PRIME (pointing down).

Inlet screen is
clogged, or suction
tube is not immersed.

Clean debris off inlet screen.
Make sure suction tube is at
bottom of paint pail.

Inlet valve check ball
is stuck.

Lightly tap inlet valve with small
wrench to jar the ball loose.
See figure at left.

Gun stopped spraying.

Tip is clogged.

See Reversible Tips on page 7.

Pump cycles but does not
build up pressure.

Pump is not primed.

See Priming on page 4.

Inlet screen is
clogged, or suction
tube is not immersed.

Clean debris off inlet screen.
Make sure suction tube is at
bottom of paint pail.

Paint pail is empty.

Refill paint pail, and reprime
sprayer.

Suction tube has
vacuum air leak.

Tighten suction tube connection.

Pump cycles, but paint only
dribbles or spurts when gun
trigger is pulled.

Pressure is set too
low.

Turn Pressure Control knob to
the right (clockwise) to increase
pressure.

Tip is clogged.

Clear tip. See Reversible Tips
on page 7.

InstaClean filter is
clogged.

Clean InstaClean filter. See
page 15.

Gun filter is clogged.

Clean gun filter. See page 14.

Spray pattern is
inconsistent or is leaving
stripes.

Pressure is set too
low.

Turn Pressure Control knob to
the right (clockwise) to increase
pressure.

Tip is worn beyond
capability of sprayer.

Replace tip.

19

Summary of Contents for XR5

Page 1: ...ble at the time of publication Graco reserves the right to make changes at any time without notice GRACO INC P O BOX 1441 MINNEAPOLIS MN 55440 1441 PRINTED IN USA 309203 Rev C 07 2000 To find your Graco MAGNUM authorized service center D See the enclosed Graco MAGNUM Authorized Service Centers list D Visit our website at www graco com D Call us at 1 888 541 9788 NEED HELP Call us at 1 888 541 9788...

Page 2: ...wer cord around cord wrap bracket 4 Place suction tube and prime tube in container to catch any drips Connect hose here 3 1 Unscrew tip guard assembly from gun to prepare for priming Setup 4 Turn power switch OFF Assembling New Sprayer or Setting Up Sprayer that Has Been Stored 3 Connect other end of hose to sprayer If hose is already connected make sure connections are tight 2 Uncoil hose and con...

Page 3: ...Turn Spray Prime valve to PRIME 8 Transfer prime tube to paint pail 5 Priming 7 D When paint starts to come out of prime tube pull and hold gun trigger and turn Spray Prime valve to SPRAY WASTE WASTE PAINT SPRAY 4 Submerge suction tube in paint Fluid Splashback Hazard see WARNINGS sheet Keep gun trigger pulled while turning Spray Prime valve in this step PAINT WASTE Flushing Out Water and Loading ...

Page 4: ...hten retaining nut by hand 7 Installing Tip Guard Screwing Tip Guard Onto Gun with Tip in SPRAY Position System is ready to spray Read Reversible Tips below and Spraying Techniques on pages 8 and 9 3 Screw tip guard assembly onto gun and tighten retaining nut by hand Reversible Tips Arrow shaped handle on reversible tip indicates SPRAY position pointing forward or UNCLOG position pointing back Thi...

Page 5: ...E water PAINT WASTE PAINT paint watch for water pull and hold trigger 11 Turn Pressure Control knob to the right clockwise to increase pressure for better cleaning 12 Turn lever to open Power Flush attachment 9 Spraying Techniques Getting Started with Basic Techniques Holding the Gun 12 in 30 cm even finish Hold gun 12 in 30 cm from surface and aim straight at surface Tilting gun to direct spray a...

Page 6: ...Power Flushing After Spraying Water Base Paint PRIME to relieve pressure 2 Place suction tube and prime tube in empty waste pail 3 Turn Spray Prime valve to PRIME to relieve pressure 11 Power Flush attachment 8 Unscrew inlet screen from suction tube and place it in waste pail WASTE WASTE Shutdown and Cleaning WASTE Power Flushing After Spraying Water Base Paint inlet screen close 6 Turn on water a...

Page 7: ...hould be atomized evenly distributed no gaps at edges Start at low pressure setting and increase pressure a little at a time until paint is atomized To prevent excessive tip wear spray at lowest pressure that atomizes paint If maximum pressure of sprayer is not enough for good spray pattern tip is too large or too worn See Reversible Tip Selection Chart in enclosed Operating Instructions 1 to 2 mi...

Page 8: ... and Cleaning InstaClean filter prevents particles from entering paint hose InstaClean filter is self cleaning but remove and clean it after each use for peak performance NEVER LEAVE WATER IN PUMP Continue with Replacing Water with Storage Fluid the final shutdown and cleaning procedure page 16 InstaClean filter Then unscrew outlet fitting Install open end of InstaClean filter in outlet fitting th...

Page 9: ...nt onto suction tube and turn on garden hose Power Flush attachment 8 Turn Pressure Control knob to the right clockwise until pump starts Water flowing out of prime tube indicates pump is primed with water 3 Unscrew inlet screen from suction tube 30 to 60 seconds 9 Let water flow out of prime tube into waste pail for 30 to 60 seconds WASTE 17 6 When storage fluid comes out of prime tube in 5 to 10...

Page 10: ...crease pressure Cannot pull gun trigger Trigger safety is in SAFETY ON position Put trigger safety in SAFETY OFF position Pump will not prime Spray Prime valve is at SPRAY Turn Spray Prime valve to PRIME pointing down Inlet screen is clogged or suction tube is not immersed Clean debris off inlet screen Make sure suction tube is at bottom of paint pail Inlet valve check ball is stuck Lightly tap in...

Reviews: