background image

en


19| ACX2180H | A/C System service


9


A/C system service


9.1


Automatic cycle setup 

Access to automatic cycles is available through the main 
menu by selecting 

AUTOMATIC

Do not connect hoses/couplers to vehicle A/C system until 
prompted by the unit. 

All values in the AUTOMATIC cycle mode are preset and 
unable to be modified from the Automatic menu, except for 
the refrigerant charge amount. If changing the value of the 
vacuum amount is desired, select a MANUAL process and 
choose all 3 services to be performed.


1.


From the main menu, select AUTOMATIC. 

2.


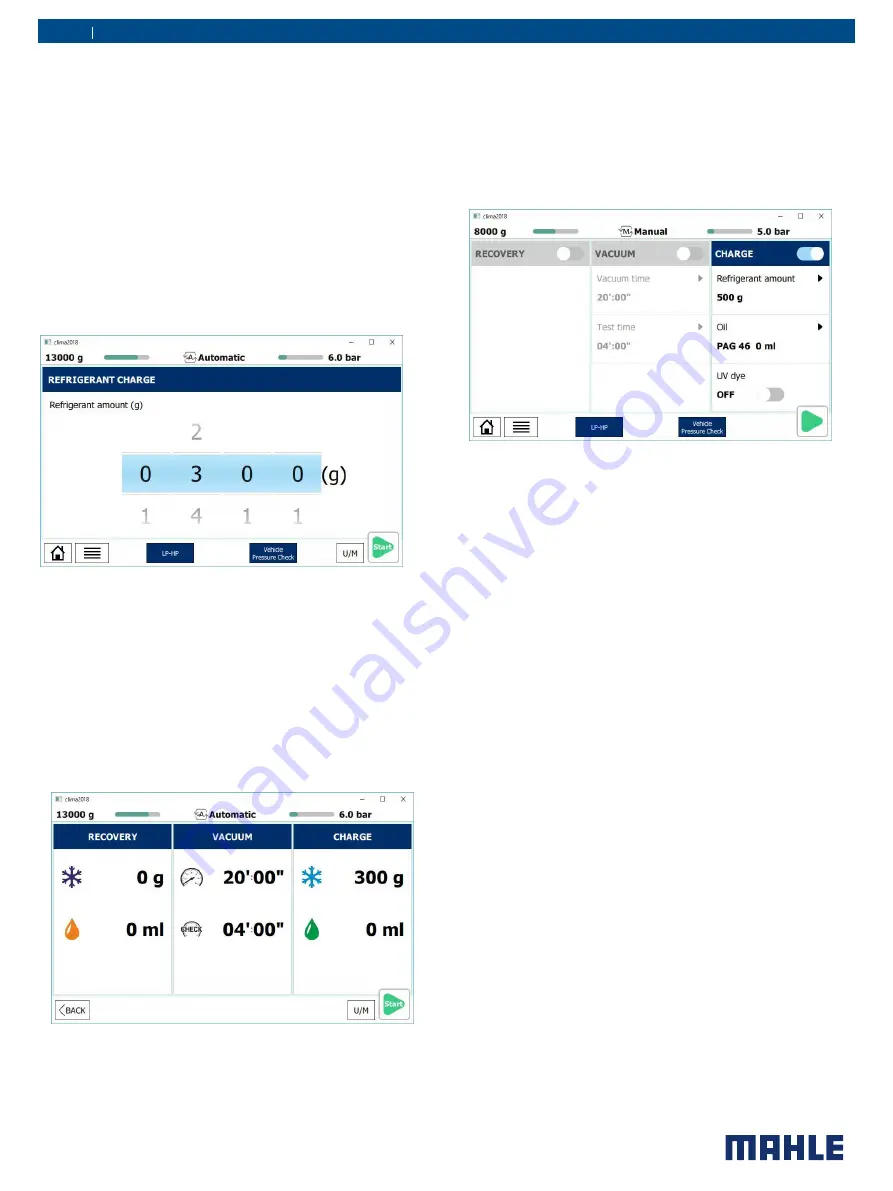
Adjust the charge value to match that of the vehicle 
manufacturer’s recommended value. 

Fig. 14:  Adjusting charge value 

3.


To change which hose the unit will charge, touch the blue 
box at the bottom of the screen that says LP-HP. A menu 
will pop up that allows technician to select which 
hoses/couplers to charge through. 

4.


 If the technician wishes to perform a pressure check of the 
A/C system, they should select Vehicle Pressure check at 
the bottom of the screen. (When highlighted BLUE, the 
pressure check function is selected; when in GREY, the 
unit will not perform a pressure check.) 

5.


After options are properly adjusted, press the green arrow 
in the lower right corner of the screen. 

Fig. 15:  Automatic setting confirmation 

6.


If settings are correct, press START button to begin 
process


9.2


Manual cycle setup


Access to manual cycles is available through the main menu by 
selecting 

MANUAL CYCLES

.


Do not connect hoses/couplers to vehicle A/C system until 
prompted by the unit. 

1.


From the main menu, select MANUAL. 

Fig. 16: Manual setting selection


2.


Select the services desired by touching button at the upper 
right corner of each column. (Figure shows charge service 
selected) 

See the sections about Recovery, Vacuum, and Charge on the 
next page for more detailed cycle setting information. 

3.


To change the charge hose, touch the blue box at the 
bottom of the screen that says LP-HP. A menu will pop up 
that allows technician to select which hoses/couplers to 
charge through. 

4.


If the technician wishes to perform a pressure check of the 
A/C system, they should select Pressure check at the 
bottom of the screen. (When highlighted BLUE, the pressure 
check function is selected; when in GREY, the unit will not 
perform a pressure check.) 

5.


After options are properly adjusted, press the green arrow in 
the lower right corner of the screen. 

6.


The unit will display a screen to confirm process settings. 
Press the START button to begin process. 

7.


Follow on-screen instructions to complete cycle. 


Summary of Contents for ACX2150

Page 1: ...MAHLE ACX2180H...

Page 2: ...en 2 ACX2180H...

Page 3: ...sioning 16 7 1 Connections and positioning 16 7 2 First start up verification 16 7 3 Setup 17 7 4 Internal Bottle Fill 17 8 A C service preparation 18 8 1 Preliminary preparation 18 8 2 Non condensabl...

Page 4: ...on onits designateduse must behandedovertotheperson 2 1 Usergroup The product may be used by skilled and instructed personnel only Personnel scheduled to be trained familiarized and instructed or to t...

Page 5: ...towards the prevention of accidents industrial diseases labor related health risks are taken and measures towards making the workplace fit for people to workinarecarriedout Basic rules The contractor...

Page 6: ...the refrigerant has been contaminated by being mixed with other gases remove the contaminated refrigerant and add fresh R134a before using the ACX2180H for A C service R134a is not to be used in area...

Page 7: ...eisdamagetotheACX2180H terminateusage immediately and contact customer service Theservicehosesandservicequick releasecouplingsmust be regularlycheckedforwearandreplacedifdamaged The ACX2180H must be o...

Page 8: ...oad cell Recovered oil container 250ml Vacuum pump 2CFM dual stage Vacuum pump oil quantity 250ml Compressor capacity 0 87cu in 14cc Dryer filter 90kg recovered R134a Non condensable gas purge Automat...

Page 9: ...g The ACX2180Hcan only be operated with R134a The ACX2180His not to be used for service work on vehicles with air conditioning systems employing refrigerants other than R134a as this will cause damage...

Page 10: ...t 4 LCD display 5 Low Pressure Gauge 6 High Pressure Gauge 7 Front Cover 8 Locking Caster 9 Rear Wheel 10 Printer optional 11 Used oil bottle Fig 2 Rear View 1 Service Hoses 2 Fan 3 Vent 4 Hose Storag...

Page 11: ...Description of unit ACX2180H 11 en Fig 4 Internal components 1 Accumulator Oil separator 2 Combo filter 3 Compressor 4 Vacuum pump 5 Refrigerant tank 6 HS compressor oil separator 7 Manifold...

Page 12: ...re used to monitor the pressure during the individual vehicle A C service phases The status of the various service phases during maintenance is displayed on the LCD screen Fig 5 Pos 2 The status and w...

Page 13: ...the cylinder Avoid the refrigerant loss dispersion in the air during the disconnection of the couplers Puff effect CheckpossibleSchradervalveleaksbefore disconnection Fig 8 EcoLOCK Couplers To connect...

Page 14: ...il is separated from the recovered vehicle refrigerant and drained into the used oil bottle The vehicle air conditioning system is partly filled with UV dye to facilitate the detection of leaks in the...

Page 15: ...improper means protections and without complying with the existing laws on manual handling of loads and with the operations described in this manual Remove staples and remove the carton Fig 10 Slowly...

Page 16: ...perations 7 2 First start up verification Warning Risk of frostbite from escaping refrigerant Refrigerant causes frostbite on the skin Check the service hoses for damage Firmly connect the service qui...

Page 17: ...rvice hoses for damage Firmly connect the service quick release couplings to the service hoses Wear protective goggles Wear protective gloves Before the ACX2180H can be used the internal refrigerant b...

Page 18: ...lled in vehicle A C system Lubricant removed from the system and or equipment shall be disposed of in accordance with the applicable federal state and local procedure and regulations The service param...

Page 19: ...adjusted press the green arrow in the lower right corner of the screen Fig 15 Automatic setting confirmation 6 If settings are correct press START button to begin process 9 2 Manual cycle setup Access...

Page 20: ...en in Figure below will appear Fig 17 Vacuum time adjustment 4 Swipe finger up or down to adjust the hours and minutes then press the to accept or the X to cancel time adjustment 5 If the vacuum test...

Page 21: ...enu prompting to complete oil flushing 9 7 Vehicle Pressure Check 1 From the MENU scroll to SPECIAL FUNCTIONS and select The SPECIAL FUNCTIONS screen will now be displayed Fig 23 Vehicle pressure chec...

Page 22: ...n fittings To ensure a reliable procedure it is advisable to use the optimum quantity of refrigerant The optimum quantity of refrigerant for the ACX2180H is 4kg 10 0kg An inadequate quantity of refrig...

Page 23: ...nd the filter dryer need replacement 1 From the MAINTENANCE menu scroll until MAINTENANCE COUNTERS is shown and make selection 2 Press to display all counters Fig 25 Maintenance counters 10 6Long life...

Page 24: ...ervice life Each filter is marked with a unique code This code must be entered when replacing the filter It is not possible to operate the ACX2180H if the same code is re used It is advisable to keep...

Page 25: ...on Make sure no corrosion or leakage is present in the internal cylinder and other metallic parts of the equipment under normal conditions the internal cylinder life is at least 20 years Ifautomaticsa...

Page 26: ...ription Order number Combo filter 360 83254 00 Vacuum pump oil 011 80070 00 Paper for printer 5 rolls 360 83110 00 Service hose HP 028 80532 00 Service hose LP 028 80533 00 Quick release coupling HP 0...

Page 27: ...en 27 ACX2180H Maintenance 12Maintenance 12 1Vacuum pump oil change Vacuum pump oil change record Date Maintenance technician identification Maintenance technician signature and stamp...

Page 28: ...Maintenance ACX2180H 28 en Vacuum pump oil change record Date Maintenance technician identification Maintenance technician signature and stamp...

Page 29: ...en 29 ACX2180H Maintenance 12 2Filter dryer change Filter Dryer Change Record Date Maintenance technician identification Maint Tech signature and stamp...

Page 30: ...Maintenance ACX2180H 30 en Filter Dryer Change Record Date Maintenance technician identification Maint Tech signature and stamp...

Page 31: ...en 31 ACX2180H Maintenance Filter Dryer Change Record Date Maintenance technician identification Maint Tech signature and stamp...

Page 32: ...2180H 32 en 12 3Refrigerant load cell calibration check Refrigerant Load Cell Calibration Check Record Date Result of check pass fail Maintenance technician identification Maintenance technician signa...

Page 33: ...ACX2180H Maintenance 12 4Other checks maintenance repairs Other checks maintenance repairs Job Date Result of check pass fail Maintenance technician identification Maintenance Technician signature and...

Page 34: ...Maintenance ACX2180H 34 en Other checks maintenance repairs Job Date Result of check pass fail Maintenance technician identification Maintenance Technician signature and stamp...

Page 35: ...en 35 ACX2180H Maintenance 12 5Notes...

Page 36: ...MAHLE Aftermarket Inc Service Solutions 10 Innovation Drive York PA 17402 USA 717 840 0678 www servicesolutions mahle com 035 82692 00 2019 01 03...

Reviews: