A/C System service | ACX2281 | 20
en
9.2
Automatic cycle setup
Access to automatic cycles is available through the main
menu by selecting AUTOMATIC.
Do not connect hoses/couplers to vehicle A/C system until
prompted by the unit.
All values in the AUTOMATIC cycle mode are preset and
unable to be modified from the Automatic menu, except for
the refrigerant charge amount. If changing the value of the
vacuum amount is desired, select a MANUAL process and
choose all 3 services to be performed.
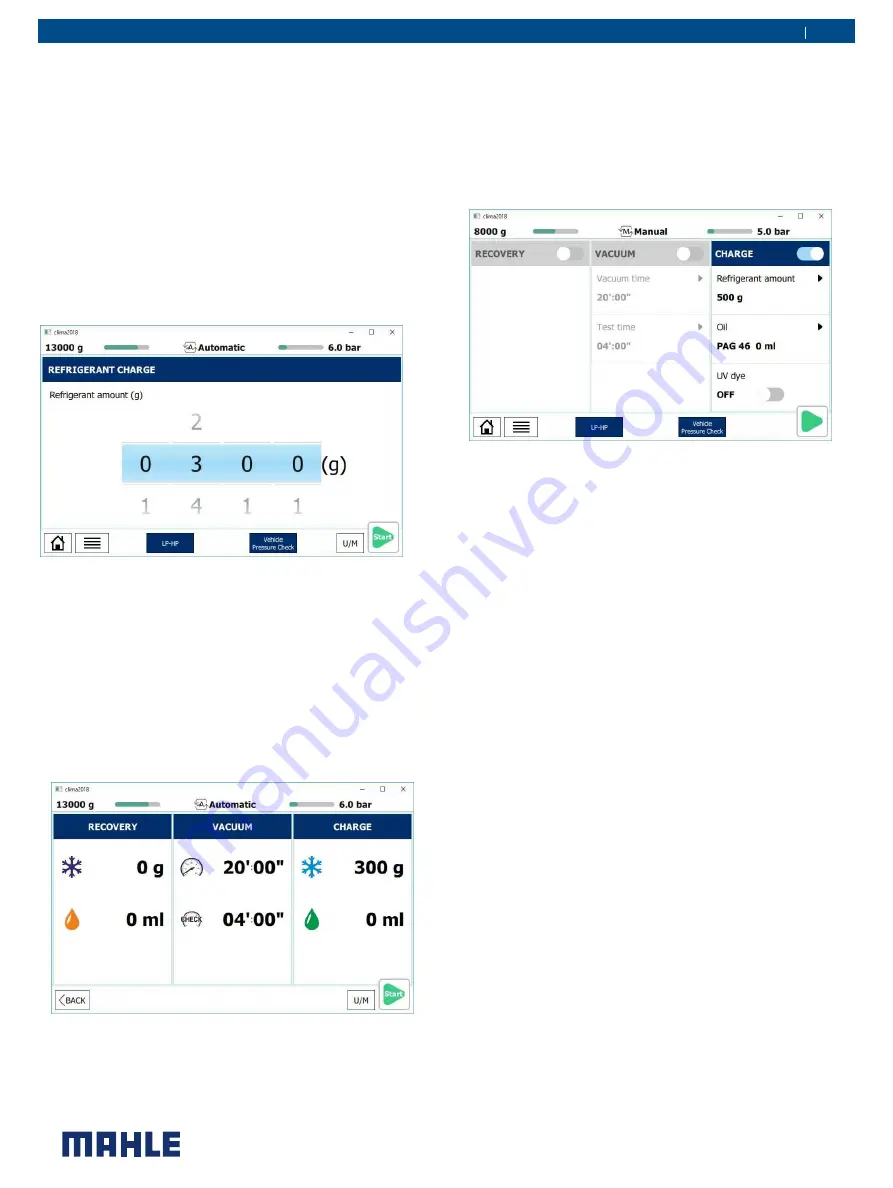
1. From the main menu, select AUTOMATIC.
2. Adjust the charge value to match that of the vehicle
manufacturer’s recommended value.
Fig. 16: Adjusting charge value
3. To change which hose the unit will charge, touch the blue
box at the bottom of the screen that says LP-HP. A menu
will pop up that allows technician to select which
hoses/couplers to charge through.
4. If the technician wishes to perform a pressure check of the
A/C system, they should select Vehicle Pressure check at
the bottom of the screen. (When highlighted BLUE, the
pressure check function is selected; when in GREY, the
unit will not perform a pressure check.)
5. After options are properly adjusted, press the green arrow
in the lower right corner of the screen.
Fig. 17: Automatic setting confirmation
6. If settings are correct, press START button to begin
process
9.3
Manual cycle setup
Access to manual cycles is available through the main menu by
selecting MANUAL CYCLES.
Do not connect hoses/couplers to vehicle A/C system until
prompted by the unit.
1. From the main menu, select MANUAL.
Fig. 18: Manual setting selection
2. Select the services desired by touching button at the upper
right corner of each column. (Figure shows charge service
selected)
See the sections about Recovery, Vacuum, and Charge on the
next page for more detailed cycle setting information.
3. To change the charge hose, touch the blue box at the
bottom of the screen that says LP-HP. A menu will pop up
that allows technician to select which hoses/couplers to
charge through.
4. If the technician wishes to perform a pressure check of the
A/C system, they should select Pressure check at the
bottom of the screen. (When highlighted BLUE, the pressure
check function is selected; when in GREY, the unit will not
perform a pressure check.)
5. After options are properly adjusted, press the green arrow
in the lower right corner of the screen.
6. The unit will display a screen to confirm process settings.
Press the START button to begin process.
7. Follow on-screen instructions to complete cycle.


