Operation
8. Operation
8.1 Preparing the work area
It is important that the surrounding area be properly
chosen and prepared before raising a load. Refer to
ANSI/ALI ALIS for additional information.
1.
Use the lift system only on hard surfaces capable of
safely supporting the load. The surface must be strong
enough to support the weight of the lift units and the
vehicle being raised. The ground pressure for each lift
unit is listed in the Specification section. The ground
pressure listed assumes the entire footprint of the lift
unit is in full contact with the floor. Hot asphalt can
become soft and should be avoided to prevent
property damage or an unsafe situation.
2.
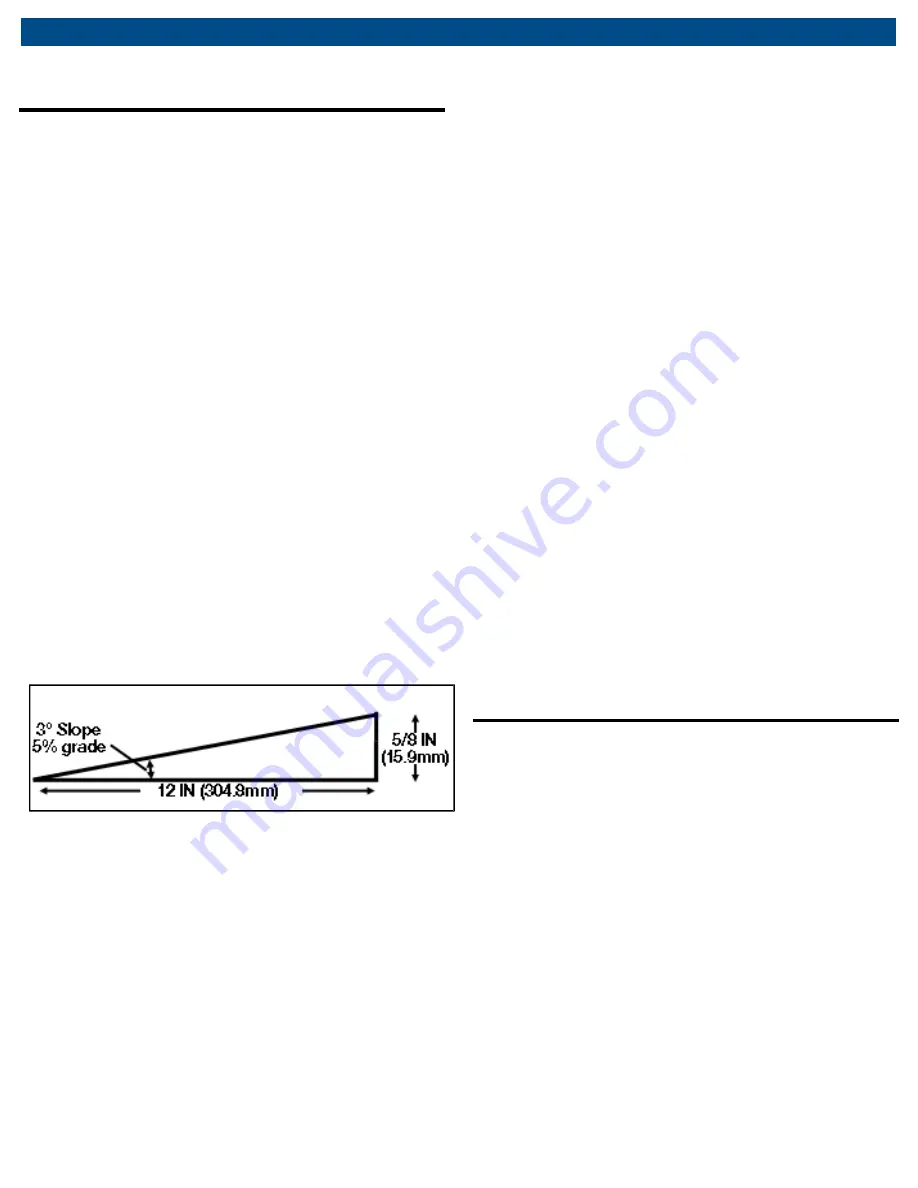
Use the lift system only on level, even surfaces. A level
surface is considered to be 3° slope or less. A surface
with 3° slope is equivalent to a 5% grade or 5/8 in.
(15.9 mm) rise or drop per horizontal foot (304.8 mm)
(See Fig. 4 below. Note also that for each degree of
slope a surface rises or drops 0.210 in. (5.33 mm) per
horizontal foot (304.8 mm)). The surface must also be
free of ripples, ridges, depressions, holes, or any
undulation (e.g., a seam in a concrete floor) that would
cause only part of the lift unit’s footprint to be in
contact with the floor
.
Fig. 5: Slope of ground under lift
3.
Make sure there is adequate clearance above the
highest point of the vehicle (including things like
vehicle exhaust pipes, air dams, etc.) so the vehicle
does not contact any overhead objects when raised
(e.g. ceiling/roof structural components, duct work,
hanging lights, heating/AC units, etc.). The lift system
can raise a vehicle as much as 69” (1753 mm, but the
vehicle will extend vertically above this. The height of
the lift unit alone (when raised to 69” (1,753 mm) is
157.13” (3991 mm).
4.
Clear the work area (especially the area underneath the
lift unit) of any unnecessary personnel, tools,
equipment, and other materials. No unauthorized
CML Series | 11 | en
personnel should be allowed in the work area where
the lifts are being used.
Ser
5.
If the lift system is used outdoors the operator assumes
all risk. Understanding that these are portable lifts, it is
foreseeable that they can and will be used outdoors
.
WARNING!
If lift units are used outdoors the following
conditions must be met
:
Do not use lift units when wind speeds or gusts exceed
20 mph to avoid tipping or loss of load
.
Do not leave lift units unattended when used outdoors.
This will help to avoid inadvertent operation by
untrained operators and unforeseen changes in
weather conditions
.
Do not use lift units outdoors when precipitation of any
type is falling or expected during the time the units will
be used. There is a risk of electric shock if lift units are
used while precipitation is falling
.
Do not charge lift units while outdoors. Only charge lift
units while indoors to avoid risk of electric shock
.
If these conditions cannot be met, move the vehicle and
lift units (separately) to an indoor area where the lifting
operation can be performed safely
.
WARNING!
Never attempt to move or reposition a lift
unit when a vehicle is raised on the lift unit
.
8.2 Prepare the vehicle
It is important that the vehicle be in proper condition
before raising it off the floor
.
1.
The vehicle’s wheels (or rims; not the tires) must meet
the minimum wheel diameter requirement shown in the
Specifications section or else they could fall through the
cradle of the lift carriage (for example, if the tires
deflate). See section of Lift Unit Preparation for
information on properly engaging a tire
.
2.
Check that the tires on the vehicle are properly inflated
and are in road-worthy condition. Make sure the weight
on any single tire does not exceed the rated capacity of
its lift unit, as the total weight of the vehicle may not be
evenly distributed across all lifted tires. Also, be sure to
consider the weight carried by unsupported axles (i.e. a
set of 4 lift units used to raise a vehicle with three axles).
Summary of Contents for CML-7
Page 38: ...Maintenance Chart CML Series 38 en Action Date Details Person responsible...
Page 39: ...en 39 CML Series Notes 16 Notes...
Page 40: ...Notes CML Series 37 Notes CML Series 40 en...
Page 41: ...en 41 CML Series Notes...
Page 42: ...en 42 CML Series Notes...
Page 43: ...en 43 CML Series Notes...


