background image

10 


ENGINE FLUSH

ENGINE FLUSH

ENGINE FLUSH

ENGINE FLUSH


The engine can be flushed with a chemical additive with the MCX-2F connected as described in 
preceding pages. Two valves located on the front panel each have two positions - EXCHANGE and 
BYPASS. 

When the valves are both turned to the BYPASS position the coolant in the vehicle bypasses the 
MCX-2F. It flows through the green and black hoses which are connected together inside the MCX-
2F by the two valves being in the BYPASS position. 

Flush (or leak sealant) additives can be added to the vehicle cooling system through the radiator fill 
port. The engine can then be started to circulate the additives throughout the cooling system. 

Connecting the MCX-2F to the cooling system prior to adding additives and running the engine 
eliminates the need to make connections involving hot coolant. 


Coolant bypasses MCX-2F when both valves are turned to BYPASS.

Overflow

LO WER RAD IAT OR

& O VER FLO W

EMPT Y  WAST E T ANK

FILL R ADIATOR  &  OVERF LO W

EXCH ANG E C OO LANT  OR


& O VER FLO W

LO WER RAD IAT OR

EMPT Y  WAST E T ANK

EXCH ANG E C OO LANT

& O VER FLO W

FILL R ADIATOR

SYSTEM  PR ESSURE

SYSTEM  VACUUM

TEST

OFF

OFF

OFF

Green Hose


Black Hose


Radiator


Adapters

Step

Hose

Radiator

Adapter

Block


Engine

Hose

Pump


Water

Core

Heater


Summary of Contents for MCX-2

Page 1: ...Coolant Exchanger With Flush and Flow Indicator MAHLE MAHLE MAHLE MAHLE Aftermarket Inc Service Solutions Aftermarket Inc Service Solutions Aftermarket Inc Service Solutions Aftermarket Inc Service S...

Page 2: ...Power 5 Relieving Radiator Pressure 6 Lowering Coolant Level 7 Connecting to the Coolant System 8 Special Hookups 9 Engine Flush 10 Coolant Replacement 11 Test Coolant System for Leaks 12 Completing...

Page 3: ...Hose Large Adapter Hose Small Hose Clamps Large Hose Clamps 1 1 4 1 1 2 Large Step Adapters Small Step Adapters VALVE OPEN 1 3 4 VALVE CLOSED 1 1 4 1 3 8 Qty 2 Filter Bowl 1 3 8 1 1 2 1 3 4 Impeller...

Page 4: ...ople and animals and are also corrosive Clean up any spills immediately CAUTION CAUTION CAUTION CAUTION FAILURE TO FOLLOW THE PRECAUTIONS AS OUTLINED IN THE OPERATION FAILURE TO FOLLOW THE PRECAUTIONS...

Page 5: ...om the caps on the Waste Tank and the New Make sure the plugs are removed from the caps on the Waste Tank and the New Make sure the plugs are removed from the caps on the Waste Tank and the New Make s...

Page 6: ...l operation Working in the vicinity of a lead explosive gases during normal operation Working in the vicinity of a lead explosive gases during normal operation Working in the vicinity of a lead explos...

Page 7: ...following o be connected to power for the following The MCX 2F will relieve the pressure in a hot car radiator by drawing a vacuum on the overflow port on the radiator cap Shop air 55 to 100 PSI conn...

Page 8: ...OW 6 Press the top of LOWER RADIATOR OVERFLOW selector switch to turn on pump 7 Use the Wand to empty the overflow container and lower the level of coolant in the radiator to a level just below the up...

Page 9: ...Black hoses from the MCX 2F to the two Step Adapters as shown in the illustrations See next page for special See next page for special See next page for special See next page for special hookups hooku...

Page 10: ...ling systems do not have a cap on the radiator Instead there is a single cap on the overflow tank as shown in the illustration below The hoses to and from the overflow tank must be pinched using hose...

Page 11: ...an be added to the vehicle cooling system through the radiator fill port The engine can then be started to circulate the additives throughout the cooling system Connecting the MCX 2F to the cooling sy...

Page 12: ...full capacity of coolant in the vehicle cooling system 4 Turn both valves on front of MCX 2F to EXCHANGE 5 Turn control valve to EXCHANGE COOLANT 6 Press the top of EXCHANGE COOLANT OR FILL RADIATOR O...

Page 13: ...he bottom of the EXCHANGE COOLANT OR FILL RADIATOR OVERFLOW selector switch when the pressure reaches 10 to 13 PSI 5 The coolant system is now pressurized Monitor the pressure for a constant reading A...

Page 14: ...to lower the level of coolant in the radiator to a level just below the upper hose where the Step Adapter is attached Open valve on Wand as required Continued on next page Continued on next page Cont...

Page 15: ...the recommended levels 16 Replace the radiator cap and overflow container cap 17 Press the bottom of the EXCHANGE COOLANT OR FILL RADIATOR OVERFLOW selector switch and disconnect power cord EMPTY WAS...

Page 16: ...e New Coolant Tank Open the valve on the Wand and then open the valve on the Step Adapter All coolant in the hoses and pump will be emptied into the New Coolant Tank 8 Close the valve on the Wand and...

Page 17: ...XCHANGE COOLANT OR FILL RADIATOR OVERFLOW selector switch to turn off the pump 15 Place the cap on the New Coolant Tank and slide it into the MCX 2F Black Hose LOWER RAD IATOR EMPTY WASTE TANK OVER FL...

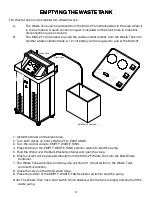
Page 18: ...Bulk Waste Container and open the valve 6 Waste coolant will be pumped directly from the MCX 2F Waste Tank into the Bulk Waste Container 7 The Waste Tank will empty and the pump will shut off A float...

Page 19: ...00 370 80007 00 370 80008 00 025 80326 00 1 3 4 1 1 2 370 80169 00 370 80047 00 Large Step Adapter Wand 1 3 8 1 1 4 370 80049 00 370 80050 00 370 80046 00 Large Adapter Hose Includes 2 Clamps Small S...

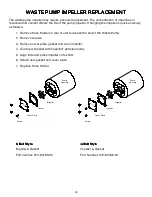
Page 20: ...lder on rear of unit to access the end of the Waste Pump 2 Remove screws 3 Remove cover plate gasket and worn impeller 4 Coat new impeller with Vaseline petroleum jelly 5 Align flats and press impelle...

Page 21: ...20 FLOW WIRING DIAGRAM FLOW WIRING DIAGRAM FLOW WIRING DIAGRAM FLOW WIRING DIAGRAM...

Reviews: