10
Mahr GmbH, MarSurf PS 10
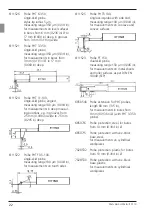
Fitting the vee-block holder back onto the
drive unit
1. Insert the drive unit into the vee-block
holder
(9)
and slide it forwards so that the
probe
(8)
is in the center of the vee-block
holder groove.
2. Tighten the two screws on the front face
of the vee-block holder with a torque of
0.1 Nm using the Allen wrench (2 mm
(0.035 in)
) pro vided.
Inserting the drive unit back into the
MarSurf PS 10 (
)
1. Turn the MarSurf PS 10 upside down.
2. If present, disconnect the extension
cable
(13)
from the drive unit.
To do so, press the locks on the plug
of the extension cable
(13)
.
3. Plug the plug
(21)
into the drive unit
(see
figure 4)
.
4. Insert the drive unit into the notch of the
MarSurf PS 10.
Insert the side stop pin
(22)
into the
groove
(22a)
and the latch pin
(23)
into the
opening
(23a)
.
5. Press against the knurled cap on the back
of the drive unit
(12)
and slide the drive unit
forwards until you hear it click into place.
Removing the drive unit from the MarSurf
PS 10 (
)
1. Turn the MarSurf PS 10 upside down.
2. Press against the front face of the drive unit
until you hear the latch pin
(23)
unlatch and
the side stop pin
(22)
is at the back
(see
figure 4)
.
3. Hold the drive unit by the probe protection
of the vee-block holder
(9)
and pry it out of
the MarSurf PS 10.
4. Disconnect the plug
(21)
from the drive unit.
5. Connect the extension cable
(13)
to the
drive unit
(12)
and the plug
(21)
(see fig
ure 5)
.
The plug of the extension cable
(13)
clicks into place in the drive unit.
6. If necessary, place the evaluation instrument
in the carry case
(14)
(see figure 1, below)
.
Removing the vee-block holder from the
drive unit (
)
(e.g. for changing the probe
or fitting the drive unit to the hand-held sup port
or a holding device)
1. Undo the two screws on the front face of
the vee-block holder
(9)
using the Allen
wrench (2 mm
(0.035 in)
) provided.
2. Slide the vee-block holder forwards until it
touches the probe, then pry the drive unit
out of the vee-block holder.
3. Changing the probe:
•
Remove the probe
(8)
from the drive
unit.
•
Carefully insert the new probe into the
probe holder on the front face of the
drive unit
(12)
, noting the plug arrange-
ment.
i
Summary of Contents for MarSurf PS 10
Page 6: ...Mahr GmbH MarSurf PS 10...
Page 185: ...3 Mahr GmbH MarSurf PS 10 1 2 3 4 5 6 VDE 7 8 Mahr GmbH i...
Page 251: ...3 Mahr GmbH MarSurf PS 10 1 2 3 4 5 6 VDE 7 8 Mahr GmbH i...
Page 273: ...3 Mahr GmbH MarSurf PS 10 1 2 3 4 5 6 VDE 7 8 Mahr GmbH i...
Page 295: ...3 Mahr GmbH MarSurf PS 10 1 2 3 4 5 6 VDE 7 8 Mahr GmbH i...
Page 381: ...Mahr GmbH MarSurf PS 10...
Page 382: ...Mahr GmbH MarSurf PS 10...
Page 383: ...27a 25 25 26 28a 27 28 29 30 Abb 6 Fig 6 Obr 6 Rys 6 6 6 bra ekil 6 6 6 6 Bild 6 Afb 6...
Page 384: ...www mahr com...


