uk
│ 9. Installation ‒ Electrical connection
18
4. Fix the fan into position at the installation
location using fixing material that is
approved for the corresponding load.
Use spring washers or lock nuts to
ensure long-term fixing. Take note of
the torque values quoted by the dowel
manufacturer. Build in the steel wall
ring without distorting it by twisting or
squeezing it. The impeller must not rub.
5. Check both the free running of the impeller
and the air gap between the impeller and
the steel wall ring, by turning the impeller
by hand.
The impeller must not rub and the air
gap must be more or less the same
all the way round.
6. Install a shutter or a protective grille on the
outside, in order to safeguard the fan
against foreign bodies falling into the air
channel. Insure there is protection against
accidental contact, in accordance with EN
ISO 13857.
Always use new lock nuts in
accordance with EN ISO 7041, when
assembling and dismantling.
9.2 Electrical connection
DANGER
Danger to life from electric
shock.
Prior to accessing the connection
terminals, switch off all supply
circuits. Switch off mains fuse,
secure against being accidentally
switched back on and position a
visible warning sign.
NOTICE
Risk of damage to unit in the
event of short-circuits.
Insulate any unnecessary cable
cores.
Information
● Always note the relevant specifications for
electrical installations and when fitting
equipment. In Germany observe DIN VDE
0100 and the corresponding parts in
particular.
● Connect the fan to a current-dependent
protection device. This should be supplied
by the customer
see protection device
operating instructions for relevant data.
Procedure
1. Switch off mains fuse and prevent from
being started up again. Fit warning sign.
2. Remove the terminal box cover [3].
NOTICE
Danger of short circuits and
damage to unit. Water may
penetrate the terminal box if
the power cable is introduced
incorrectly or if sealing
elements such as a self-
sealing grommet, cable
grommet or cable screw-
connections are not fitted
correctly.
Install the sealing elements
such that the power cable is
held snugly in place.
3. Install suitable sealing element such as a
self-sealing grommet, cable grommet or
cable screw-connections.
4. Guide the power cable into the terminal
box such that the sealing element fits
around the cable sheathing completely.
If necessary, seal the terminal box on-site.
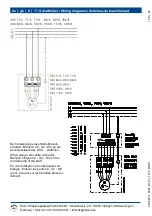
5. Wire fan to the terminal block according to
the wiring diagram (
Chapter 17). Note
tightening torque of screws of 0.7 Nm.
NOTICE
Risk of damage to unit if
unauthorised external control
device is used.
Only connect control devices
with a current-dependent
protection device.
6. Wire external control device to the terminal
block according to the wiring diagram
(
Chapter 17). Note tightening torque
of screws of 0.7 Nm.


