background image

1. General notes 


1. General notes 


Please read these instructions 

carefully. Follow the instructions. 

Pass these instructions onto the 

owner. Keep these instructions 

somewhere safe. 

The warnings provided, indicate hazardous 

situations which, if not avoided will result in 

death or serious injury in the case of 

DANGER

 or could result in death or serious 

injury in the case of 

WARNING

.  

CAUTION

 indicates a hazard situation which 

could result in minor injuries if not avoided.  

NOTICE 

indicates potential damage to the 

product or its surroundings. 


2. Specialist installer qualification 

Mounting may only be carried out by 

specia-

lists

 who have the necessary knowledge and 

experience in 

ventilation engineering

Only a 

trained electrician

 is permitted to 

work on the electrics. You are deemed a 

trained electrician if you are familiar with the 

relevant standards and guidelines, can 

competently and safely connect units to an 

electrical power supply in line with the 

attached wiring diagram and are able to 

recognise and avoid risks and dangers 

associated with electricity on the basis  

of your technical training and experience. 


3. Intended use 

These fans are used to extract air from 

interior bathrooms and toilet rooms, storage 

rooms and kitchens with an outside window. 
If operated other than stated in DIN 18017-3, 

the fans may also be used as standalone 

units (fitted on the wall or ceiling) or to extract 

air from other rooms (interior kitchen etc.). 
These fans are only intended for domestic 

use and similar purposes. 


4. Non-intended use 

These fans must not be used in the following 

situations 

under any circumstances

. Read 

all the safety instructions. 


DANGER 


Risk of combustion/fire from 

flammable materials, liquids or gases in 

the vicinity of the ventilation unit. 

 Do not place any flammable materials,  

liquids or gases near the fan, which may  

ignite in the event of heat or sparks and 

catch fire. 


Explosion hazard. 

Explosive gases 

and dusts may ignite and cause serious 

explosions or fire  

 Never use the fan in an explosive 

atmosphere. 


Explosion hazard. 

Explosive 

substances in lab extraction units may 

ignite and cause serious explosions or fire. 

Aggressive substances may damage the 

fan. 

 Never use fan in combination with a lab 

extraction unit. 


WARNING 

Risk to health from chemicals or 

aggressive gases/vapours. 

Chemicals  

or aggressive gases/vapours may harm 

health, especially if they are distributed 

throughout the rooms by the fan. 

 Never use fan to convey chemicals or 

aggressive gases/vapours. 


Summary of Contents for ER-UP/GH

Page 1: ...Mounting and operating instructions Recess mounted exhaust air system according to DIN 18017 3 ER UP GH ER 60 E ER 100 E www m aico ventilatoren c om DE...

Page 2: ...2 1...

Page 3: ...7 3 Possible combinations 10 8 Environmental conditions and operating limits 12 8 1 Regulations for operation with fireplaces 12 9 Technical data 12 10 Storage 12 11 Mounting preparations 13 11 1 Inst...

Page 4: ...embly Fan insert ER 60 E ER 100 E Article no internet or catalogue Fan inserts with different control circuit boards depending on application Can be used in all ER UP GH recessed mounted housings Inte...

Page 5: ...fans are used to extract air from interior bathrooms and toilet rooms storage rooms and kitchens with an outside window If operated other than stated in DIN 18017 3 the fans may also be used as standa...

Page 6: ...eople with reduced physical sen sory or mental capabilities or a lack of knowledge Fan may only be installed commissioned cleaned and maintained by people who can safely recognise and avoid the risks...

Page 7: ...which are added or modified at a later date Parts range hood air ventilated fireplace etc which are added or modified at a later date may result in health risks and operation which is not permitted Pa...

Page 8: ...installation is undertaken correctly and if the connecting cable is correctly guided through the cable grommet The grommet must completely enclose the cable sheathing The fan insert must also be engag...

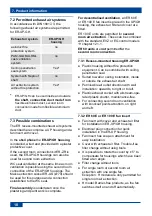
Page 9: ...down Cool down time can be up to 10 minutes The fan switches back on automatically after cooling down 7 Product information The ER UP GH recess mounted housings are specified for ER recess mounted ver...

Page 10: ...60 E or ER 100 E fan insert is placed in the UP GH housing the exhaust air filter and cover are fitted ER 100 E units are permitted for second room air extraction These can be combined with the stand...

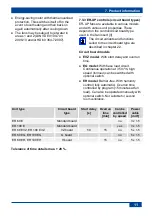
Page 11: ...described in chapter 22 Circuit board models EVZ model With start delay and overrun time EG model With base load circuit Continuous operation at 35 m h high speed full load can be switched with option...

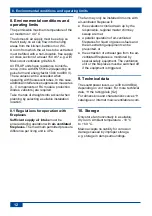
Page 12: ...s for operation with fireplaces Sufficient supply air intake must be ensured during operation with air ventilated fireplaces The maximum permitted pressure difference per living unit is 4 Pa The fan m...

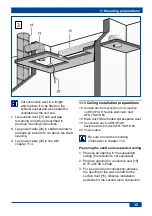
Page 13: ...ucts inside the shaft E g flexible aluminium duct AFR 80 between main duct in shaft and ER unit max 2 m long Connection ducts outside the shaft E g flexible aluminium duct AFR 80 between main duct in...

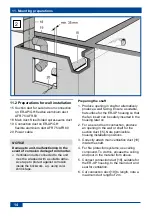
Page 14: ...old shrink tape Preparing the shaft 1 Produce opening in shaft or alternatively produce a wall facing Ensure a suitable flat surface for the ER UP housing so that the fan insert can be safely inserted...

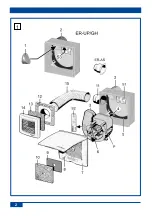
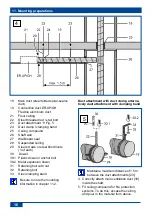
Page 15: ...reparations 15 Suction duct for second room connection on ER UP GH flexible aluminium duct AFR 75 AFR 80 18 Main duct Steel folded spiral seams duct 19 Connection duct on ER UP GH flexible aluminium d...

Page 16: ...3 of each 30 Dowel 30 1 Plastic dowel or anchor bolt 30 2 Metal expansion dowel 31 Retaining bolt with nut 32 Retaining bolt 33 Steel clamping band Be sure to note the mounting information in chapter...

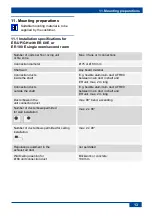
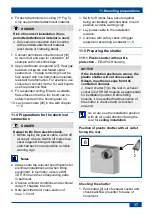
Page 17: ...ion a visible warning sign Notes Always note the relevant specifications for electrical installations and when fitting equipment In Germany observe DIN VDE 0100 and the corresponding parts in particul...

Page 18: ...e mounting material is to be supplied by the customer The plastic shutter should be prepared according to chapter 11 5 1 so that it closes fully sealed in the installation position The ER UP GH housin...

Page 19: ...100 2 Cut the mounting support 37 to the required length bend it into shape and fix it to the ER UP GH housing with the supplied fixing screws 3 Mark fixing holes for mounting support on rear shaft wa...

Page 20: ...the ER UP GH housing with the supplied fixing screws Fig 7 3 Mark fixing holes for mounting support and or ER UP GH housing on ceiling produce holes and insert dowels Suitable mounting material is to...

Page 21: ...guaranteed Lift up housing floor seal 5 near socket and insert installation socket 11 Re insert housing floor seal in the correct position 2 Place installation socket 11 in ER UP GH housing The edge...

Page 22: ...upport 40 Expanded rubber ER MO X4 Clamping band or steel threaded rod with pipe clamp chapter 11 3 12 1 7 Ceiling installation ER UP GH second room Observe mounting information in chapter 12 1 2 1 Mo...

Page 23: ...on terminals switch off all supply circuits Switch off mains fuse secure against being accidentally switched back on and position a visible warning sign DANGER Danger to life from electric shock The u...

Page 24: ...apter 8 and technical data chapter 9 Note permitted duct cross section of max 1 5 mm Only connect the unit to a permanent electrical installation The degree of protection is only guaranteed if install...

Page 25: ...d level 60 or 100 m h If there are no further increases the unit continues to run at nominal load level 1 until the humidity again falls below the saved reference value If the humidity falls below the...

Page 26: ...ly Ensure correct engagement in the 3 fixing points 43 and 44 As an option fix the fan insert 3 suitable fixing screws 42 Mounting information in unit 7 Slide fan insert exhaust air element evenly and...

Page 27: ...this with a two part wall frame ER MR can be adjusted between 50 100 mm This prevents air from being drawn in from the shaft Use the supplied screw to fix the cover 1 Fold up cover 7 at the recessed g...

Page 28: ...to clean the cover 7 of the fan 2 If the cover is very dirty remove it and clean with water 3 Fold up cover 7 4 Take out filter mat 10 and replace it 5 Place filter mat on intake grille cover 7 and l...

Page 29: ...bH Steinbeisstra e 20 78056 Villingen Schwenningen Germany Tel 49 7720 694 445 Fax 49 7720 694 175 Internet www ventilatorshop24 com E mail ersatzteilservice maico de 16 3 Removing fan insert 10 Fan i...

Page 30: ...t click into place on the wall of the housing CAUTION Damage to unit in the event of improper installation position of the housing floor seal Protection class is not guaranteed Lift up the housing flo...

Page 31: ...nect the fan as per the wiring diagram Fan doesn t start up Check whether the fan insert is correctly inserted Fault Cause measure Fan is too loud Dirty filter Replace filter Fan insert incorrectly in...

Page 32: ...20 Dismantling Dismantling may only be undertaken by a trained electrician chap 2 DANGER Danger to life from electric shock Prior to accessing the connection terminals switch off all supply circuits S...

Page 33: ...The fan also switches off after the room lighting has been turned off ER 60 EVZ ER 100 EVZ Standard switching The fan starts up approximately 50 seconds after the room lighting is switched on The fan...

Page 34: ...he relative humidity falls below the reference value Switching option 1 Permanent base load operation with pre defined overrun time The fan is running in base load operation Humidity control is active...

Page 35: ...active After switching off with S1 the fan continues in full load operation for an overrun time of 6 minutes If after this time the humidity as measured at the fan is higher than the switch off point...

Page 36: ...Maico Elektroapparate Fabrik GmbH Steinbeisstr 20 78056 Villingen Schwenningen Germany Service 49 7720 6940 technik maico de 06 18_Es D06 18_UK_DSW...

Reviews: