background image

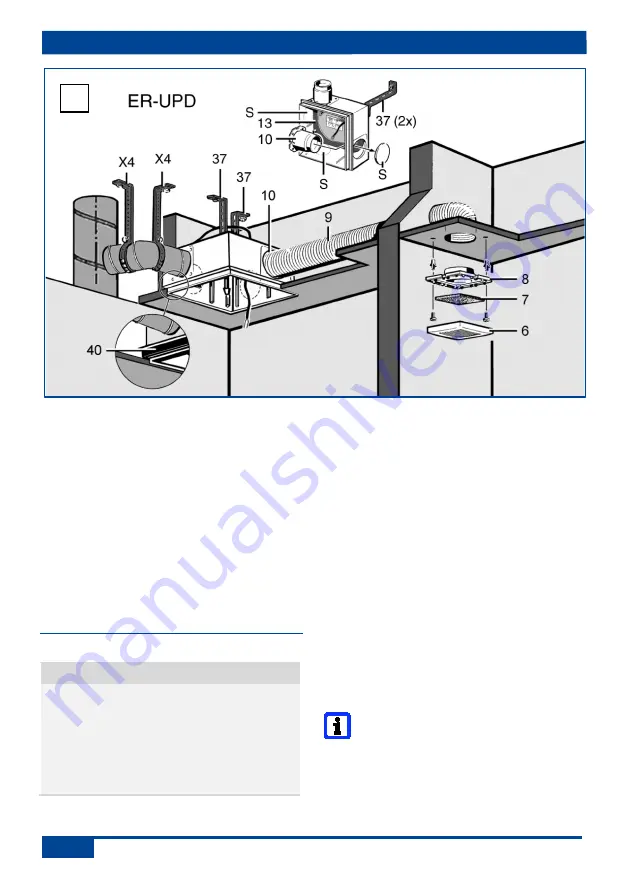
12. Installation ‒ ER-UPD - second room 


28 


6  Protective grille 

7  Filter mat, filter class G2 

8  Adapter 

9  Suction duct, second room connection:  


flexible aluminium duct AFR 75/AFR 80 

10  Plastic installation socket for second  


room extraction Ø 75/80 

13  Housing floor seal 

37  Mounting support UPM 60/100 (2 items) 

40  Expanded rubber ER-MO 

S  Housing segment 

X4  Clamping band or steel threaded rod 


with pipe clamp 

 chapter 11.3 


12.2.5 ER-UPD installation, second room 

NOTICE 

The unit will be damaged and function 

impaired by incorrect air if the plastic 

socket is inserted incorrectly. Protection 

class is no longer guaranteed. 

 Lift up housing floor seal [13] near 

socket and insert installation socket [10]. 

Reposition housing floor seal correctly. 


1.  Cut out the desired housing segment "S" 

(left, right or bottom) at the marking with  

a knife. 

2.  Place plastic installation socket [10] in  

ER-UP/G housing. The edge of the socket  

must click into place on the wall of the 

housing. 

3.  Install ER-UPD housing as described in 

chapter 12.2.4. 

4.  Connect suction duct [9] with plastic instal-

lation socket [10] sealed for ventilation. 

5.  Produce fixing holes for adapter [8] and 

insert dowels. 

6.  Connect adapter [8] to suction duct [9], 

e.g. with cold-shrink tape. 

7.  Secure adapter [8] to the wall/ceiling with 

screws. 

8.  Insert filter mat [7] and locate protective 

grille [6] in the correct position. 


With second room extraction, keep 

regulating plate [16] (

 Fig. 1) for 

final installation. This is needed to 

operate the ER 100 fan insert and  

is inserted in the cover [15] (

 Fig. 1). 

12 

Summary of Contents for ER-UP

Page 1: ...Maico ER 60 H ER UP G...

Page 2: ...Mounting and operating instructions Recess mounted exhaust air system according to DIN 18017 3 ER UP G ER UPD ER UPB ER 60 ER 100 Centro M Centro E www m aico ventilatoren c om UK...

Page 3: ...nt fire spreading K90 18017 Plaster protective cover Mounting and operating instructions Mounting support UPM 60 100 article no 0018 0010 For securing the recessed mounted housing Fan inserts final as...

Page 4: ...1...

Page 5: ...stallation conditions 7 7 3 Permitted exhaust air systems 8 7 4 Combination options 8 8 Environmental conditions operating limits 12 8 1 Regulations for operation with fireplaces 12 9 Technical data 1...

Page 6: ......

Page 7: ...g and experience 3 Intended use These fans are used to extract air from interior bathrooms and toilet rooms storage rooms and kitchens with an outside window If operated other than stated in DIN 18017...

Page 8: ...ldren with reduced physical sensory or mental capabilities or a lack of knowledge Fan may only be installed commissioned cleaned and maintained by people who can safely recognise and avoid the risks a...

Page 9: ...ied at a later date Parts range hood air ventilated fireplace etc which are added or modified at a later date may result in health risks and operation which is not permitted Parts may only be added or...

Page 10: ...d if installation is undertaken correctly and if the connection cable is correctly guided through the cable grommet The grommet must completely enclose the cable sheathing The fan insert must also be...

Page 11: ...he fan switches off Wait until the motor has cooled down Cool down time can be up to 10 minutes The fan switches back on automatically after cooling down 7 Product information 7 1 Certificates of appr...

Page 12: ......

Page 13: ...housing and a fan insert exhaust air element with cover In the shell phase the ER UP housing ER UP G ER UPD and ER UPB are installed wired and provided with a plaster protective cover ER UP G and ER U...

Page 14: ...cond room ventilation with knockout points at bottom on right and left 7 4 4 Recess mounted housing ER UPB Housing with maintenance free fire protection shut off device to prevent fire from spreading...

Page 15: ...ay timing Continuous operation at 35 m h high speed full load can be switched with optional switch The EC variant has a particularly economical EC motor I model with interval control For manual operat...

Page 16: ...0 F ER 100 F F board 50 6 No 3 x 1 5 ER 60 G ER 100 G G board No 5 x 1 5 ER 60 GVZ ER 100 GVZ G board VZ board No 5 x 1 5 ER 60 GVZC EC GVZC EC board 0 30 W 60 120 180 0 1 3 6 15 W No 5 x 1 5 ER 60 I...

Page 17: ...ed during operation with air ventilated fireplaces The maximum permitted pressure difference per living unit is 4 Pa The fan may only be installed in rooms with air ventilated fireplaces if the evalua...

Page 18: ......

Page 19: ...E g flexible aluminium duct AFR 80 between main duct in shaft and ER unit max 2 m long approval Steel folded spiral seams duct between main duct in shaft and ER unit max 2 m long approval Flexible alu...

Page 20: ...d room Number of duct elbows permitted for wall installation max 2 x 90 Number of duct elbows permitted for ceiling installation max 2 x 90 Regulating equipment in the exhaust air duct not permitted O...

Page 21: ...brickwork wall boards wall ceiling must be fully sealed with non flammable materials resistant to deformation e g concrete cement mortar fire protection filler NOTICE Damage to unit malfunctioning in...

Page 22: ...tes for the length of the shaft walls in the event of a fire 10 Lay power cable 20 in line with chapter 11 4 11 3 Ceiling installation preparations 9 Suction duct for second room connection on ER UP G...

Page 23: ...t 26 Ceiling compound 27 Shaft wall 28 Wall board seal 29 Suspended ceiling 30 Steel screws or steel blind rivets 3 of each 31 Steel dowel 31 1 Steel dowel or anchor bolt 31 2 Metal expansion dowel 32...

Page 24: ......

Page 25: ...wall boards use fire protection filler 9 Fit suspended ceiling With ER UPD housings ensure a suitable flat surface so that the fan insert can be safely inserted in the housing later on 10 Attach spigo...

Page 26: ...ter will not close sealed Odours may then escape from the ventilation channel Insert shutter 1 in exhaust socket 2 of ER UP G housing as appropriate for installation position i e upwards to right to l...

Page 27: ...the shut off shutter also opens in normal operation NOTICE Unpleasant odours from the main duct The fire protection shut off device does not close fully sealed if incorrectly installed Before install...

Page 28: ...epared according to chapter 11 5 1 so that it closes fully sealed in the installation position The ER UP G housing must be inserted without any distortion Failure to do so will mean that the fan inser...

Page 29: ...M 60 100 2 Cut the mounting support 37 to the required length bend it into shape and fix it to the ER UP G housing with the supplied fixing screws 3 Mark fixing holes for mounting support on rear shaf...

Page 30: ......

Page 31: ...t to the ER UP G housing with the supplied fixing screws Fig 8 3 Mark fixing holes for mounting support ER UP G housing on ceiling produce holes and insert dowels Suitable mounting material is to be s...

Page 32: ...longer guaranteed Lift up housing floor seal 13 near socket and insert installation socket 10 Reposition housing floor seal correctly 2 Place installation socket 10 in ER UP G housing The edge of the...

Page 33: ...port 40 Expanded rubber ER MO X4 Clamping band or steel threaded rod with pipe clamp chapter 11 3 12 1 7 Ceiling installation ER UP G second room Observe mounting instructions in chapter 12 1 2 1 Moun...

Page 34: ...epared according to chapter 11 5 2 The ER UPD housing must be inserted without any distortion Failure to do so will mean that the fan insert cannot engage correctly in the ER UPD housing and the degre...

Page 35: ...le sheathing all the way round circular no slots 4 Insert power cable 20 from rear of housing through cable grommet into ER UPD housing 5 Locate ER UPD housing in the desired position and fix it to th...

Page 36: ......

Page 37: ...d insert installation socket 10 Reposition housing floor seal correctly 1 Cut out the desired housing segment S left right or bottom at the marking with a knife 2 Place plastic installation socket 10...

Page 38: ...shut off device should be prepared according to chapter 11 5 2 A second room connection is only permitted with ER UPB R ER UPB L or ER UPB U 12 3 3 Important information about plastering DANGER Fire...

Page 39: ...hrough cable grommet into ER UPB housing 5 Insert ER UPB housing with two mounting supports into the shaft and fix to the rear wall of the shaft DANGER Fire may spread if connection duct 19 is incorre...

Page 40: ...housing as described in chapter 12 3 4 2 Secure suction duct 9 and steel socket 5 1 with 3 steel blind rivets 41 or steel screws and connect sealed for ventilation 3 Produce fixing holes for adapter...

Page 41: ...ion terminals switch off all supply circuits Switch off mains fuse secure against being accidentally switched back on and position a visible warning sign DANGER Danger to life from electric shock The...

Page 42: ......

Page 43: ...sing Observe ambient conditions chapter 8 and technical data chapter 9 Note permitted duct cross section of max 1 5 mm Only connect the unit to a permanent electrical installation The degree of protec...

Page 44: ...suppression measures L C components or RC module protection diodes varistors are required Setting 1 Place fan insert on front so that electronic circuit board 12 control is freely accessible 2 Set the...

Page 45: ...st air element is inserted in recess mounted housings ER UP G ER UPD or ER UPB as follows 1 Switch off mains fuse secure and fit warning sign 2 Remove plaster protective cover 41 and clean any dirt of...

Page 46: ...oints 44 and 45 As an option fix the fan insert 3 suitable fixing screws 43 8 Slide fan insert exhaust air element evenly and in parallel onto both studs 45 Ensure that both locking tabs of the studs...

Page 47: ...ompensate for this with a two part wall frame ER MR can be adjusted between 50 100 mm This prevents air from being drawn in from the shaft Use the supplied screw to fix the cover 1 Fold up cover 15 at...

Page 48: ......

Page 49: ...essive cleaning agents 1 Only use a dry cloth to clean the cover 15 of the fan 2 If the cover is very dirty remove it and clean with water 16 1 Filter change 15 Cover 17 Filter mat filter class G2 Fil...

Page 50: ...isstra e 20 78056 Villingen Schwenningen Germany Tel 49 7720 694 445 Fax 49 7720 694 175 E mail ersatzteilservice maico de 16 3 Removing fan insert 11 Fan insert 44 Locking lever 45 Studs 45 1 and 45...

Page 51: ...P housing The edge of the socket must click into place on the wall of the housing CAUTION Damage to unit in the event of improper installation position of the housing floor seal Protection class is no...

Page 52: ...ng diagram Fan doesn t start up Check whether the fan insert is correctly inserted Fault Cause measure Fan is too loud Dirty filter Replace filter Fan insert incorrectly inserted Insert fan insert cor...

Page 53: ...beisstra e 20 78056 Villingen Schwenningen Germany Tel 49 7720 694 445 Fax 49 7720 694 175 E mail ersatzteilservice maico de 20 Dismantling Dismantling may only be undertaken by a trained electrician...

Page 54: ......

Page 55: ...switching off With VZ 15 units the overrun time is approximately 15 minutes Switching option The fan starts up approx 50 seconds after switching on the room lighting with switch S1 and S2 The fan has...

Page 56: ...s approximately 10 under the correspondingly set switch on point The humidity variant must not be deactivated using a switch on terminal 1 and or terminal N Standard switching Permanent base load oper...

Page 57: ...tive After switching off with S1 the fan continues in full load operation for an overrun time of 6 minutes If after this time the humidity as measured at the fan is higher than the switch off point th...

Page 58: ...switch S2 ER 60 GVZC EC Standard switching The unit permanently runs at least at base load The base load level cannot be switched off manually If the room lighting is switched on S1 On the fan switch...

Page 59: ...hed off the fan continues running for an overrun time of up to 15 minutes The overrun time can be set to between 0 and 15 minutes using a jumper Then the fan switches back to the base load level For s...

Page 60: ......

Page 61: ...utes The interval function can be switched off chapter 14 1 Standard switching The fan starts up approximately 50 seconds after the room lighting is switched on The fan has an overrun time of approxim...

Page 62: ......

Reviews: