background image

4

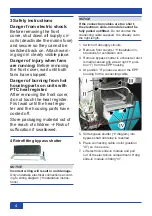
3 Safety instructions

Danger from electric shock: 

Before removing the front 

cover, shut down all supply cir-

cuits (deactivate the mains fuse) 

and secure so they cannot be 

switched back on. Attach warn-

ing sign in clearly visible place. 

Danger of injury when fans 

are running:

 Before removing 

the front cover, wait until both 

fans have stopped.

Danger of burning from hot 

housing parts on units with 

PTC heat register:


After removing the front cover, 

do not touch the heat register. 

First wait until the heat regis-

ter and the housing parts have 

cooled off.

Store packaging material out of 

the reach of children


 Risk of 

suffocation if swallowed.

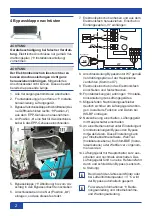
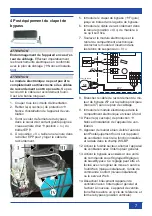
Retrofitting bypass shutter

NOTICE 

Incorrect wiring will result in unit damage.  

Only undertake electrical connections accord-

ing to wiring diagram (

 installation instruc-

tions).

NOTICE 

If the connection cables are too short, 

the electronic slide-in module cannot be 

fully pulled out/fitted. 

Do not shorten the 

connecting cable supplied. It is already cut to 

the right length.

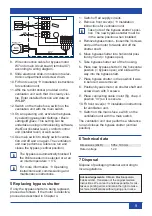
1.  Switch off all supply circuits.
2.  Remove front cover(s) 

 Installation in- 

structions for ventilation unit.

3.  Remove bypass shutter in exhaust air duct  

(small recessed grip at rear right 

 posi- 

tion “I”) from the EPP housing.

4.  At position “II” produce a slot in the EPP 

housing for the connecting cable.

5.  Slide bypass shutter (

 diagram) into 

bypass shaft until stop is reached.

6.  Place connecting cable in slot (position 

“III”) so it is secure.

7.  Lift electronic slide-in module and pull 

out of the electronics compartment. Hang 

slide-in module in fitting “IV”.

Summary of Contents for WS-BP 320/470

Page 1: ...stungsaufkleber und diese Installations anleitung 2 Bestimmungsgem e Verwendung Bypassklappe mit Stellungsr ckmeldung zum ffnen oder Verschlie en des Sommerbypasses der zentralen L ftungsger te WR 310...

Page 2: ...s T1 T2 T3 T X8 F hler E N L Option X3 1 2 X4 PE N L PE N L Zuluft Abluft X5 PE N L Heizregister X6 1 2 Kontakt 2 1 X2 W3 BK WHBN GN YE GR XO1 WH BN GN YE GR W5 8 Anschlussleitung Bypassmotor W7 gem V...

Page 3: ...spannung 12 V 7 Entsorgung Verpackungsmaterial gem den rtlichen Bestimmungen entsorgen Dear installer only a trained electrician is permitted to work on the electrics You are considered a trained elec...

Page 4: ...Incorrect wiring will result in unit damage Only undertake electrical connections accord ing to wiring diagram installation instruc tions NOTICE If the connection cables are too short the electronic...

Page 5: ...mation Operating instructions and commissioning and maintenance instructions 5 Replacing bypass shutter If only the bypass shutter is being replaced proceed as follows If the motor is defective procee...

Page 6: ...ur de chaleur fonction nement sans r cup ration de chaleur Veuillez lire en premier lieu les consignes de s curit de la notice d installation de l appareil de ventilation avant d installer le clapet d...

Page 7: ...register Bypassmotor BN BU GNYE S1 GNYE BU BN GNYE BU BN M3 1 2 3 4 5 6 W4 W6 W7 A1 MAICO Steuerung KWL 1 2 3 4 5 X7 Bypass T1 T2 T3 T X8 F hler X1 PE N L Netz PE N L Option X3 1 2 X4 PE N L PE N L Zu...

Page 8: ...le clapet de bypass l horizontale bypass ouvert 5 Retirer le clapet de bypass du bo tier 6 Placer le nouveau clapet de bypass l ho rizontale bypass ouvert et l enfoncer compl tement dans la gaine de...

Reviews: