background image

Pg 36 of 38

1-800-892-3986

IS9052

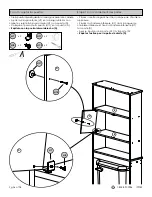
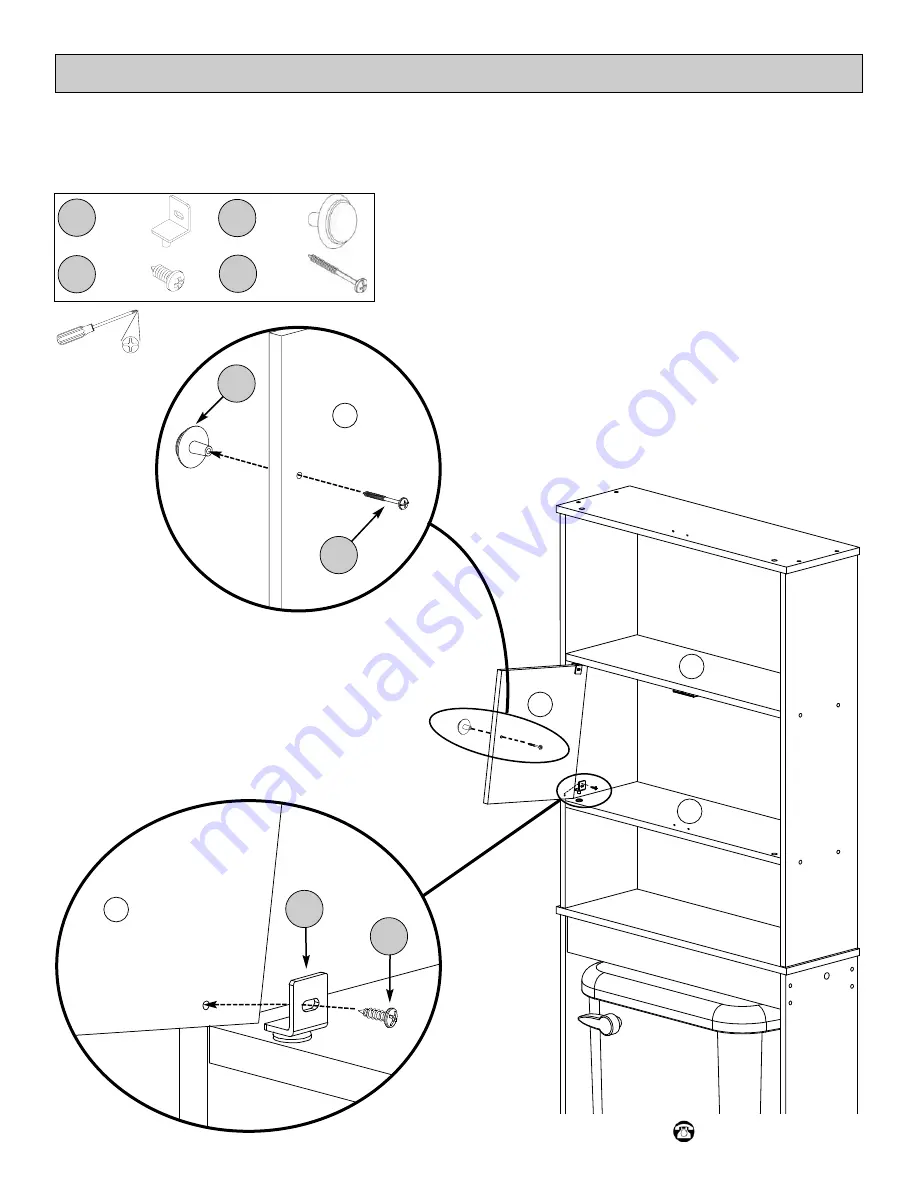
Paso 10: sujetar las puertas.

Étape 10 - raccordement des portes.

D

B

B

D

D

H 7

H 8

x 2

x 2

H 11

H 12

x 2

x 2

• Fije la puerta lateral izquierda a la bisagra superior con cojinete. 
• Ajuste la bisagra inferior (H7) en la bisagra inferior con
cojinete y sujete la bisagra inferior (H7) a la puerta (D). 
• Coloque el pomo de la puerta (H11) en la puerta (D). 
• 

Repítalo con la puerta lateral derecha (D).

• Placez la porte de gauche dans la bague de charnière
supérieure. 
• Placez la charnière inférieure (H7) dans la bague de
charnière inférieure et fixez la charnière inférieure (H7) 
à la porte (D).
• Fixez le bouton de la porte (H11) à la porte (D). 
• 

Répétez l’action pour la porte de droite (D).

H 12

H 11

H 8

H 7

Summary of Contents for 9509CHWM

Page 1: ...ts and hardware pieces before you begin When laying out parts place them on a soft surface to prevent scratching If any pieces are missing call our Toll Free Number 1 800 892 3986 between 8 00AM 5 00P...

Page 2: ...ation Options on page 6 Standard Installation 29 7 in inside height Included Leg Extensions OPTION A adds 3 in 32 7 in inside height Optional not included Leg Extensions OPTION B adds 4 5 in 34 2 in i...

Page 3: ...2 B Fixed Shelf 2 C Top Side Panel C R right and C L left 2 D Door 2 List of Parts E Back Panel 1 F Support Rail Trim 2 G Bottom Side Panel 2 H Optional Leg Extension 2 A A B B C R E F F G C L D D G...

Page 4: ...arge Screw Hinge Screw Cambolt Magnet Hinge Bushing Magnet Screw Hinge Allen Wrench for use with Large Screws H2 x 1 x 24 x 2 x 4 x 4 x 4 x 1 x 2 Nail x 40 Plastic Snap Cam x 2 H 10 H 1 H 2 H 3 H 4 H...

Page 5: ...9052 Pg 5 of 38 Sheet of 6 stickers Knob Screw Knob x 2 x 2 x 3 H 11 H 12 Screw Cap x 16 H 13 H 14 List of Hardware continued Mounting Bracket x 1 Wood Screw x 1 Wall Mounting Screw x 1 Wall Anchor x...

Page 6: ...making sure the bottom side panels are completely aligned with the leg extensions Fig 2 NOTE If needed lightly tap the leg extension with a rubber mallet to install Leg Extensions Option A adds 3 in...

Page 7: ...dge facing up G F H 2 H 1 H 2 x 4 Fasten ONE support rail F to bottom side panels G This is the bottom assembly unfinished edge facing up NOTE Support rail F can be fastened in the back location accor...

Page 8: ...e the bottom assembly in the desired location NOTE If the unit does not fit around your toilet to your satisfaction you can add the leg extensions H Install the other support rail F with the unfinishe...

Page 9: ...NOTE FOR STEP 3 1 page 10 or page 11 Prior to attaching fixed shelves B to side panels C L and C R please ensure BOTH top side panels C L and C R are oriented with the long unfinished edge facing bac...

Page 10: ...B B B C L C R Magnet holes facing UP on the fixed shelf B finished edge Magnet holes facing UP on the top shelf A A C L C R Step 3 2 MIDDLE Cabinet Assembly for MIDDLE DOOR installation option H 1 H 2...

Page 11: ...t holes facing DOWN on the top shelf A A C L C R Step 3 2 Cabinet Assembly for TOP DOOR installation option H 1 H 2 x 4 H 2 H 2 H 2 H 2 NOTE Do NOT fully tighten side panels C L and C R to the fixed s...

Page 12: ...800 892 3986 IS9052 Step 4 Attaching the Bottom Panel H 1 H 2 x 4 Magnet holes facing DOWN on the bottom shelf A A C L C R Step 5 Installing the Cambolts x 2 H 4 H 2 H 2 H 4 H 4 NOTE DO NOT OVERTIGHTE...

Page 13: ...the unit face down on floor with the unfinished edges facing up Fasten back panel E to back of unit Helpful Hint With the seam side of back panel facing up align the back panel properly fasten a nail...

Page 14: ...x 2 H 5 Carefully place the top assembly onto the bottom assembly NOTE Be sure to align the cambolts H4 with the holes in bottom side panels G Insert snap cams H5 into the holes in the bottom side pa...

Page 15: ...Pg 15 of 38 1 800 892 3986 IS9052 Step 8 Installing the TOP Hinges H 7 H 8 x 2 x 2 pre attached magnet strikes Incorrect Correct D D D H 8 H 7 H 8 H 7 D H 8 H 7...

Page 16: ...Pg 16 of 38 1 800 892 3986 IS9052 Step 9 Installing the Magnet B B B x 4 x 1 x 2 H 10 H 6 H 9 H 9 Assembly for TOP DOOR installation option H 6 H 10 H 9 H 6 A B RECOMMEND...

Page 17: ...D D H 7 H 8 x 2 x 2 H 11 H 12 x 2 x 2 Set the left side door into the top hinge bushing Fit bottom hinge H7 into the bottom hinge bushing and fasten the bottom hinge H7 to the door D Attach door knob...

Page 18: ...stickers H14 to unused holes Step 11 Attaching Screw Caps x 3 x 16 H 13 H 14 H 13 NOTE Make sure to FULLY TIGHTEN the large screws H 2 that connect the side panels C L and C R to the fixed shelves B F...

Page 19: ...N OF ELECTRICAL PLUMBING AND GAS LINES CUTTING ANY OF THESE MAY CAUSE SERIOUS INJURY It is imperative that the unit be fastened to the wall for safety and stability For safety reasons it is imperative...

Page 20: ...ribuir las piezas col quelas sobre una superficie suave para evitar que se rayen Si faltaran piezas llame a nuestro n mero gratuito 1 800 892 3986 entre las 8 00 a m 5 00 p m hora del este de lunes a...

Page 21: ...ent au bas des panneaux lat raux G AVANT l tape n 1 Voir la page 25 pour l in stallation des extensions de pieds Si vous s lectionnez l OPTION B vous pouvez commander des extensions de pieds n oubliez...

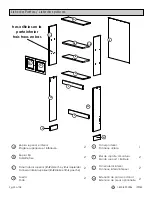
Page 22: ...lat ral sup rieur C R droite et C L gauche 2 D Puerta Porte 2 Lista de Partes Liste des pi ces E Panel posterior Panneau arri re 1 F Riel de soporte Moldura Rail de support Bordure 2 G Panel lateral i...

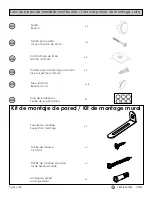
Page 23: ...x 24 Clavo Clou x 40 H 1 H 2 H 3 Perno para leva Boulon came x 2 C mara de pl stico Came snap en plastique x 2 H 4 H 5 Tornillo para bisagras Vis pour charni re Cojinete para bisagras Douille pour cha...

Page 24: ...pour g che d aimant Perilla Bouton x 2 x 2 x 2 x 2 x 3 H 11 H 12 H 13 H 14 Tapa roscada Bouchon vis x 16 H 15 H 16 Lista de piezas de torniller a continuada Liste des pi ces de montage suite Kit de mo...

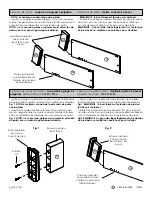
Page 25: ...ous assurant que les panneaux lat raux inf rieurs sont compl tement align s avec les extensions de pieds Fig 2 REMARQUE Si n cessaire tapez l g rement sur l extension du pied avec un maillet en caoutc...

Page 26: ...s el conjunto inferior Fixez UN rail de support F aux panneaux lat raux inf rieurs G Ceci est l assemblage du bas borde inconcluso hacia arriba bord inachev vers le haut NOTA el riel de soporte F se p...

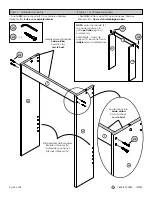
Page 27: ...extensi n de patas H Instale el otro riel de soporte F con el extremo no terminado hacia abajo Placez l ensemble inf rieur l emplacement souhait REMARQUE Si l appareil ne vous convient pas votre toile...

Page 28: ...UPERIOR p gina 30 Pour les portes situ es en HAUTEUR passez l tape 3 1 HAUTEUR la page 30 D D C L C R Ants de ajustar los estantes fijos B a los paneles laterales C L y C R aseg rese de que AMBOS pane...

Page 29: ...os terminados bord fini Los orificios para el im n hacia ARRIBA en la repisa superior A Trous d aimants orient s vers le HAUT sur l tag re fixe A A C L C R Paso 3 2 MEDIO El conjunto del gabinete para...

Page 30: ...l tag re fixe B B B C L C R Los orificios para el im n hacia ABAJO en la repisa superior A Trous d aimants orient s vers le BAS sur l tag re sup rieure A A C L C R Paso 3 2 El conjunto del gabinete p...

Page 31: ...cios para el im n hacia ABAJO en la repisa inferior A Trous d aimants orient s vers le BAS sur l tag re inf rieure A A C L C R Paso 5 Instale las levas de fijaci n tape 5 Installation des boulons came...

Page 32: ...eral del panel posterior hacia arriba alinee el panel posterior adecuadamente y coloque un clavo en cada una de sus esquinas Posez l appareil face vers le bas sur le sol avec les bords non finis vers...

Page 33: ...c maras H5 en los orificios de los paneles laterales inferiores G NOTA si es necesario golpee levemente las c maras con un martillo Placez d licatement l ensemble sup rieur sur l ensemble inf rieur R...

Page 34: ...aso 8 Instalar las bisagras superiores tape 8 Installation des charni res sup rieures H 7 H 8 x 2 x 2 Incorrecto Incorrect Correcto Correct contrachapas para magneto prefijadas g ches aimant pr attach...

Page 35: ...aso 9 Instalar el im n tape 9 Installation de l aimant B B B x 4 x 1 x 2 H 10 H 6 H 9 H 9 Conjunto para opci n de instalaci n de la PUERTA SUPERIOR Montage d installation de la PORTE SUP RIEURE H 6 H...

Page 36: ...ra inferior con cojinete y sujete la bisagra inferior H7 a la puerta D Coloque el pomo de la puerta H11 en la puerta D Rep talo con la puerta lateral derecha D Placez la porte de gauche dans la bague...

Page 37: ...Fixation des bouchons vis x 3 x 16 H 13 H 14 H 13 NOTA aseg rese de APRETAR COMPLETAMENTE los tornillos largos H 2 que conectan los paneles laterales C L y C R a las repisas fijas B REMARQUE Veillez...

Page 38: ...o de madera Marquez le point de montage sur le mur travers le trou du support de montage Percez un trou l endroit marqu sur le mur et ins rez l ancrage mural REMARQUE L ancrage mural n est pas n cessa...

Reviews: