background image

 8

65 lbs

. / 29.5 kg

.

65 lbs

. / 29.5 kg

.

ADVERTENCIA

: No exceda la capacidad de carga máxima. Superior a la capacidad máxima de carga puede  


               resultar en fracaso y la posibilidad de lesiones.

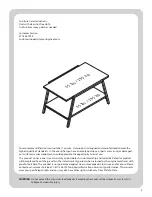
Instrucciones de cuidado:  

Desempolve con un paño limpio y libre de pelusa.  

Utilice un pulidor en spray para muebles según se 

necesite. 

Servicio al Cliente:

877.436.7290

customersupport@tenspringstreet.com

Su completa satisfacción es nuestra prioridad número 1. Nuestro producto está diseñado y fabricado para cum-

plir con la más alta calidad de las normas. En el caso de que tenga preguntas sobre el ensamblaje, o partes falta 

o está dañado, nuestro departamento de servicio al cliente apreciaría la oportunidad de ayudarle. 

Este producto cuenta con un (1) año de garantía contra defectos de fabricación y de materiales. El producto de-

fectuoso será reemplazado de forma gratuita dentro del periodo de garantía establecido, cuando sea devuelto 

por el comprador original con prueba de compra. Este producto no está garantizado contra el desgaste o ro-

tura debido al mal uso y/o abuso. Por favor, póngase en contacto con nuestro Servicio al Cliente al 1-877-436-

7290 para obtener información sobre la garantía. Esta garantía le otorga derechos legales específicos y usted 

también puede tener otros derechos que varían de estado a estado.

Summary of Contents for CONRAD Series

Page 1: ...stomer Service 1 877 436 7290 customersupport tenspringstreet com THIS INSTRUCTION BOOKLET CONTAINS IMPORTANT SAFETY INFORMATION PLEASE READ AND KEEP FOR FUTURE REFERENCE black white dark brown black...

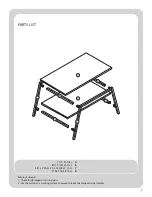
Page 2: ...LIST TOP PANEL BOT TOM PANEL SIDE FR AME ASSEMBLY X2 STRE TCHER X4 A B C D Before you begin 1 Check for damaged or missing parts 2 Use the carton as a working surface to prevent product damage during...

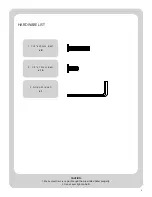
Page 3: ...3 HARDWARE LIST CAUTION 1 Make sure the screws go through the pre drilled holes properly 2 Do not over tighten bolts 3 Allen Wrench x1 1 1 4 x30mm B olt x8 2 1 4 x13mm B olt x16...

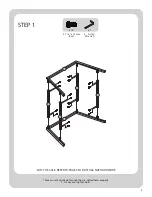
Page 4: ...4 x16 x1 STEP 1 1 Make sure the bolts go through the pre drilled holes properly 2 Do not over tighten bolts 2 1 4 x13mm B olt 3 Allen Wrench NOT TO SCALE REFER TO PAGE 3 FOR ACTUAL SIZE HARDWARE...

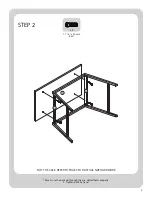
Page 5: ...5 x4 STEP 2 1 Make sure the bolts go through the pre drilled holes properly 2 Tighten bolts by hand 1 1 4 x30mm B olt NOT TO SCALE REFER TO PAGE 3 FOR ACTUAL SIZE HARDWARE...

Page 6: ...6 x4 STEP 3 1 Make sure the bolts go through the pre drilled holes properly 2 Tighten bolts by hand 1 1 4 x30mm B olt NOT TO SCALE REFER TO PAGE 3 FOR ACTUAL SIZE HARDWARE...

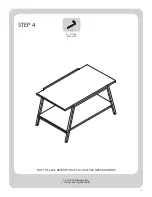
Page 7: ...7 x1 STEP 4 1 Finish tightening bolts 2 Do not over tighten bolts 3 Allen Wrench NOT TO SCALE REFER TO PAGE 3 FOR ACTUAL SIZE HARDWARE...

Page 8: ...nt that you have assembly questions or parts are missing or damaged our customer service department would appreciate the opportunity to assist you This product carries a one 1 year warranty against de...

Page 9: ...ente 1 877 436 7290 customersupport tenspringstreet com ESTE MANUAL DE INSTRUCCIONES CONTIENE INFORMACI N IMPORTANTE DE SEGURIDAD POR FAVOR LEA Y GUARDE PARA REFERENCIA FUTURA negro blanco marr n oscu...

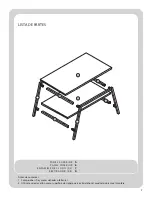
Page 10: ...enzar 1 Compruebe si hay piezas da adas o faltantes 2 Utilice la caja de cart n como superficie de trabajo para evitar da os al producto durante el montaje PANEL SUPERIOR PANEL INFERIOR ENSAMBLE DEL L...

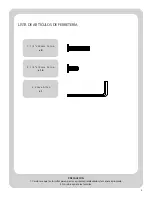
Page 11: ...CULOS DE FERRETER A PRECAUCI N 1 Cerci rese que los tornillos pasen por los agujeros pretaladrados de manera apropiada 2 No sobreapriete los tornillos 3 Llave Allen x1 2 1 4 x13mm Per no x16 1 1 4 x3...

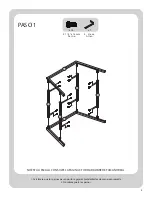
Page 12: ...1 2 1 4 x13mm Per no 3 Llave Allen 1 Cerci rese que los pernos pasen por los agujeros pretaladrados de manera apropiada 2 No sobreapriete los pernos NO EST A ESCALA CONSULTE LA P GINA 3 FOR HARDWARE D...

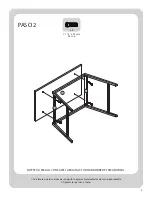
Page 13: ...PASO 2 1 1 4 x30mm Per no 1 Cerci rese que los pernos pasen por los agujeros pretaladrados de manera apropiada 2 Apretar los pernos a mano NO EST A ESCALA CONSULTE LA P GINA 3 FOR HARDWARE DE TAMA O...

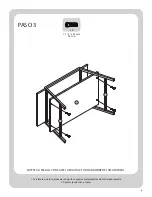
Page 14: ...PASO 3 1 1 4 x30mm Per no 1 Cerci rese que los pernos pasen por los agujeros pretaladrados de manera apropiada 2 Apretar los pernos a mano NO EST A ESCALA CONSULTE LA P GINA 3 FOR HARDWARE DE TAMA O...

Page 15: ...7 x1 PASO 4 3 Llave Allen 1 Terminar los pernos de apriete 2 No sobreapriete los pernos NO EST A ESCALA CONSULTE LA P GINA 3 FOR HARDWARE DE TAMA O REAL...

Page 16: ...que tenga preguntas sobre el ensamblaje o partes falta o est da ado nuestro departamento de servicio al cliente apreciar a la oportunidad de ayudarle Este producto cuenta con un 1 a o de garant a con...

Reviews: