background image

10 

Care and Maintenance 


Use a soft, clean cloth that will not scratch the surface when dusting. 


Use of furniture polishes is not necessary. Should you choose to use polishes, test first in an inconspicuous 

area. 


Using solvents of any kind on your furniture may damage your furniture’s finish. 


Never use water to clean your furniture as it may cause damage to the finish. 


Always use coasters under beverage glasses and flowerpots. 


Liquid spills should be removed immediately. Using a soft, clean cloth, blot the spill gently. Avoid rubbing. 


Always use protective pads under hot dishes and plates. Heat can cause chemical changes that may create 

spotting within the furniture finish. 


In the event that your furniture is stained or otherwise damaged during use, we recommend that you call a 

professional to repair your furniture. 


Check bolts/screws periodically and tighten them if necessary. 


Further Advice about Wood Furniture Care 


It  is  best  to  keep  your  furniture  in  a  climate-controlled  environment.  Extreme  temperature  and  humidity 

changes can cause fading, warping, shrinking and splitting of wood. It is advised to keep furniture away from 

direct sunlight as sun may damage the finish. 


Proper care and cleaning at home will extend the life of your purchase. Following these important and helpful 

tips will enhance your furniture as it ages. 


We hope you enjoy your purchase for many years. 

Thank you for your purchase! 


QUALITY GUARANTEE 


We are confident that you will be delighted with your Whalen Furniture purchase. 


Should this product be defective in workmanship or materials or fail under normal use, we will repair or replace 

it  for  up  to  one  (1)  year  from  date  of  purchase.  Every  Whalen  Furniture  product  is  designed  to  meet  your 

highest expectations. We guarantee that you will immediately see the value of our fine furniture. 


This warranty gives you specific legal rights and you may also have other rights which vary from state to state. 


Customer Service: 866-942-5362 

8:30 a.m. - 4:30 p.m., PST, Monday to Friday 

www.whalenstyle.com 


Summary of Contents for MSW-10003

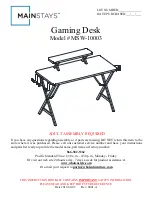
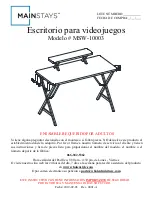
Page 1: ...sing DO NOT return this item to the store where it was purchased Please call our customer service number and have your instructions and parts list ready to provide the model name part name or factory...

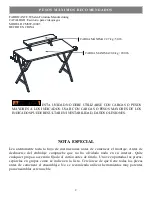
Page 2: ...re discarding Remove all parts from carton and separate into groups as indicated on part list Please ensure all parts are included prior to assembly Use of power tools to complete assembly is not reco...

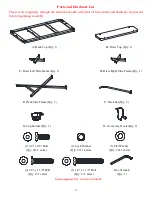
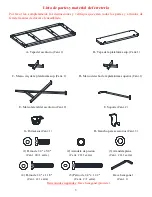
Page 3: ...1 B Riser Top Qty 1 C Riser Left Side Frame Qty 1 D Riser Right Side Frame Qty 1 E Desk Side Frame Qty 2 F Stretcher Qty 2 G Cup Holder Qty 1 H Accessory Hook Qty 3 1 1 4 x 5 8 Bolt 2 Lock Washer 3 Fl...

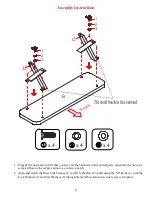
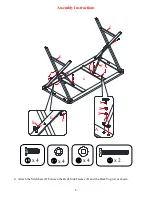
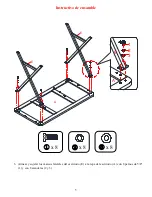
Page 4: ...ts Assemble the unit on a carpeted floor or the empty carton to avoid any scratch 2 Align and attach the Riser Side Frames C and D to the Riser Top B using the 5 8 Bolts 1 with the Lock Washers 2 and...

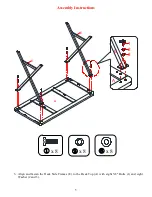
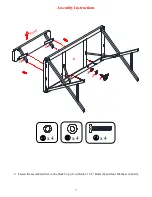
Page 5: ...5 Assembly Instructions 3 Align and fasten the Desk Side Frames E to the Desk Top A with eight 5 8 Bolts 1 and eight Washer 2 and 3 x 8 x 8 x 8 2 3 A E E E A 1...

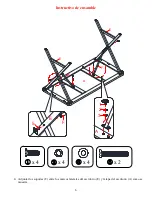
Page 6: ...6 Assembly Instructions 4 Attach the Stretchers F between the Desk Side Frames E and the Desk Top A as shown x 4 x 4 x 4 x 2 1 2 3 5 A E F A E E F F...

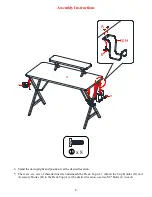
Page 7: ...7 Assembly Instructions 5 Fasten the assembled riser to the Desk Top A with four 1 1 8 Bolts 4 and four Washers 2 and 3 x 4 x 4 x 4 A D C 4 2 3...

Page 8: ...ght and position it at the desired location 7 There are six sets of threaded inserts underneath the Desk Top A Attach the Cup Holder G and Accessory Hooks H to the Desk Top A at the desired location u...

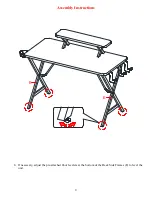
Page 9: ...9 Assembly Instructions 8 If necessary adjust the pre attached floor levelers at the bottom of the Desk Side Frames E to level the unit E E...

Page 10: ...iture Care It is best to keep your furniture in a climate controlled environment Extreme temperature and humidity changes can cause fading warping shrinking and splitting of wood It is advised to keep...

Page 11: ...lecimiento donde lo adquiri Por favor llame a nuestro n mero de servicio al cliente y tienen sus instrucciones y lista de piezas listo para proporcionar el nombre del modelo el nombre o el n mero de p...

Page 12: ...ijado al cart n antes de tirarlo Una vez apartadas las piezas sep relas en grupos como se indica en la lista Cerci rese de que tiene todas las piezas antes de comenzar el ensamblaje No se recomienda u...

Page 13: ...Marco izq de la plataforma sup Cant 1 D Marco derecho de la plataforma superior Cant 1 E Marco lateral del escritorio Cant 2 F Soporte Cant 2 G Portavasos Cant 1 H Gancho para accesorios Cant 3 1 Per...

Page 14: ...n un piso alfombrado o en el cart n vac o para evitar rasgu os 2 Alinear y adjuntar los marcos laterales de la plataforma superior C y D a la tapa de la plataforma superior B usando los pernos de 5 8...

Page 15: ...5 Instructivo de ensamble 3 Alinear y sujetar los marcos laterales del escritorio E a la tapa del escritorio A con 8 pernos de 5 8 1 y con 8 arandelas 2 y 3 2 3 A E E E A 1 x 8 x 8 x 8...

Page 16: ...6 Instructivo de ensamble 4 Adjuntar los soportes F entre los marcos laterales del escritorio E y la tapa del escritorio A como se muestra 1 2 3 5 A E F A E E F F x 4 x 4 x 4 x 2...

Page 17: ...7 Instructivo de ensamble 5 Sujetar la tapa de la plataforma superior ensamblada a la tapa del escritorio A con 4 pernos de 1 1 8 4 y 4 arandelas 2 y 3 x 4 x 4 x 4 A D C 4 2 3...

Page 18: ...y poner en el lugar deseado 7 Existen 6 juegos de espacios roscados abajo de la tapa del escritorio A Adjuntar el portavasos G y los ganchos para accesorios H a la tapa del escritorio A en los lugare...

Page 19: ...9 Instructivo de ensamble 8 Si fuera necesario ajustar los niveladores de piso pre adjuntados en la parte inferior de los marcos laterales del escritorio E para nivelar la unidad E E...

Page 20: ...e humedad pueden causar cambios como partes pandas molduras que se contraigan o que la madera se raje Es recomendable mantener la unidad lejos del sol directo ya que puede da ar el acabado Cuidados ad...

Reviews: