PART LIST
DESCRIPTION QTY
A
Table leg
4
2
e
c
a
r
b
e
l
b
a
T
B
1
g
n
ir
g
n
it
c
e
n
n
o
C
C
1
m
ir
e
l
b
a
T
D
1
s
s
a
l
G
E
4
2
r
e
h
s
a
W
6
M
A
A
BB
M6x25 Bolt
24
1
h
c
n
e
r
w
n
e
ll
A
C
C
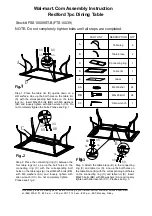
Step 3: Attach the table brace (B) to the connecting
ring (C) and table rim (D). Line up the bolt holes on
the table brace (B) with the corresponding bolt holes
on the connecting ring (C) and table rim (D). Insert
M6x25 bolts (BB) with M6 washers (AA) and loosely
tighten with allen wrench (CC). Please see Fig. 3.
Step 2: Place the connecting ring (C) between the
four table legs (A). Line up the bolt holes on the
connecting ring (C) with the corresponding bolt
holes on the table legs (A). Insert M6x25 bolts (BB)
with M6 washers (AA) and loosely tighten with
allen wrench (CC). Do not completely tighten.
Please see Fig. 2.
Step 1: Place the table rim (D) upside down on a
soft surface. Line up the bolt holes on the table rim
(D) with the corresponding bolt holes on the table
legs (A). Insert M6x25 bolts (BB) with M6 washers
(AA) and loosely tighten with allen wrench (CC). Do
not completely tighten the bolts. Please see Fig. 1.
Questions, problems, missing parts? Before returning to your retailer, call our customer service department
at (866) 905-4107, 8:30 a.m. – 5:00 p.m. PST /11:30 a.m.- 8:00 p.m., EST, Monday- Friday.
Fig.11
..
AA
BB
AA
BB
A
D
Fig.2
..
AA
BB
AA
BB
C
Fig.3
ig..
AA
BB
AA
BB
AA
BB
AA
BB
B
NOTE: Do not completely tighten bolts until all steps are completed.
Redford 7pc Dining Table
Stock# FSS10009ST-B(FTS10039)
Wal-mart.Com Assembly Instruction


