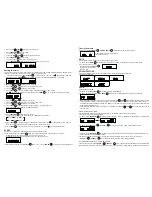


1. Premere e tenere premuto il tasto
PROGRAM
/
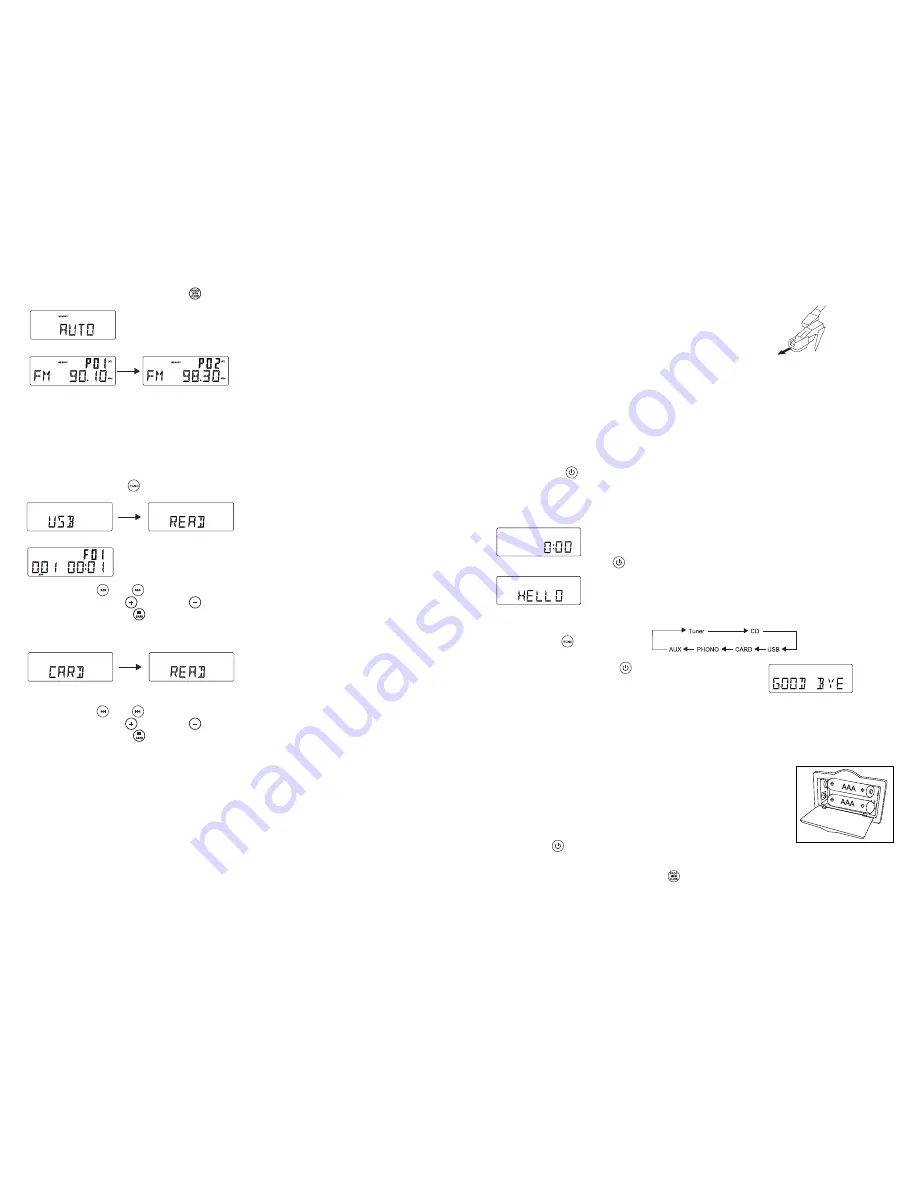
fino a quando appare Auto
- Il simbolo memory inizierà a lampeggiare
- Le stazioni radio disponibili sono memorizzate
- Terminata la memorizzazione automatica, lunità si sintonizzerà sullultima stazione radio memorizzata
ANTENNA
Antenna: per la ricezione della banda FM lunità è dotata di unantenna FM a filo. Muovere lantenna fino a quando la ricezione
è buona e senza interferenze. Per la ricezione della banda AM, lunità è dotata di unantenna direzionale in ferrite. Ruotarla
fino ad ottenere la migliore ricezione. Non collegare lantenna esterna FM ad unaltra antenna esterna.
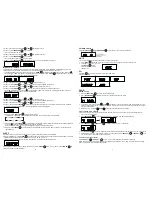
UTILIZZARE USB & SCHEDA SD
Utilizzare un dispositivo USB:
1. Premere il tasto
FUNCTION
/
per impostare lunità in modalità USB.
2. Il dispositivo USB viene caricato. Viene visualizzato READ mentre il sistema legge il contenuto del dispositivo USB.
3. Il brano nr. 1 o la cartella nr. 1 saranno riprodotti automaticamente una volta letto tutto il contenuto del dispositivo USB.
4. Premere il tasto
FF
/
o
FB
/
una o più volte fino a visualizzare il brano desiderato.
5. Premere il tasto
PRESET
+
/
o
PRESET
/
per selezionare lalbum desiderato.
6. Premere il tasto
STOP/BAND
/
per interrompere la riproduzione.
Utilizzare una SCHEDA SD:
1. Premere il tasto
FUNCTION
per impostare lunità in modalità CARD.
2. Inserire la Scheda-SD nellalloggio. Viene visualizzato READ mentre il sistema legge il contenuto della Scheda-SD.
3. Il brano nr. 1 o la cartella nr. 1 saranno riprodotti automaticamente una volta letto tutto il contenuto della Scheda-SD.
4. Premere il tasto
FF
/
o
FB
/
una o più volte fino a visualizzare il numero del brano desiderato.
5. Premere il tasto
PRESET
+
/
o
PRESET
/
per selezionare lalbum desiderato.
6. Premere il tasto
STOP/BAND
/
per interrompere la riproduzione.
NOTE:
1) La porta USB non supporta la connessione con una prolunga USB.
2) Lunità non è progettata per essere collegato direttamente ad un computer.
3) Non si garantisce che tutti i dispositivi USB e tutte le Schede-SD funzionino correttamente.
IMPORTANTE:
Non scollegare il dispositivo USB in modalità USB, potrebbe danneggiarsi il dispositivo od il suo contenuto. Prima spegnere
o passare in unaltra modalità, poi scollegare il dispositivo USB.
Specifiche tecniche USB:
Interfaccia
- USB 2.0 Full speed, HOST (HUB USB non è supportata) Flash memory corrispondente
- Compatibile con Audio MPEG 1, 2, 2.5
- Compatibile con Layer 1, 2, 3
- Compatibile con Bit rate: 128 320 Kbps
- Ramo cartelle : 8 livelli
- Numero di brani / titoli max 999
GETTING STARTED
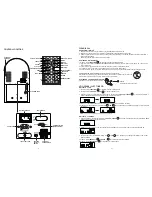
UNPACKING
1 Remove packing materials from unit.
Note: Save all packing materials
2 Remote control is located in the outside of the Styrofoam packaging
3 Remove plastic bag covering radio and remote control.
4 Untie antenna wire on back of radio.
5 Remove Styrofoam shipping material from turntable.
6 Remove black tie-wrap from under the TONE ARM .
7 Remove white protective needle cover by gently pulling towards the front of the unit.
Remarks:
a) ESD remark: In case of malfunction due to electrostatic discharge, just reset the product
(reconnect of power source may be required) to resume normal operation.
b) Electrical Fast Transient (Burst) Remark (I2): In case of malfunction due to electrical fast transient (Burst), just reset
the product. (reconnect of power source may be required) to resume normal operation.
SET UP
1 Untie the wire on the AC power cord .
2 Press the MAIN POWER button on the back of the unit to switch the main power on.
3 Press the
POWER
/
button on the front of the unit to switch the unit to Standby mode.
4 Untie the FM antenna and allow it to hang down in a straight line for optimum FM reception. If you have trouble tuning
in an FM station, move the external FM antenna for best reception. Do not connect FM antenna to outside antenna.
POWER UP YOUR UNIT
Connect the AC power cord to the wall socket. This system switches to Standby mode automatically and LCD would shown
as below
To switch the unit on, press
POWER
/
LCD backlight will be turned on.
STANDBY LED is turned off and displayed as below.
BASIC OPERATION
Function select
1. Press
FUNCTION
/
to select among:
2. When the set is on, press
POWER
/
to switch the unit off. LCD
backlight will be turned off and shown messageGOOD BYE for 2 seconds,
then the STANDBY LED is turned on.
Note: In the standby mode, the tone, sound settings, tuner presets and the volume level (up to a maximum volume level
of 30) will be stored in the units memory.
BATTERY BACK UP
The battery backup system to maintain your clock and alarm settings during a power outage. In the event of a power outage,
the battery backup will save your time and alarm settings until power is restored. To utilize the battery backup, you must
install two AAA batteries. The battery backup will not operate unless batteries are installed. To install batteries, follow the
instructions below.
1 Remove the Battery Compartment cover from the back of the unit.
2 Install two new AAA batteries in the correct position as shown inside the battery cover.
3 Reinstall the Battery Compartment cover.
NOTE:
Do not use different batteries
Do not mix old and new batteries
Setting the clock
After connecting the system to power supply, set the clock first.
1. Press
POWER
/
to switch the unit to Standby mode
-
The display shows the time
-
0:00 flashes by default if you have not set the clock
2 In the Standby mode, press and hold
PROGRAM
/
over 1 second.
-
The hours digit starts flashing
5
20