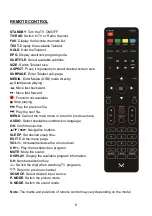
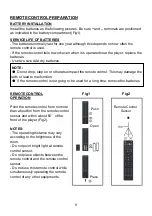
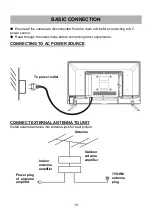
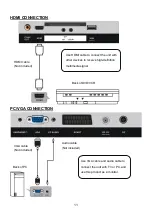
background image


16 

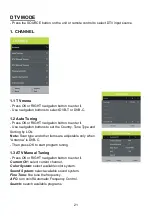
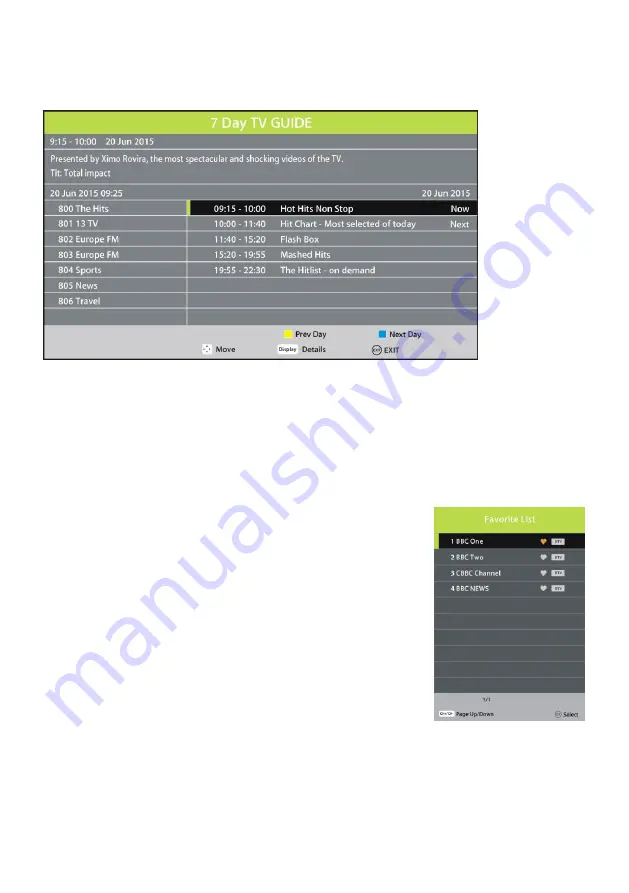
EPG TV GUIDE (FOR DTV MODE ONLY) 

- Press EPG button on remote control to display program guide. 


- Press UP/DOWN navigation button to select preferred program 
- Press LEFT/RIGHT navigation button to switch between left column and right column. 
 

When a program is highlighted (cursor moved to Right column): 

- Press YELLOW button to display program guide of previous day. 
- Press BLUE button to display program guide of next day. 
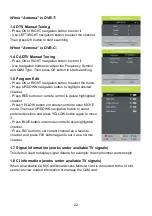
 

FAVORITE LIST


When viewing an available channel, press FAV button on 
remote control to enter Favorite List menu page. 
- Press UP or DOWN navigation button to select preferred 
channel. 
- Press OK button to confirm selection. 

Note: 

To add a favorite channel, please refer to the operations 

of 

“Channel>Program Edit”. 


Summary of Contents for TVD 224/S2 LED

Page 1: ...23 6 WIDESCREEN LED TV MODEL NO TVD 224 S2 LED USER MANUAL New Majestic S p A Via Rossi Martini 41 26013 Crema CR Italy www newmajestic com ASSEMBLED IN EU ...

Page 2: ... necessary to carefully read the instruction booklet IMPORTANT NOTES The use must be allowed only to adults and responsible persons adequately educated on the damages deriving from incorrect use This appliance can be used by children aged 8 and over if they are under supervision or if they have received instructions regarding the safe use of the appliance and if they understand the dangers involve...

Page 3: ...s with naked flames such as lighted candles on the appliance Do not try to repair or intervene on the appliance yourself Incorrect interventions or tampering can void the guarantee In the event of any damaged parts or suspected malfunction discontinue use immediately and consult qualified personnel Never immerse the appliance in water or other liquids Do not place items containing liquids such as ...

Page 4: ...motors and transformers Do not use outdoors in inclement weather Do not use the TV while driving this is dangerous and is illegal in some areas BATTERY HANDLING AND USAGE Keep batteries away from children and pets Only adults should handle batteries Never throw batteries into a fire or expose them to fire or other heat sources Follow the battery satiety and usage instructions provided by the manuf...

Page 5: ... CONTROL 8 REMOTE CONTROL PREPARATION 9 BASIC CONNECTION 10 14 OPERATIONS BASIC OPERATIONS 15 19 MAIN MENU 20 31 FIRST TIME INSTALLATION 20 DTV MODE 21 29 ATV AND OTHER MODES 29 SATELLITE MODE 30 PC MODE 31 FOR REFERENCE MAINTENANCE 32 WALL MOUNTING 32 STAND INSTALLATION 33 SPECIFICATIONS 34 35 TROUBLESHOOTING 36 ...

Page 6: ...ETEXT Europe Function Support USB Multimedia Playback Support Multi languages On Screen Display Support Full Function Remote Control Support HDMI SCART YPBPR VGA PC AUDIO AV Input CI high definition contents playback supported Support EARPHONE and COAXIAL Output With Detachable Stand Holder With External Antenna Jack DVB T DVB S With Built in Speakers FEATURES ...

Page 7: ...he indicator light will display blue color 3 Stand holder 4 SOURCE button To select the input source 5 MENU button To enter menu setting page 6 CH button To select next previous channel or move up down 7 VOL button To increase decrease the volume level or move left right 8 STANDBY button To turn ON OFF the TV GENERAL PARTS Front View Back View ...

Page 8: ...put terminal To connect the external Satellite TV Antenna DVB S2 7 RF input terminal To connect the external TV antenna DTV ATV 8 USB input terminal 9 CI input terminal CI compatible 10 Mini YPbPr input terminal Component 11 Mini AV input terminal 12 HDMI input terminal 13 COAXIAL output terminal GENERAL PARTS Back View ...

Page 9: ...t available Stop playing Play the previous file Play the next file MENU Call out the main menu or return to previous menu AUDIO Select available soundtrack or language OK Confirm selection Navigation buttons SLEEP Set desired sleep time EXIT Exit the menu page VOL Increase decrease the volume level CH Play the next previous program MUTE Mute the sound DISPLAY Display the available program informat...

Page 10: ... impact the remote control This may damage the parts or lead to malfunction If the remote control is not going to be used for a long time remove the batteries REMOTE CONTROL OPERATION Point the remote control from no more than about 6m from the remote control sensor and within about 60 of the front of the player Fig2 NOTES The operating distance may vary according to the brightness of the room Do ...

Page 11: ...tions before connecting other equipments CONNECTING TO AC POWER SOURCE CONNECT EXTERNAL ANTENNA TO UNIT Install external antenna into antenna jack for best picture BASIC CONNECTION Antenna Outdoor antenna amplifier Indoor antenna amplifier Power plug of antenna amplifier 75 OHM antenna plug To power outlet To power outlet ...

Page 12: ...HDMI cable to connect the unit with other devices to receive high definition multimedia signal Back of DVD VCR Back of PC Use VGA cable and Audio cable to connect the unit with TV or PC and use this product as a monitor VGA cable Not included Audio cable Not included ...

Page 13: ...COMPOSITE VIDEO CONNECTION Back of DVD VCR Back of DVD VCR For basic connection use the composite Audio L R white red and CVBS yellow cable to connect the unit with other devices SCART cable Not included AV cable Not included ...

Page 14: ...ION COAXIAL CONNECTION Back of DVD VCR AUDIO cable Not included YPbPr cable Not included Use coaxial cable not included to connect the unit with amplifier or other audio decoding devices for coaxial audio signal output ...

Page 15: ...N INSERT A CI CARD CI or standard EARPHONE CONNECTION Insert your CI card Conditional Access Module to watch special digital channels in your area Not included Earphone cable Not included USB Memory Device Not included ...

Page 16: ...dly to switch the digit VOLUME CONTROL Press VOL or VOL to adjust the level of current volume Available range 0 100 MUTE CONTROL Press MUTE button to mute the sound press it again to turn on the sound SOURCE SETTING Press SOURCE button on the unit or remote control to display the sources list Press UP or DOWN navigation button to select desired input source and then press OK button to confirm sele...

Page 17: ...ighlighted cursor moved to Right column Press YELLOW button to display program guide of previous day Press BLUE button to display program guide of next day FAVORITE LIST When viewing an available channel press FAV button on remote control to enter Favorite List menu page Press UP or DOWN navigation button to select preferred channel Press OK button to confirm selection Note To add a favorite chann...

Page 18: ...the unit between TV and radio mode DTV only SUBTITLE Press SUBTITLE button on remote control repeatedly to select desired subtitle NOTE To enable this function make sure that the channel you are viewing supports multi subtitle MEDIA PLAYBACK USB INPUT Insert a USB memory device into USB slot before following operations Press SOURCE button on the unit or remote control to switch the unit to USB mod...

Page 19: ...on to start playback Press DISPLAY button to call out the tool bar Use navigation buttons to select desired option and press OK to confirm it Press EXIT button to dismiss the tool bar 2 MUSIC Press LEFT RIGHT navigation button to select Music in the main menu and press OK button to enter it Use navigation buttons to select desired folder or file When selecting files press RED button to enter subme...

Page 20: ... it Use navigation buttons to select desired folder or file When selecting files press RED button to enter submenu and you can delete a file accordingly Use navigation buttons to select a file and press OK button to add to play list Press button to start playback Press DISPLAY button to call out the tool bar Use navigation buttons to select desired option and press OK to confirm it Press EXIT butt...

Page 21: ...and DOWN buttons to select the option to adjust Press MENU button to save current setting and return to previous menu page Press EXIT button to exit menu page First Time Installation Connect to power source and turn on this TV then below setup page will display on the screen Press UP DOWN navigation button to move the cursor Press LEFT RIGHT navigation button to select an option Language select th...

Page 22: ... navigation buttons to set the Country Tune Type and Sorting by LCN Note Scan type and other items are adjustable only when Antenna is DVB C Then press OK to start program tuning 1 3 ATV Manual Tuning Press OK or RIGHT navigation button to enter it Current CH select current channel Color System select available color system Sound System select available sound system Fine Tune fine tune the frequen...

Page 23: ...ED button on remote control to delete highlighted channel Press YELLOW button on remote control to enter MOVE mode Then use UP DOWN navigation button to select preferred position and press YELLOW button again to move it Press BLUE button on remote control to skip highlighted channel Press FAV button to set current channel as a favorite channel and press FAV button again to set it as a normal chann...

Page 24: ...d Sharpness are adjustable only when Picture Mode is User Tint is adjustable only for NTSC system 2 2 Color Temperature This item is used to adjust the optimum color temperature for suitable viewing Available options Normal Warm Cold 2 3 Noise Reduction Available options Off Low Medium High Note when the TV signal does not have noises we advise to keep this function off 2 4 SCREEN for PC VGA mode ...

Page 25: ... and right speaker from 50 to 50 3 3 Auto Volume This item is used to set Auto Volume ON or OFF 3 4 Surround Sound This item is used to select desired mode of Surround sound 3 5 S PDIF Mode Available options Auto PCM Off 3 6 AD Switch This item is used to turn on off Audio Description function For Visually Impaired users this function can help to know a certain scene or action through the narratio...

Page 26: ...Off 4 4 On Time On Time available options Off Once Every Day Mon Fri Mon Sat Sat Sun Sun Hour Minute Source Channel Volume use navigation buttons to adjust these items when Off Time is not Off 4 5 Sleep Timer This item is used to set the automatic sleep time when no signals Available options Off 10min 20min 30min 60min 90min 120min 180min 240min 4 6 Auto Standby This item is used to select desired...

Page 27: ...m Lock This item is used to turn on off Lock System 5 2 Set Password Input the old password using number buttons on remote control and then input your private password twice to finish it 5 3 Channel Lock Press OK or RIGHT navigation button to enter it Press UP DOWN navigation button to select the channel which you want to lock Press GREEN button repeatedly to lock unlock the highlighted channel 5 ...

Page 28: ...Mode turn on off Hotel Mode Source Lock turn on off the lock of available sources Default Source set the default source Default Prog set the default digital program Default Volume set the default volume level Max Volume set the maximum volume level Export DataBase export database to USB device Import DataBase import database from USB device Clear Lock Clear above settings ...

Page 29: ...select desired primary subtitle language and secondary subtitle Language 6 5 Hearing Impaired This item is used to turn on off Hearing Impaired function For Hearing Impaired users this function can assist help to know a certain scene or action through the caption instead of hearing it NOTE Hearing Impaired function works only when you are viewing programs that contain related caption information 6...

Page 30: ...ate software through the USB memory device 6 12 HDMI CEC Consumer Electronic Control Press RIGHT navigation button to enter it To use HDMI CEC function Make sure the HDMI device Amplifier etc is connected correctly Press SOURCE button on the unit or remote control to select HDMI input source HDMI CEC turn on off HDMI CEC HDMI ARC turn on off ARC function Auto Power turn on off Auto Power function ...

Page 31: ...nd press OK to enter it Country select your country Satellite select an available satellite Scan Mode select your scan mode Channel Type select a channel type Service Type select a service type 2 Dish Setup Press MENU button to call out the main menu Highlight TV using navigation buttons and press OK to enter it Then highlight Dish Setup and press OK to enter it Press LEFT RIGHT navigation button ...

Page 32: ... navigation button to select preferred item Press OK or RIGHT navigation button to enter submenu Press LEFT RIGHT navigation button to adjust the value 1 Auto Adjust This item is used to adjust the PC screen automatically 2 H Offset This item is used to adjust the value of horizontal position 3 V Offset This item is used to adjust the value of vertical position 4 Size This item is used to adjust t...

Page 33: ...ipe again with a dry cloth Never use alcohol benzene thinner cleaning fluid or other chemicals And do not use compressed air to remove dust Contact a professional for assistance when wall mounting your TV We are not responsible for any damage to the product or injury to yourself if you mount the TV on your own Do not wall mount the TV while TV is turned on It may cause personal injury due to elect...

Page 34: ... a soft cloth or cushion to prevent the panel from being damaged Step 2 Align the Stands with TV bottom in the correct position as per picture 2 Step 3 Press the Stand into the TV bottom NOTES 1 Unplug the power plug first when installing or removing the TV Stand 2 To avoid any damage to this TV contact one or more partner for assistance when installing or removing the TV stand STAND INSTALLATION ...

Page 35: ...otel function DVB T T2 and DVB S S2 USB input USB Supported formats AVI MP4 MKV MPG VOB Codec MPEG1 MPEG2 MPEG4 Xvid H264 fine at 1080p 30fps Photo JPEG BMP Music MP3 WMA Although the unit has been tested with most commercially available USB devices it is impossible to establish a universal compatibility level due to continuous technical technological updates Inputs CAM conditional Access Module n...

Page 36: ...480p 576i 576p 720p 1080i 1080p HDMI 480i 480p 576i 576p 720p 1080i 1080p SCART CVBS RGB AC 100 240V 50 60Hz Operation temperature 5 to 35 Unit dimensions 55 1 L x 32 9 H x 6 2 D cm Dimensions with stand 55 1 L x 38 1 H x 17 1 D cm Weight with stand Approx 2 2 kg Specifications are subject to change without notice ...

Page 37: ...mote control unit at a distance of no more than 6m from the remote control sensor Remove the obstacles between the remote control and remote control sensor No key operation by the main unit and or the remote control unit is effective Disconnect the power plug and then reconnect it The TV may not be operating properly due to lightning static electricity or some other factors Symptom TV Remedy No or...

Page 38: ...r at the time of purchase of a new type of equivalent equipment one by one Appropriate separate disposal for the subsequent start up of the disused equipment for recycling treatment and compatible environmental disposal helps to avoid possible negative effects on the environment and health and favours the re use and or recycling of the materials it is composed the equipment The illegal disposal of...

Page 39: ...38 Class II double insulation WEEE Logo Waste of electrical and electronic equipments Indoor use Battery disposal ...

Reviews: