background image

9

OFF

V

Hz%

CAP

Ω

Temp

°C°F

600A

AC/DC TRMS

CLAMP METER

WITH DA

TALOGGER 

1000A

CAT III 1000V
CAT IV 600V

CAP

V      Hz%

Ω

Temp

COM

AUTO POWER OFF

V

LoZ

ESC

Bluetooth

INRUSH

REL

RANGE

MENU

MODE

2sec.

10:18

V

600.0

Mode

Max

Menu

Auto

0

3

6

OFF

V

Hz%

CAP

Ω

Temp

°C°F

600A

AC/DC TRMS

CLAMP METER

WITH DA

TALOGGER 

1000A

CAT III 1000V
CAT IV 600V

CAP

V      Hz%

Ω

Temp

COM

AUTO POWER OFF

V

LoZ

ESC

Bluetooth

INRUSH

REL

RANGE

MENU

MODE

2sec.

10:18

V

600.0

Mode

Max

Menu

Auto

0

3

6

4.2. Inrush Current Measurements

1.  Set the function switch to the 

600A

 or 

1000A

 position.

2.  Press the 

INRUSH

 button (Enter key for 2 seconds) to indicate “Inrush” 

on the display. Then measurement display “----” .

3.  Clamp the cable to be motor.
4.  Start the motor.
5.  Read the inrush current in the display.

4.3. AC/DC Voltage Measurements
WARNING:

 Risk of Electrocution. The probe tips may not be long enough 

to contact the live parts inside some 240V outlets for appliances because 
the contacts are recessed deep in the outlets. As a result, the reading may 
show 0 volts when the outlet actually has voltage on it. Make sure the 
probe tips are touching the metal contacts inside the outlet before 
assuming that no voltage is present.

CAUTION: 

Do not measure AC/DC voltages if a motor on the circuit is 

being switched ON or OFF. Large voltage surges may occur that can 
damage the meter.
1.  Set the function switch to the 

V AC/DC 

position.

2.  Insert the black test lead banana plug into the negative 

COM

 jack. 

Insert the red test lead banana plug into the positive 

V

 jack.

3.  Press the 

MODE

 key to switch AC or DC Voltage functions.

4.  Read the voltage in the display.

Summary of Contents for MT777

Page 1: ...MT777 AC DC TRMS CLAMP METER with Datalogger Mobile APP INSTRUCTION MANUAL II...

Page 2: ...2...

Page 3: ...12 4 11 Capacitance Measurements 13 4 12 Temperature Measurements 13 4 13 Flexible Coil Current Measurements 14 4 14 Using RANGE 14 4 15 Hold Mode 15 4 16 Capturing Minimum and Maximum Values 15 4 17...

Page 4: ...on the Bluetooth function on the instrument using Menu Button 2 Turn on the Bluetooth of the Smartphone press the Meterbox Pro icon and enter into the home interface Then press Connect Device icon on...

Page 5: ...e test leads from the circuit under test 2 4 CAUTIONS Improper use of this meter can cause damage shock injury or death Read and understand this user manual before operating the meter Always remove th...

Page 6: ...n 11 Battery Cover 12 COM Input Jack 13 V Hz CAP TEMP Jack 14 Flashlight WARNING TO AVOID ELECTRICAL SHOCK REMOVE TEST LEADS BEFORE OPENING CASE OR BATTERY COVER DO NOT OPERATE WITH BATTERY COVER OPEN...

Page 7: ...n AC Voltage measurement 2 RANGE Press the Range key to manual range and press for 2 seconds to switch to auto range measurement 3 MENU Press the menu key to open the menu functions and press the rang...

Page 8: ...rom the meter before making current clamp measurements 1 Set the Function switch to the 1000A 600A range If the approx range of the measurement is not known select the highest range then move to the l...

Page 9: ...tor 5 Read the inrush current in the display 4 3 AC DC Voltage Measurements WARNING Risk of Electrocution The probe tips may not be long enough to contact the live parts inside some 240V outlets for a...

Page 10: ...he function switch to the V AC DC position 2 Insert the black test lead banana plug into the negative COM jack Insert the red test lead banana plug into the positive V jack 3 Press the menu key for 2...

Page 11: ...ent CAUTION Do not measure AC voltages if a motor on the circuit is being switched ON or OFF Large voltage surges may occur that can damage the meter 1 Set the function switch to the VAC LoZ position...

Page 12: ...es and unplug the line cords 1 Set the function switch to the CAP position 2 Insert the black test lead banana plug into the negative COM jack Insert the red test lead banana plug into the positive ja...

Page 13: ...connect power to the unit under test and discharge all capacitors before taking any capacitance measurements Remove the batteries and unplug the line cords 1 Set the rotary function switch to the CAP...

Page 14: ...ch range 30A 300A 3000A 4 14 Using RANGE Press the RANGE key to activate the manual mode and to disable the Auto range function The message Manual appears on the upper left part of the display instead...

Page 15: ...e is for capturing intermittent readings recording minimum and maximum readings unattended or recording readings while equipment operation precludes watching the Meter To activate the MAX MIN mode pre...

Page 16: ...electrical cord sets are often twisted For best results move the probe tip along a length of the cord to assure placing the tip in close proximity to the live conductor Note The detector is designed...

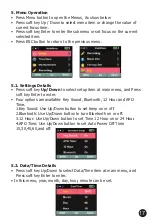
Page 17: ...item at main menu and Press soft key Enter to enter Four options are available Key Sound Bluetooth 12 Hour and APO Time 1 Key Sound Use Up Down button to set beep on or off 2 Bluetooth Use Up Down bu...

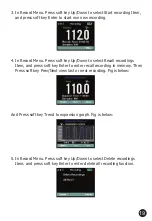
Page 18: ...is below 18 5 3 Measurement Details Press soft key Up Down to select Measurement item at Measurement menu and Press soft key Enter to enter the menu 5 4 Recording Details 1 Press soft key Up Down to s...

Page 19: ...own to select Recall recordings Item and press soft key Enter to enter recall recording in memory Then Press soft key Prev Next view last or next recording Fig is below And Press soft key Trend to exp...

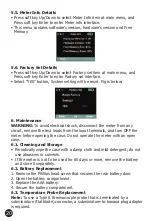
Page 20: ...the rear battery door 2 Open the battery compartment 3 Replace the AAA battery 4 Secure the battery compartment 6 3 Temperature Probe Replacement Note To use a Type K thermocouple probe that is termi...

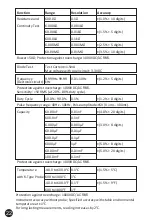
Page 21: ...gits 6 000V 0 001V Input impedance 300k Protection against overcharge 1000VDC AC RMS Accuracy specified from 10 to 100 of the measuring range sine wave 50Hz 400Hz 300 0V 0 1V Voltage 60 00V 0 01V 3 0...

Page 22: ...99 kHz 10 0 90 0 60 00nF 600 0nF 6 000 F 60 00 F 600 0 F 6000 F 60 00mF 100 0mF Resolution 0 1 0 001k 0 01k 0 1k 0 001M 0 01M 0 01 10Hz 0 1 0 01nF 0 1nF 0 001 F 0 01 F 0 1 F 1 F 0 01mF 0 1mF Accuracy...

Page 23: ...edance 10M VDC and 9M VAC AC Response True RMS AAC and VAC Operating Temperature 5 to 40 C 41 to 104 F Storage Temperature 20 to 60 C 4 to 140 F Operating Humidity Max 80 up to 31 C decreasing linearl...

Page 24: ...www major tech com www majortech com au sales major tech com info majortech com au MAJOR TECH PTY LTD South Africa Australia...

Reviews: