5
EN
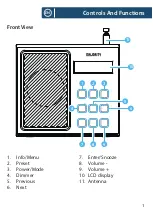
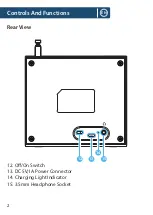
Please note all (Ref.) refer to Pages 1-2 of the Controls and Functions guide.
Instructions Guide
Getting Started
Plug the power connector into the back of the system via the port
that is labelled as DC 5V (
Ref.13
). Alternatively, charge the radio for
approximately 3.5 hours to charge the internal battery. This will allow
for approximately 6 hours of charge and portability. Once powered or
charged, switch the Power Supply switch on the back of the system to
‘ON’ (
Ref.12
).
Ensure the antenna (
Ref.11
) is extended as far as possible so that you
can rotate it. This will allow you to receive the best possible signal
before DAB or FM mode are selected.
Press the ‘Power/Mode’ button (
Ref.3
) to turn on the unit from standby.
It will automatically take you to DAB radio mode or the previous mode
you were using.
If DAB mode is activated, the radio will automatically begin scanning
and storing DAB stations with good signal. The screen will display “Full
Scan” when it is scanning, and will display a radio station when the scan
is complete. If the radio does not automatically begin scanning, simply
press and hold the ‘Menu’ button (
Ref.1
) then select Full scan to initiate
a full scan. Once it is finished, the first available station will begin to play
To place the music system in standby mode, press and
hold
the ‘Power/
Mode’ button (
Ref.3
) To turn the radio off fully, switch the button on
the rear of the unit (
Ref.12
) to OFF and turn the power off at the source
or unplug the USB cable. This would be advisable to save the radio’s
internal battery charge if you are operating it in this way instead of
operating it from the mains.

