background image

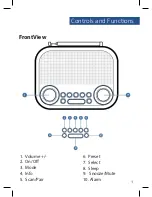
Please note all (Ref.) refer to Page 1 Controls and Functions mapping guide. 


Basic Operation 


Plug the connector into the back of the system labelled DC 5V 

(

Ref.14

) and the power supply into the mains. 

Ensure the antenna (

Ref.15

) is extended as far as possible so that 

you can rotate it. This will enable you to get the best signal you 

can. 

Press the ‘On/Off’ button to turn on the unit (

Ref.2

). It will  

automatically take you to DAB radio mode or to the previous 

mode that you were using. When DAB Radio is activated for the 

first time it will automatically start scanning and storing all 

stations that have a strong signal. If scanning does not 

automatically start, press the ‘Scan/Pair’ button (

Ref.5

). To scroll 

through the stations use the ‘Select’ (

Ref.7

) dial. Press the ‘Select’ 

dial (

Ref.7

) to listen to a station. 

To change the mode, press the ‘Mode’ button (

Ref.3

). This will 

switch between DAB Radio, FM Radio, Bluetooth and Aux in. 

The display screen will dim automatically after 10 seconds if left 

in standby or working mode.

Standby 


To place the music system in standby, press the ‘On/Off’ button 

(

Ref.2

). To turn off fully, switch it off at the mains.  The cord must 

be out of reach of children.

Instructions Guide

4

Summary of Contents for FUL-DAB-BLK

Page 1: ...Majority Fulbourn Bedside Radio Alarm Clock User Guide FUL DAB BLK...

Page 2: ...Radio Preset Stations FM Radio Set Up of the FM Radio Preset Stations Station information for DAB and FM Radio Clock and Date Setting Dual Alarm Setting and Alarm Snooze Other Functions Technical Spec...

Page 3: ...Controls and Functions FrontView 1 Volume 2 On Off 3 Mode 4 Info 5 Scan Pair 1 6 Preset 7 Select 8 Sleep 9 Snooze Mute 10 Alarm...

Page 4: ...Controls and Functions Top View 11 Dual USB Ports 12 Aux In 13 Earphones jack 14 DC 5V Port 15 Antenna 2...

Page 5: ...What s in the box Majority Fulbourn DAB DAB FM Radio Clock UK Standard Plug DC5V 2A Power Supply User Guide 3...

Page 6: ...activated for the first time it will automatically start scanning and storing all stations that have a strong signal If scanning does not automatically start press the Scan Pair button Ref 5 To scrol...

Page 7: ...searching has finished it will automatically play the first station stored To listen to all stations that have been stored use the Select dial Ref 7 to scroll through them Press the Select dial Ref 7...

Page 8: ...amic Range Compression DRC This function enables you to reduce the difference between the maximum and minimum audio volume being broadcast This makes quiet sounds comparatively louder and loud sounds...

Page 9: ...ns that were missed while auto tuning Press and hold the Info button Ref 4 and use the Select dial Ref 7 to scroll through options Select Manual Tune and press the Select dial Ref 7 Use the Select Ref...

Page 10: ...the Select dial Ref 7 to change the 1 to the number you want to store the station as Then press Select button Ref 7 to save The display will then show Preset 1 stored How to play a preset radio statio...

Page 11: ...an down the frequency band press and hold the Scan Pair button Ref 5 for a few seconds The radio will display station information when you press the Info button Ref 4 Press multiple times to view all...

Page 12: ...k Mono and Stereo Press and hold the Info button Ref 4 To make your choice use the Select dial Ref 7 to choose your option Select Audio Setting and press the Select dial Ref 7 Use the Select dial Ref...

Page 13: ...ow on the display Use the Select dial Ref 7 to change the 1 to the number you want to store the station as Then press Select button Ref 7 to save The display will then show Preset 1 stored How to play...

Page 14: ...Shows the type and description of the programme provided by the DAB station Channel and Frequency Displays the station s transmission channel number and frequency Bit Rate The data rate which the sign...

Page 15: ...of programme provided by the broadcaster Frequency Displays the station s transmission frequency Audio Type Displays the audio type of the station you are listening to It will either be stereo or mono...

Page 16: ...to choose your option Select Time and press the Select dial Ref 7 The select Set Time Date and press the Select dial Ref 7 The hour will flash on the display screen Twist the Select buttons Ref 7 unt...

Page 17: ...quired year is displayed To confirm the year press the Select dial Ref 7 The month will flash on the display screen Use the Select dial Ref 7 until the required month is displayed To confirm the month...

Page 18: ...make your selection use the Select dial Ref 7 Select System and press the Select dial Ref 7 Highlight Time and press the Select dial Ref 7 then Auto Update Using the Select dial Ref 7 choose from Upd...

Page 19: ...the hour and press the Select dial Ref 7 to confirm Use the Select dial Ref 7 to change the minutes and press Select dial Ref 7 to confirm Use the Select dial Ref 7 to change the volume and press Sele...

Page 20: ...the Select dial Ref 7 so that OFF is flashing and press the Select dial Ref 7 to confirm 18 Alarm Sound and Snooze Snooze Switch off Alarm when Sounding When the alarm sounds press the Snooze Mute but...

Page 21: ...19 Other Functions Instructions Guide...

Page 22: ...r playlist from your phone If there is already an existing connection press the Scan Pair button Ref 5 on the unit The operational range between the unit and a Bluetooth device is approximately 10 met...

Page 23: ...select the required level Off Low Medium or High To change when the display screen times out after use follow the above instructions and select Timeout and press the Select dial Ref 7 to confirm Use t...

Page 24: ...gral telescopic aerial Warranty All products come with a standard 12 month warranty All items must be registered on www majorityradios co uk for the warranty to be valid Once on the web page use the m...

Page 25: ...he unit to a stonger signal location Re scan stations The volume is too high Adjust the volume control Weak signal Use the manual tune function There is no DAB coverage in your area or poor reception...

Page 26: ...aced on the apparatus 14 Dispose of used electrical products and batteries safely according to your local authority and regulations ADDITIONAL WARNINGS The apparatus shall not be exposed to dripping o...

Page 27: ......

Page 28: ...ffiAJORITY www majorityradios co uk...

Reviews: