background image

SCREEN LOCK

ACTIVE SCREEN SCROLL

Description:

Settings:

Description:

Settings:

Allows you to stop the display screens from scrolling from

function to function, letting you display only one screen.

Use the LEFT or RIGHT ARROW buttons to reach the screen

you want displayed. Press the UP button until the LOCK icon appears in
the upper left-hand corner of the display screen. To resume screen
scrolling function, press any button.

The screen will scroll through all ACTIVE SCREENS

(screens for functions that are in use) when left un-locked and un-
touched.

There are no settings for this feature.

?

?

?

?

?

?

?

?

?

?

Press the STAR key to accept your starting cooking temperature.
The screen will now display END 1.1. SET: NONE. Use the ARROW
buttons for NONE, TIME or MEAT PROBE 1, 2 or 3. If you have
selected a MEAT PROBE, you will need to select a temperature for the
probe to reach in order for the program to go to the 1.2 setting in the
program.
If TIME is selected, the TIMER screen will appear. Set timer by following
the directions for TIMER.
Once you have selected a MEAT PROBE Temperature, or TIME, press
the STAR button once.
The display will now show 1.2 SET: SMKE. The word SMKE will be
flashing. Go through all of the same steps for settings 1.1. Do this for
steps 1.3, 1.4 and 1.5 if so desired.

To END the program, set END to NONE.

Once the program has been set-up the screen will display OFF.
To start the program, use the ARROW buttons to reach USER 1, 2 or 3.
Press the STAR button once. Use the UP or DOWN arrow buttons to
START, press the STAR button to accept. The program will begin to
run.
To STOP any USER PROGRAM, press the STAR button, choose a
different USER PROGRAM, select OFF or change the temperature.
To restart any USER PROGRAM, select START and press the STAR
button once.

FOR USER PROGRAMS 2 & 3—Follow the above steps to program.
Descriptions are the same as USER 1.

13

Summary of Contents for EP-380-1G

Page 1: ...keep your sales receipt in a safe place for reference if needed Any other use may cause serious injury and will void any and all warranties Do not operate this grill in the vicinity of any liquid com...

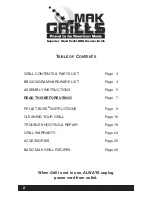
Page 2: ...Page 5 Page 7 PELLET BOSS INSTRUCTIONS Page 9 CLEANING YOUR GRILL Page 16 TROUBLE SHOOTING REPAIR Page 19 GRILL WARRANTY Page 24 ACCESSORIES Page 25 BASIC MAK GRILL RECIPES Page 26 READ THIS BEFORE US...

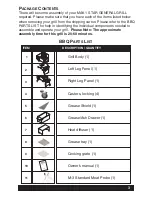
Page 3: ...LIST for help in identifying the individual components needed to assemble and operate your grill Please Note The approximate assembly time for this grill is 20 60 minutes BBQ PARTS LIST 3 DESCRIPTION...

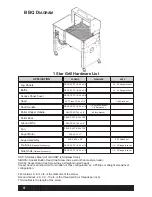
Page 4: ...CS SST 6 x 3 8 6 lock washer Auger Motor SHCS 6 32 x 1 Hood SST Truss 1 4 20 x 7 8 1 4 20 lock nut Ground Wire SBHCS SST 6 x 3 8 Toolhook Optional Accessory SBHCS SST 1 4 20 x 1 2 1 4 20 flange lock n...

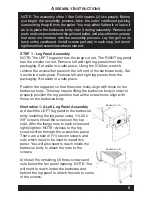
Page 5: ...on the left end of the barbecue body Set it aside in a safe place Remove left and right leg panels from the packaging Set aside in a safe place Position the leg panel so that the screw holes align wi...

Page 6: ...over the firepot The diffuser should fit over the top of the front and rear brackets which hold the heat diffuser in place Place the grease shield into position making sure that the bottom tab is faci...

Page 7: ...LL 7 Always start and cook with the grill lid CLOSED NOTE On initial start up it will take at least 20 minutes before the fire starts while the auger between the hopper and firepot gets filled with pe...

Page 8: ...r of the screen whenever the auger is operating The auger will run for 2 two minutes feeding pellets into the firepot and then will stop the auger will feed more pellets into the firepot and will run...

Page 9: ...e Press the STAR button to activate change or accept changes made to any Pellet Boss function Example To change the grill SETPOINT temperature press the STAR button The screen will flash Use the UP or...

Page 10: ...the food you are cooking Put the probe plug into any of the 3 three Temperature Meat Probe inputs Run the probe through the mouse hole on the front left side of the grill opening and insert the probe...

Page 11: ...on it will activate the ignition mode The Pellet Boss screen will display IGNITING There are no user settings for this screen To change the grill cooking temperature follow the instructions above Dis...

Page 12: ...ay screen will flash until any button on the control panel is pressed When the grill is turned off all alarms will reset to OFF Press and hold the STAR button for 3 three seconds to reset the timer ba...

Page 13: ...ure for the probe to reach in order for the program to go to the 1 2 setting in the program If TIME is selected the TIMER screen will appear Set timer by following the directions for TIMER Once you ha...

Page 14: ...se the MANUAL MODE will allow you to use your grill until you receive and install a replacement thermocouple To enable the MANUAL MODE press and hold the STAR button unit MANUAL SMOKE is displayed Pre...

Page 15: ...re no user settings for this feature If you wish to override the SHUT DOWN mode just press any button and the unit will turn off Register Your Grill Receive MAK s All Star Wood Pellet Grill Cookbook N...

Page 16: ...inputs Wipe dry using a soft towel or cloth Grill Lid To reduce grease dripping clean the lip and inside of the grill lid using mild dish detergent and hot water Some grill owners remove their lids fr...

Page 17: ...and secure it into position using the pin Do this at least every 3 5 cooks Igniter Over time it is possible for scale to develop on the igniter To clean remove the firepot Then take a piece of 2 or 3...

Page 18: ...n Panel Inside of Lid Pellet Hopper Grill Lid MAK S ALL STAR PELLETS 18 Our Hazelnut Blend BBQ Pellets are different than all the others We start with select Northwest Hazelnut Filbert wood along with...

Page 19: ...grill is plugged in has tripped GRILL DOES NOT LIGHT DISPLAY READS FLAME OUT CHECK FIREPOT HOPPER This is an indication that the hopper has run out of pellets or has excessive ash build up in the fir...

Page 20: ...of the board Unplug the power cord remove the fan access panel to get to the back of the control board Confirm that the plug labeled AUGER is tightly plugged into the WHITE receptacle on the back of t...

Page 21: ...nel fan and fan deflector Unplug the auger from the back of the Pellet Boss it is labeled AUGER the white plug receptacle Remove the 2 two auger mounting screws from the rear of the motor and pull the...

Page 22: ...MUCH SMOKE AS BEFORE There are several reasons why this may be happening Dirty thermocouple Take a piece of steel wool and clean it so the metal housing all around the thermocouple is shiny clean Cle...

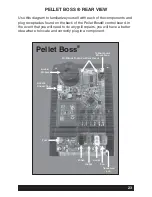
Page 23: ...NDING LUG Pellet Boss 23 PELLET BOSS REAR VIEW Use this diagram to familiarize yourself with each of the components and plug receptacles found on the back of the Pellet Boss control board In the event...

Page 24: ...is exposed to unreasonable or extreme weather conditions the unit is re sold or traded to another owner components accessories or fuels not compatible with the unit have been used the unit has been us...

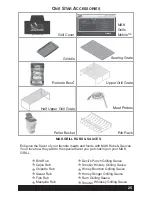
Page 25: ...favorite meats and foods with MAK Rubs Sauces You ll love how they add to the special flavor you get cooking on your MAK GRILL Bird Rub Cajun Rub Chipotle Rub Sweet Rub 4 4 4 4 4 4 4 4 4 4 4 4 Devil...

Page 26: ...makgrills com BEEF Steaks Approximate cooking time 15 25 min One 8 12 oz steak per person 2 tsp MAK Mesquite Rub 2 Tbsp MAK Smokin Whiskey Grilling Sauce Sprinkle each side of the steak with one teas...

Page 27: ...165 degrees Remove brisket from grill and place in foil Add 1 cup heated beef bullion Seal tightly place back on grill and set grill temperature to 250 degrees Insert meat probe and program alarm for...

Page 28: ...h 2 12 oz cans of beer Dark Stout or Porter is recommended 1 1 3 cup MAK Rum Grilling Sauce 1 2 Tbsp MAK Bird Rub per chicken Mix together two thirds of each can of beer and BBQ sauce in a bowl Discar...

Page 29: ...p paprika 1 Tbsp allspice Tbsp ground cloves Unwrap ham and wipe down with a paper towel In a glass bowl combine and mix all ingredients except ham until thoroughly blended Divide mixture in half Appl...

Page 30: ...at to low and simmer uncovered for 10 minutes Start grill with setpoint temperature at 250 degrees Pre heat grill approximately 10 minutes Pour water and vinegar mixture into heat tolerant container P...

Page 31: ...to pale in color Do not over cook fish Cold Smoked Salmon whole or half Approximate cooking time 5 hours 1 salmon whole or half skin on 2 cups of brown sugar 1 cup of sea salt 1 4 cup garlic salt Pla...

Page 32: ...one hour Soak wood skewers in boiling hot water for 30 minutes Remove shrimp from refrigerator and thread onto skewers Start grill and adjust setpoint temperature to 300 degrees Pre heat grill approx...

Page 33: ...ise on each half until bread becomes moist Do not over moisten the bread Sprinkle cup of cheese on each half of bread Option Sprinkle TBSP of MAK Chipotle Rub on each half of bread Start grill adjusti...

Page 34: ...than one and a half inches thick Place cheese blocks on foil arranged on top of grate inside Warmer Smoker box or use pie tin or plate for the cheese Smoke cheese for approximately 20 60 minutes depen...

Reviews: