05_20ed3a Machine Delivery.fm
5 - 9
3UH,QVWDOODWLRQ*XLGH
('*(
5.6
Air Source
Connect the Air Supply
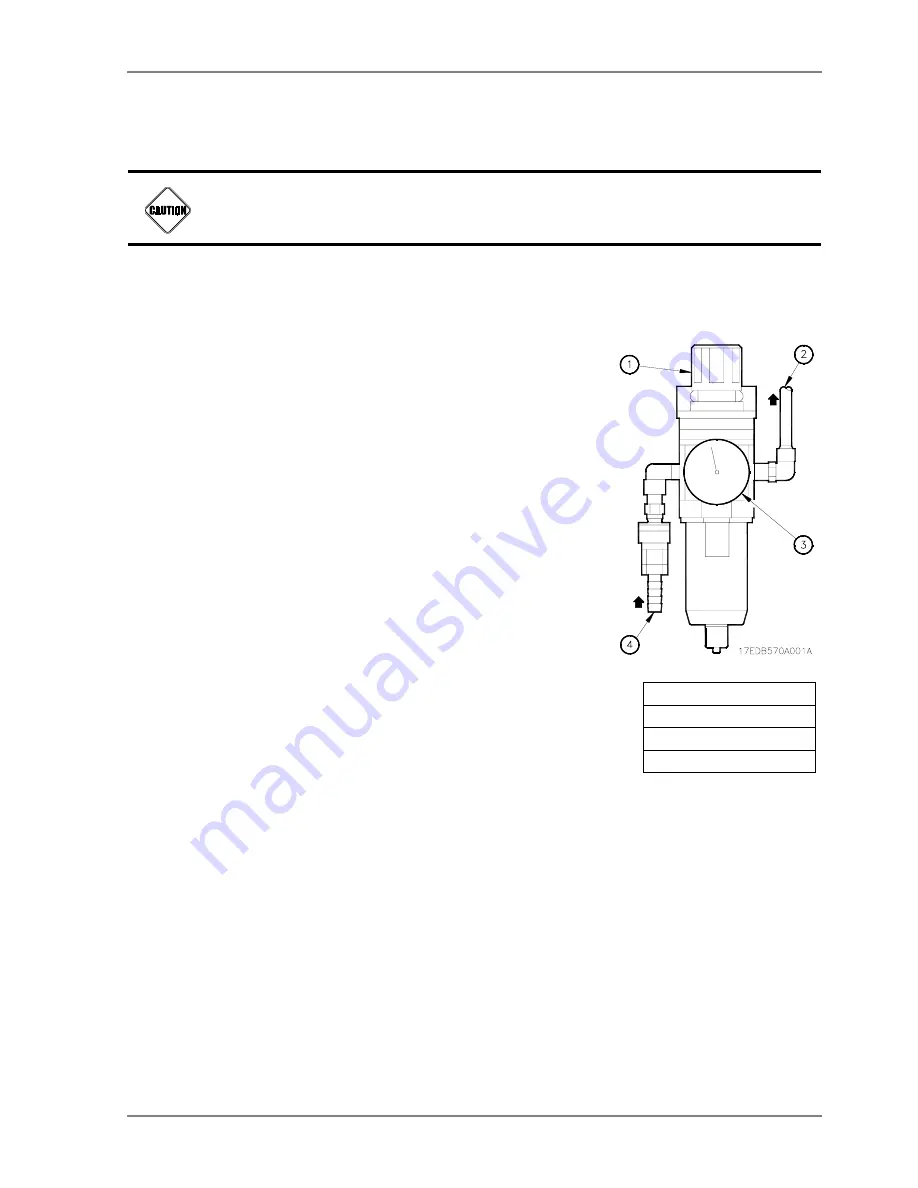
The air source is connected at the filter/regu-
lator (
) located on the right rear of
the machine.
1. Prepare an 8mm I.D. air supply hose with
a female coupling.
2. Connect air supply hose to male inlet cou-
pling.
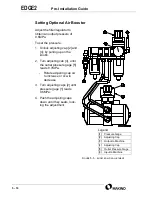
Setting Standard Air Regulator
Adjust the filter/regulator to obtain an output
pressure of 0.6MPa.To set the pressure:
1. Pull up on adjusting cap [1].
2. Rotate adjusting cap [1] (cw to increase or
ccw to decrease), until pressure gage [3]
reads 0.6MPa.
3. Push adjusting cap [1] down until it seats,
locking the adjustment.
Incoming Air Supply
Makino considers it the customer’s responsibility to ensure that the air supply to the
machine is both clean and dry. Supplied air must NOT exceed 40% relative humidity.
F
IGURE
5-4
STANDARD
AIR
ADJUSTMENT
Legend
[1]
Adjusting Cap
[2]
Output to Machine
[3]
Pressure Gage
[4]
Input to Machine
Summary of Contents for EDGE-2
Page 8: ...vi 3UH QVWDOODWLRQ XLGH...
Page 11: ...01_20ed3aSafety fm 3UH QVWDOODWLRQ XLGH 1 11 Installation Safety Instructions 1 25...
Page 12: ...3UH QVWDOODWLRQ XLGH NOTES SKETCHES...
Page 34: ...1 22 3UH QVWDOODWLRQ XLGH FIGURE 1 4 OILMATIC SAFETY LABELS...
Page 38: ...1 26 3UH QVWDOODWLRQ XLGH NOTES SKETCHES...
Page 63: ...02_20ed3a Specifications fm 2 23 3UH QVWDOODWLRQ XLGH NOTES SKETCHES...
Page 64: ...2 24 3UH QVWDOODWLRQ XLGH...
Page 74: ...3 8 3UH QVWDOODWLRQ XLGH NOTES SKETCHES...
Page 79: ...04_20ed3a Pre Delivery Prep fm 4 3 3UH QVWDOODWLRQ XLGH NOTES SKETCHES...
Page 87: ...04_20ed3a Pre Delivery Prep fm 4 11 3UH QVWDOODWLRQ XLGH NOTES SKETCHES...
Page 88: ...4 12 3UH QVWDOODWLRQ XLGH NOTES SKETCHES...
Page 103: ...05_20ed3a Machine Delivery fm 5 13 3UH QVWDOODWLRQ XLGH NOTES SKETCHES...
Page 104: ...5 14 3UH QVWDOODWLRQ XLGH NOTES SKETCHES...
Page 112: ...SSHQGL A 6 NOTES SKETCHES...
Page 120: ...SSHQGL A 14 NOTES SKETCHES...

