8
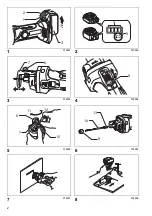
Switch action (Fig. 4)
CAUTION:
• Before installing the battery cartridge into the tool,
always check to see that the slide switch actuates
properly and returns to the “OFF” position when the
rear of the slide switch is depressed.
To start the tool, slide the slide switch toward the “I (ON)”
position. For continuous operation, press the front of the
slide switch to lock it.
To stop the tool, press the rear of the slide switch, then
slide it toward the “O (OFF)” position.
Accidental re-start preventive function
Even if the battery cartridge is installed on the tool with
the slide switch in the “I (ON)” position, the tool does not
start.
To start the tool, first slide the slide switch toward the
“O (OFF)” position and then slide it toward the “I (ON)”
position.
ASSEMBLY
CAUTION:
• Always be sure that the tool is switched off and the
battery cartridge is removed before adjusting or
checking function on the tool.
Installing or removing bit (Fig. 5)
CAUTION:
• Do not tighten the collet nut without installing a bit, or
the collet cone may break.
Press the shaft lock to prevent shaft rotation when
installing or removing the bit.
To install the bit, place it in the collet cone as far as it
goes and then tighten the collet nut securely with the
shoe as a wrench.
To remove the bit, follow the installation procedure in
reverse.
Changing the collet cone (country specific)
(Fig. 6)
CAUTION:
• Use the correct size collet cone for the bit which you
intended to use.
• Do not tighten the collet nut without installing a bit, or
the collet cone may break.
To change the collet cone, loosen the collet nut and
remove. Remove the installed collet cone and replace
with desired collet cone. Reinstall collet nut.
OPERATION
CAUTION:
• Avoid forcing the bit to bend or twist. It may snap.
• Before turning the tool on, make sure the bit and collet
nut are securely tightened.
Hold the tool securely with the bit pointing in a safe
direction not contacting any surface. Turn the tool on and
wait until the tool reaches full speed.
(Fig. 7)
When using the drywall guide bit into a drywall, carefully
insert the bit straight until the shoe base contacts the
material fully.
Move the tool slowly with a constant pressure in a
clockwise direction to make the cut.
(Fig. 8)
When cutting straight line, clamp a straight board firmly
to the material and use it as a guide. Move the tool in the
direction of the arrow with the shoe base flush with the
side of the guide board.
When the cut is complete, turn the tool off and wait for
the bit to stop rotating and then carefully remove it from
the material.
NOTE:
• When using this tool, the rotating action causes the tool
to pull. The less pressure applied to the tool causes
less pull and provides a more accurate cut. Excessive
pressure or fast cutting can cause the bit to dull or
break premature.
• When cutting drywall around outlet boxes, cut in a
counterclockwise direction for ease of cut.
• The standard bit included with this tool is for cutting
drywall only. When cutting materials other than drywall,
do not use the standard drywall guide bit.
Using multipurpose bit (optional accessory)
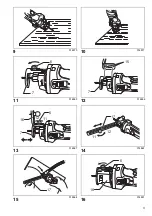
(Fig. 9 & 10)
When using the multipurpose bit into the material, hold
the tool at approximately a 45 degree angle with the
edge of the shoe base contacting the material.
Bring the tool carefully to a straight position so the shoe
base contacts the material fully.
Circular guide (optional accessory)
Circular cutting diameters: 10 cm – 34 cm
Installing circular guide (Fig. 11, 12 & 13)
Release the thumb screw which secures the shoe.
Align the projections in the circular guide with the
grooves in the shoe, and secure the shoe and circular
guide with the thumb screw.
To adjust the cutting depth, loose the thumb screw and
then slide the shoe with the circular guide. After the
proper adjustment, tighten the thumb screw securely.
Using circular guide (Fig. 14 & 15)
Loosen the knob, and adjust its position in accordance
with the size of the circle to be cut. (The hole dimensions
to be cut are indicated on the side of the circular guide as
a general guideline.) After completion of the adjustment,
tighten the knob securely.
Install the end of the knob into the center of the circle to
be cut, and proceed to cut in a clockwise direction.
Vacuum cover (optional accessory) (Fig. 16, 17 &
18)
To perform cleaner operations, use the vacuum cover
and connect the tool to Makita vacuum cleaner or dust
collector.
Loosen the thumb screw and remove the shoe. Attach
the vacuum cover, and fasten it securely with the thumb
screw.
The circular guide (optional accessory) can be installed
on the vacuum cover.
Connect the hose of a vacuum cleaner/dust collector to
the vacuum cover. When connecting to Makita vacuum
cleaner, use an optional hose 28 mm in inner diameter.
When connecting to Makita dust collector, connect the
hose for the dust collector directly to the dust nozzle.


