7
ENGLISH
(Original instructions)
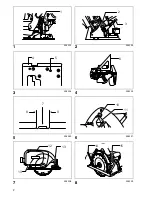
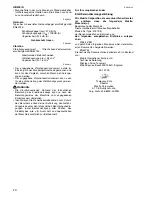
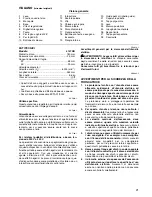
Explanation of general view
1
Lever
2
Bevel scale plate
3
Knob
4
Base
5
Adjusting screw
6
Triangular rule
7
Notch
8
For 45° bevel cuts
9
For straight cuts
10 Lock-off button
11 Switch trigger
12 Dust box
13 Screw
14 Hex wrench
15 Shaft lock
16 Diamond wheel
17 Outer flange
18 Hex socket head bolt
19 Inner flange
20 Rip fence (Guide rule)
21
Dust cap
22
Rubber cap
23
Lever
24
Rear handle
25
Front grip
26
Limit mark
27
Brush holder cap
28
Screwdriver
SPECIFICATIONS
Model
4157KB
Wheel diameter ................................................ 180 mm
Max. wheel thickness ........................................ 2.3 mm
Max. cutting capacities
90° ................................................................... 58 mm
45° ................................................................... 29 mm
Rated speed (n) / No load speed (n
0
)...... 6,200 (min
–1
)
Overall length .................................................. 354 mm
Net weight........................................................... 5.6 kg
Safety class ............................................................
/II
• Due to our continuing program of research and devel-
opment, the specifications herein are subject to change
without notice.
• Specifications may differ from country to country.
• Weight according to EPTA-Procedure 01/2003
ENE024-1
Intended use
The tool is intended for cutting in brick and concrete with-
out the use of water.
ENF002-2
Power supply
The tool should be connected only to a power supply of
the same voltage as indicated on the nameplate, and can
only be operated on single-phase AC supply. They are
double-insulated and can, therefore, also be used from
sockets without earth wire.
ENF100-1
For public low-voltage distribution systems of
between 220 V and 250 V.
Switching operations of electric apparatus cause voltage
fluctuations. The operation of this device under unfavor-
able mains conditions can have adverse effects to the
operation of other equipment. With a mains impedance
equal or less than 0.31 Ohms it can be presumed that
there will be no negative effects. The mains socket used
for this device must be protected with a fuse or protective
circuit breaker having slow tripping characteristics.
GEA010-1
General Power Tool Safety Warnings
WARNING Read all safety warnings and all
instructions.
Failure to follow the warnings and
instructions may result in electric shock, fire and/or
serious injury.
Save all warnings and instructions for future refer-
ence.
GEB069-5
CUTTER SAFETY WARNINGS
1.
The guard provided with the tool must be
securely attached to the power tool and posi-
tioned for maximum safety, so the least amount
of wheel is exposed towards the operator. Posi-
tion yourself and bystanders away from the
plane of the rotating wheel.
The guard helps to
protect operator from broken wheel fragments and
accidental contact with wheel.
2.
Use only diamond cut-off wheels for your power
tool.
Just because the accessory can be attached to
your power tool, it does not assure safe operation.
3.
The rated speed of the accessory must be at
least equal to the maximum speed marked on
the power tool.
Accessories running faster than
their rated speed can break and fly apart.
4.
Wheels must be used only for recommended
applications. For example: do not grind with the
side of cut-off wheel.
Abrasive cut-off wheels are
intended for peripheral grinding, side forces applied
to these wheels may cause them to shatter.
5.
Always use undamaged wheel flanges that are of
correct diameter for your selected wheel.
Proper
wheel flanges support the wheel thus reducing the
possibility of wheel breakage.
6.
The outside diameter and the thickness of your
accessory must be within the capacity rating of
your power tool.
Incorrectly sized accessories can-
not be adequately guarded or controlled.
7.
The arbour size of wheels and flanges must
properly fit the spindle of the power tool.
Wheels
and flanges with arbour holes that do not match the
mounting hardware of the power tool will run out of
balance, vibrate excessively and may cause loss of
control.
8.
Do not use damaged wheels. Before each use,
inspect the wheels for chips and cracks. If power
tool or wheel is dropped, inspect for damage or
install an undamaged wheel. After inspecting
and installing the wheel, position yourself and
bystanders away from the plane of the rotating
wheel and run the power tool at maximum no
load speed for one minute.
Damaged wheels will
normally break apart during this test time.


