background image

6

8.

Hold the tool firmly with both hands.

9.

Keep hands away from rotating parts.

10.

Before using the tool on an actual workpiece, let it 
run for a while. Watch for vibration or wobbling 
that could indicate poor installation or a poorly 
balanced blade.

11.

Make sure the blade is not contacting the 
workpiece before the switch is turned on.

12.

Wait until the blade attains full speed before 
cutting.

13.

Always switch off and wait for the blades to come 
to a complete stop before any adjusting.

14.

Never stick your finger into the chip chute. Chute 
may jam when cutting damp wood. Clean out 
chips with a stick.

15.

Do not leave the tool running. Operate the tool 
only when hand-held.

16.

Always change both blades or covers on the 
drum, otherwise the resulting imbalance will 
cause vibration and shorten tool life.

17.

Use only Makita blades specified in this manual.

18.

Always use the correct dust mask/respirator for 
the material and application you are working with.

SAVE THESE INSTRUCTIONS.

WARNING:

DO NOT let comfort or familiarity with product (gained 
from repeated use) replace strict adherence to safety 
rules for the subject product.
MISUSE or failure to follow the safety rules stated in 
this instruction manual may cause serious personal 
injury.

FUNCTIONAL DESCRIPTION

CAUTION:

• Always be sure that the tool is switched off and 

unplugged before adjusting or checking function on the 
tool.

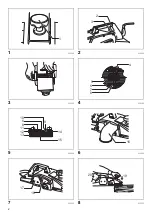
Adjusting depth of cut (Fig. 1)

To adjust the depth of cut, turn the knob on the front of the 
tool. 

Switch action (Fig. 2)

CAUTION:

• Before plugging in the tool, always check to see that 

the switch trigger actuates properly and returns to the 
“OFF” position when released.

To start the tool, simply pull the switch trigger. Release the 
switch trigger to stop.
For continuous operation, pull the switch trigger and then 
push in the lock button, and then release the switch 
trigger.
To stop the tool from the locked position, pull the switch 
trigger fully, then release it.

ASSEMBLY

CAUTION:

• Always be sure that the tool is switched off and 

unplugged before carrying out any work on the tool.

Removing or installing planer blades 
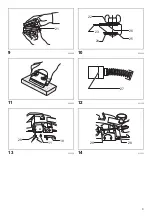
(Fig. 3, Fig. 4 & Fig. 5)

CAUTION:

• Tighten the blade installation bolts carefully when 

attaching the blades to the tool. A loose installation bolt 
can be dangerous. Always check to see they are 
tightened securely.

• Handle the blades very carefully. Use gloves or rags to 

protect your fingers or hands when removing or 
installing the blades.

• Use only the Makita wrench provided to remove or 

install the blades. Failure to do so may result in 
overtightening or insufficient tightening of the 
installation bolts. This could cause an injury.

To remove the blades on the drum, unscrew the four 
installation bolts with the socket wrench. The drum plate 
comes off together with the blades.
To install the blades, first clean out all chips or foreign 
matter adhering to the drum or blades. Use blades of the 
same dimensions and weight, or drum oscillation/vibration 
will result, causing poor planing action and, eventually, 
tool breakdown.
Place the blade on the gauge base so that the blade edge 
is perfectly flush with the inside edge of the gauge plate. 
Place the adjusting plate on the blade, then simply press 
in the heel of the adjusting plate flush with the back side of 
the gauge base and tighten two screws on the adjusting 
plate. Now slip the heel of the adjusting plate into the 
drum groove, then fit the drum cover on it. Tighten the four 
installation bolts evenly and alternately with the socket 
wrench.

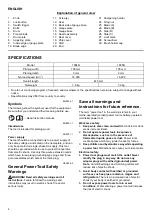
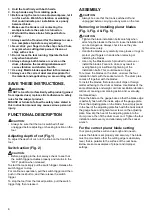
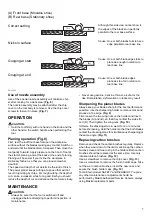
For the correct planer blade setting

Your planing surface will end up rough and uneven, 
unless the blade is set properly and securely. The blade 
must be mounted so that the cutting edge is absolutely 
level, that is, parallel to the surface of the rear base.
Below are some examples of proper and improper 
settings.

Summary of Contents for 1804N

Page 1: ...Power Planer Instruction manual Mesin Serut Listrik Petunjuk penggunaan Máy Bào Cầm Tay Hoạt Động Bằng Động Cơ Điện Tài liệu hướng dẫn เครื องไสไม ไฟฟ า คู มือการใช งาน 1804N 1805N GB VI TH ID ...

Page 2: ...2 1 013229 2 013234 3 013232 4 013185 5 002556 6 013236 7 013233 8 013235 1 2 3 4 5 6 7 8 9 10 6 8 11 12 13 14 15 16 17 18 19 20 ...

Page 3: ...3 9 002588 10 004952 11 004953 12 001145 13 013230 14 013231 21 22 23 24 26 25 27 28 11 18 29 28 ...

Page 4: ...k area clean and well lit Cluttered or dark areas invite accidents 2 Do not operate power tools in explosive atmospheres such as in the presence of flammable liquids gases or dust Power tools create sparks which may ignite the dust or fumes 3 Keep children and bystanders away while operating a power tool Distractions can cause you to lose control Electrical safety 4 Power tool plugs must match the...

Page 5: ...ot use the power tool if the switch does not turn it on and off Any power tool that cannot be controlled with the switch is dangerous and must be repaired 20 Disconnect the plug from the power source and or the battery pack from the power tool before making any adjustments changing accessories or storing power tools Such preventive safety measures reduce the risk of starting the power tool acciden...

Page 6: ... the lock button and then release the switch trigger To stop the tool from the locked position pull the switch trigger fully then release it ASSEMBLY CAUTION Always be sure that the tool is switched off and unplugged before carrying out any work on the tool Removing or installing planer blades Fig 3 Fig 4 Fig 5 CAUTION Tighten the blade installation bolts carefully when attaching the blades to the...

Page 7: ...arp for the best performance possible Use the sharpening holder to remove nicks and produce a fine edge Fig 9 First loosen the two wing nuts on the holder and insert the blades A and B so that they contact the sides C and D Then tighten the wing nuts Fig 10 Immerse the dressing stone in water for 2 or 3 minutes before sharpening Hold the holder so that the both blades contact the dressing stone fo...

Page 8: ... Keselamatan tempat kerja 1 Jaga tempat kerja selalu bersih dan berpenerangan cukup Tempat kerja yang berantakan dan gelap mengundang kecelakaan 2 Jangan gunakan mesin listrik dalam lingkungan yang mudah meledak misalnya jika ada cairan gas atau debu yang mudah menyala Mesin listrik menimbulkan bunga api yang dapat menyalakan debu atau uap tersebut 3 Jauhkan anak anak dan orang lain saat menggunak...

Page 9: ...ika tersedia fasilitas untuk menghisap dan mengumpulkan debu pastikan fasilitas tersebut terhubung listrik dan digunakan dengan baik Penggunaan pembersih debu dapat mengurangi bahaya yang terkait dengan debu Penggunaan dan pemeliharaan mesin listrik 18 Jangan memaksa mesin listrik Gunakan mesin listrik yang tepat untuk keperluan Anda Mesin listrik yang tepat akan menuntaskan pekerjaan dengan lebih...

Page 10: ...RIPSI FUNGSI PERHATIAN Selalu pastikan bahwa mesin dalam keadaan mati dan steker tercabut sebelum menyetel atau memeriksa kerja mesin Menyetel kedalaman pemotongan Gb 1 Untuk menyetel kedalaman pemotongan putar knop di depan mesin Kerja saklar Gb 2 PERHATIAN Sebelum memasukkan steker selalu periksa apakah picu saklar berfungsi dengan baik dan kembali ke posisi OFF saat dilepas Untuk menjalankan me...

Page 11: ...kan macet akibat adanya serpihan serpihan kayu Untuk pemotongan kasar kedalaman pemotongan bisa ditingkatkan sementara untuk hasil yang halus Anda harus mengurangi kedalaman pemotongan serta menggerakkan mesin secara lebih lambat PERAWATAN PERHATIAN Selalu pastikan bahwa mesin dimatikan dan steker dicabut sebelum melakukan pemeriksaan atau perawatan Jangan sekali kali menggunakan bensin tiner alko...

Page 12: ...g sama Hanya gunakan sikat karbon yang sama Gb 12 Gunakan obeng untuk melepas tutup serpihan kayu Gb 13 Gunakan obeng untuk melepas tutup tempat sikat Tarik keluar sikat karbon yang aus masukkan yang baru dan pasang tutup tempat sikat Gb 14 Untuk menjaga KEAMANAN dan KEANDALAN mesin perbaikan perawatan atau penyetelan lain harus dilakukan oleh Pusat Layanan Resmi Makita dan selalu gunakan suku cad...

Page 13: ... máy không dây được vận hành bằng pin của bạn An toàn tại nơi làm việc 1 Giữ nơi làm việc sạch sẽ và có đủ ánh sáng Nơi làm việc bừa bộn hoặc tối thường dễ gây ra tai nạn 2 Không vận hành dụng cụ máy trong môi trường cháy nổ ví dụ như môi trường có sự hiện diện của các chất lỏng khí hoặc bụi dễ cháy Các dụng cụ máy tạo tia lửa điện có thể làm bụi hoặc khí bốc cháy 3 Giữ trẻ em và người ngoài tránh...

Page 14: ... chúng được kết nối và sử dụng hợp lý Việc sử dụng thiết bị thu gom bụi có thể làm giảm những mối nguy hiểm liên quan đến bụi Sử dụng và bảo quản dụng cụ máy 18 Không dùng lực đối với dụng cụ máy Sử dụng đúng dụng cụ máy cho công việc của bạn Sử dụng đúng dụng cụ máy sẽ giúp thực hiện công việc tốt hơn và an toàn hơn theo giá trị định mức được thiết kế của dụng cụ máy đó 19 Không sử dụng dụng cụ m...

Page 15: ...u chỉnh chiều sâu cắt hãy xoay núm ở mặt trước dụng cụ Hoạt động công tắc Hình 2 CẨN TRỌNG Trước khi cắm điện vào dụng cụ luôn luôn kiểm tra xem cần khởi động công tắc có hoạt động bình thường hay không và trả về vị trí OFF TẮT khi nhả ra Để khởi động dụng cụ chỉ cần kéo cần khởi động công tắc Nhả cần khởi động công tắc ra để dừng Để vận hành liên tục hãy kéo cần khởi động công tắc sau đó nhấn nút...

Page 16: ...ược sắc bén để có thể hoạt động tốt nhất Sử dụng giá mài để loại bỏ các vết khía và làm mép lưỡi sắc bén Hình 9 Đầu tiên vặn lỏng hai ốc tai vặn ở trên giá mài và lắp các lưỡi A và B vào sao cho chúng tiếp xúc với các mặt C và D Sau đó vặn chặt các ốc tai vặn Hình 10 Nhúng viên đá mài vào nước trong vòng 2 hoặc 3 phút trước khi mài Giữ chặt giá mài sao cho cả hai lưỡi đều tiếp xúc với viên đá mài ...

Page 17: ...และคําแนะนําทั งหมด การไม ปฏิบัติตามคําเตือนและคําแนะนําดังกล าวอาจส งผลให เกิด ไฟฟ าช อต ไฟไหม และ หรือได รับบาดเจ บอย างร ายแรง เก บรักษาคําเตือนและคําแนะนําทั งหมดไว เป นข อมูลอ างอิงในอนาคต คําว า เครื องมือไฟฟ า ในคําเตือนนี หมายถึง เครื องมือไฟฟ า มี สาย ที ทํางานโดยใช กระแสไฟฟ า หรือเครื องมือไฟฟ า ไร สาย ที ทํางานโดยใช แบตเตอรี ความปลอดภัยของพื นที ทํางาน 1 ดูแลพื นที ทํางานให มีความสะอาดแ...

Page 18: ...ณสวิตช เพื อถือเครื องมือไฟฟ า หรือการชาร จไฟเครื องมือ ไฟฟ าในขณะที เป ดสวิตช อยู อาจนําไปสู การเกิดอุบัติเหตุ 14 นํากุญแจปรับแต งหรือประแจออกก อนที จะเป ดเครื องมือไฟฟ า ประแจหรือกุญแจที เสียบค างอยู ในชิ นส วนที หมุนได ของเครื อง มือไฟฟ าอาจทําให คุณได รับบาดเจ บ 15 อย าทํางานในระยะที สุดเอื อม จัดท าการยืนและการทรงตัวให เหมาะสมตลอดเวลา เพราะจะทําให ควบคุมเครื องมือไฟฟ าได ดี ขึ นในสถานการณ ที ...

Page 19: ...งานถึงความเร วเต มที ก อนที จะเริ มตัด 13 ป ดสวิตช และรอจนกว าใบมีดจะหยุดนิ งสนิทก อนทําการปรับ แต งใดๆ ทุกครั ง 14 ห ามแหย นิ วเข าไปในรางส งเศษไม เด ดขาด รางส งอาจติดขัด เมื อตัดไม ที เป ยกชื น ให ใช แท งไม ทําความสะอาดเศษไม ออก 15 อย าปล อยให เครื องมือทํางานค างไว ใช งานเครื องมือในขณะที ถืออยู เท านั น 16 เปลี ยนใบมีดทั งสองใบหรือฝาครอบทุ นอยู เสมอ ไม เช นนั นการ เสียสมดุลย ที เกิดขึ นจะส งผล...

Page 20: ... จากนั นให เลื อนส นของแผ นปรับระดับเข าไปในร องทุ น จากนั น ให ใส ฝาครอบทุ นลงไป ขันสลักเกลียวใส ใบมีดสี ตัวโดยสลับขันให เท าๆ กันด วยประแจเปลี ยนหัว สําหรับการตั งใบมีดกบที ถูกต อง ผิวหน าที คุณไสจะออกมาหยาบและไม เสมอกัน จนกว าใบมีดจะถูก ติดอย างถูกต องและแน นหนา ใบมีดต องถูกยึดเพื อให คมมีดมีระนาบ เท ากันโดยสมบูรณ ซึ งเป นการขนานไปกับผิวหน าของฐานด านท าย ต อไปนี คือตัวอย างของการติดตั งที ถูกต...

Page 21: ...ด การลับคมใบมีดกบ ลับใบมีดของคุณให คมอยู เสมอเพื อประสิทธิภาพการทํางานที ดีที สุด เท าที จะเป นไปได ใช ตัวจับสําหรับลับใบมีดเพื อลบรอยบิ นและลับคม ภาพที 9 ขั นแรก ให คลายแป นเกลียวป กสองตัวบนตัวยึดและใส ใบมีด A และ B เพื อให ใบมีดสัมผัสกับข าง C และ D จากนั นขันแป น เกลียวป กให แน น ภาพที 10 แช หินลับมีดไว ในน ํา 2 หรือ 3 นาทีก อนที จะทําการลับ จับตัวจับ สําหรับลับใบมีดเพื อให ใบมีดทั งสองสัมผัสกั...

Page 22: ...22 ...

Page 23: ...23 ...

Page 24: ...883003C374 TRD Makita Corporation 3 11 8 Sumiyoshi cho Anjo Aichi 446 8502 Japan www makita com ...

Reviews: