background image

5

ENGLISH (Original instructions)

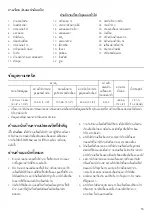
Explanation of general view

SPECIFICATIONS

• Due to our continuing program of research and development, the specifications herein are subject to change without 

notice.

• Specifications may differ from country to country.

IMPORTANT SAFETY 

INSTRUCTIONS

 WARNING:

 When using electric tools, basic safety 

precautions should always be followed to reduce the risk 
of fire, electric shock, and personal injury, including the 
following: 

READ ALL INSTRUCTIONS. 

1. KEEP WORK AREA CLEAN. Cluttered areas and 

benches invite injuries. 

2. CONSIDER WORK AREA ENVIRONMENT. Do not 

use power tools in damp or wet locations. Keep work 
area well lit. Do not expose power tools to rain. Do not 
use tool in presence of flammable liquids or gases. 

3. KEEP CHILDREN AWAY. All visitors must be kept 

away from work area. Do not let visitors contact tool or 
extension cord. 

4. STORE IDLE TOOLS. When not in use, tools must be 

stored in dry, and high or locked-up place – out of 
reach of children. 

5. DO NOT FORCE TOOL. It will do the job better and 

safer at the rate for which it was intended. 

6. USE RIGHT TOOL. Do not force small tool or 

attachment to do the job of a heavy-duty tool. Do not 
use tool for purpose not intended. 

7. DRESS PROPERLY. Do not wear loose clothing or 

jewelry. They may be caught in moving parts. Rubber 
gloves and non-skid footwear are recommended when 
working outdoors. Wear protective hair covering to 
contain long hair. 

8. USE SAFETY GLASSES. Also use face or dust mask 

if cutting operation is dusty. 

9. DO NOT ABUSE CORD. Never carry tool by cord or 

yank it to disconnect from receptacle. Keep the cord 
away from heat, oil, and sharp edges. 

10. SECURE WORK. Use clamps or a vise to hold work. 

It’s safer than using your hand and it frees both hands 
to operate tool. 

11. DO NOT OVERREACH. Keep proper footing and 

balance at all times. 

12. MAINTAIN TOOLS WITH CARE. Keep tools sharp 

and clean for better and safer performance. Follow 
instructions for lubrication and changing accessories. 
Inspect tool cords periodically and if damaged, have it 
repaired by authorized service facility. Inspect 
extension cords periodically and replace it if damaged. 
Keep handles dry, clean, and free from oil and grease. 

13. DISCONNECT TOOLS. When not in use, before 

servicing, and when changing accessories, such as 
blades, bits, cutters. 

14. REMOVE ADJUSTING KEYS AND WRENCHES. 

Form habit of checking to see that keys and adjusting 
wrenches are removed from tool before turning it on. 

15. AVOID UNINTENTIONAL STARTING. Do not carry 

plugged-in tool with finger on switch. Be sure switch is 
OFF when plugging in. 

16. OUTDOOR USE EXTENSION CORDS. When tool is 

used outdoors, use only extension cords intended for 
use outdoors and so marked. 

17. STAY ALERT. Watch what you are doing, use 

common sense. Do not operate tool when you are 
tired. 

18. CHECK DAMAGED PARTS. Before further use of the 

tool, a guard or other part that is damaged should be 
carefully checked to determine if it operates properly 
and performs its intended function. Check for 
alignment of moving parts, binding of moving parts, 
breakage of parts, mounting, and any other conditions 

1.

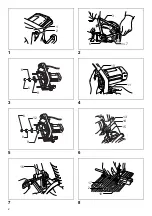
Cutter cover

2.

Wing bolt 

3.

Wrench 21 

4.

Loosen

5.

Tighten

6.

Hex nut

7.

Wrench 19

8.

Outer flange

9.

Cutter blade

10. Safety guide
11. Stopper

12. Flange 35 
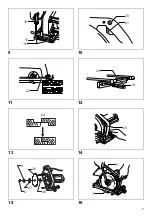
13. Depth adjusting wing bolt
14. Depth indicator
15. Indication plate
16. Screw
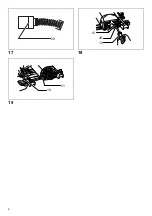
17. Scale plate
18. Guide rule
19. Screwdriver
20. Lock button
21. Trigger switch
22. Base

23. Shiplapping rule
24. Shiplapping 
25. Safety cover
26. Saw blade
27. Outer flange 56
28. Inner flange 56
29. Limit mark
30. Rear cover
31. Brush holder cap

Capacities

No load 

speed

(RPM)

Overall 

length

Net weight

Max. cutter

blade size

Max. cutting depth 

of cutter blade

Saw blade 

diameter

Max. cutting depth 

of saw blade

120 mm x 36 mm

(4-3/4” x 1-3/8”)

30 mm (1-1/8”)

190 mm

(7-1/2”)

65 mm (2-1/2”)

6,500

365 mm

(14-3/8”)

7.2 kg

(15.8 Ibs)

Summary of Contents for 3501N

Page 1: ...GB Groove Cutter Instruction manual ID Mesin Pembuat Alur Petunjuk penggunaan VI Maùy Caét Raõnh Taøi lieäu höôùng daãn TH 3501N ...

Page 2: ...2 1 2 3 4 5 6 7 8 1 2 3 6 7 4 5 8 6 9 10 11 6 12 8 9 13 14 15 16 17 2 18 ...

Page 3: ...3 9 10 11 12 13 14 15 16 19 17 16 20 21 22 23 18 24 25 8 26 6 27 28 3 4 5 7 ...

Page 4: ...4 17 18 19 29 16 30 19 31 19 ...

Page 5: ...at all times 12 MAINTAIN TOOLS WITH CARE Keep tools sharp and clean for better and safer performance Follow instructions for lubrication and changing accessories Inspect tool cords periodically and if damaged have it repaired by authorized service facility Inspect extension cords periodically and replace it if damaged Keep handles dry clean and free from oil and grease 13 DISCONNECT TOOLS When not...

Page 6: ... Always use a wooden stick etc to remove them SAVE THESE INSTRUCTIONS Removing or installing cutter blade WARNING Always be sure that the tool is switched off and unplugged before removing or installing To remove the cutter blade loosen the wing bolt and take off the cutter cover Fig 1 Hold the outer flange with wrench 21 and loosen the hex nut with wrench 19 Remove the hex nut outer flange and cu...

Page 7: ... as a circular saw always keep the safety cover in place and in working order Never wedge or tie the safety cover Fig 14 Remove the depth adjusting wing bolt and move the base down Mount the inner flange 56 saw blade outer flange 56 outer flange and hex nut onto the spindle in the order making sure that the saw blade is installed with teeth pointing up at the front of the tool Fig 15 Reinstall the...

Page 8: ...AN Pakai juga masker wajah atau masker debu jika pekerjaan pemotongan menimbulkan debu 9 JANGAN MENANGANI KABEL DENGAN KASAR Jangan sekali kali membawa mesin dengan menenteng kabelnya atau merenggut kabel untuk mencabutnya dari stopkontak Jauhkan kabel dari panas minyak dan tepian tajam 10 AMANKAN BENDA KERJA Gunakan klem atau ragum untuk menahan benda kerja Cara tersebut lebih aman daripada mengg...

Page 9: ...n KAIDAH KESELAMATAN TAMBAHAN 1 Periksa dan cabut paku atau benda asing dari benda kerja sebelum mengoperasikan mesin 2 Periksa bilah pemotong dengan teliti dari retakan atau kerusakan sebelum digunakan Segera ganti bilah pemotong yang retak atau rusak 3 Kencangkan benda kerja kuat kuat 4 Jangan mengenakan sarung tangan saat mengoperasikan mesin ini 5 Pegang mesin kuat kuat dengan kedua tangan 6 J...

Page 10: ...n kembali ke posisi OFF dimatikan saat dilepaskan Pengoperasian Letakkan ujung depan alas pada permukaan benda kerja dengan penggaris pemandu menyentuh rata sisi benda kerja dan tanpa membuat bilah pemotong menyentuh benda kerja Hidupkan mesin dan tunggu hingga bilah pemotong mencapai kecepatan penuh Kemudian majukan mesin dengan perlahan Gb 11 CATATAN Jika mesin miring pada awal atau akhir pemoto...

Page 11: ... AKSESORI TAMBAHAN PERHATIAN Aksesori atau alat tambahan ini dianjurkan untuk digunakan dengan mesin Makita Anda yang disebutkan dalam buku petunjuk ini Penggunaan aksesori atau alat tambahan lain dapat menimbulkan risiko cedera pada orang Aksesori atau alat tambahan harus digunakan hanya dengan cara yang benar dan sesuai peruntukannya Bilah pemotong Roda gergaji kombinasi Dia roda 190 mm 7 1 2 Ro...

Page 12: ...caét sinh ra nhieàu buïi 9 KHOÂNG ÑÖÔÏC LAÏM DUÏNG DAÂY ÑIEÄN Khoâng ñöôïc caàm duïng cuï baèng daây ñieän hoaëc giaät maïnh daây ra khoûi oå ñieän Ñeå daây traùnh xa choã noùng daàu vaø caùc caïnh saéc 10 COÁ ÑÒNH PHOÂI GIA COÂNG Söû duïng keïp hoaëc baøn keïp ñeå giöõ phoâi gia coâng Vieäc naøy seõ an toaøn hôn laø söû duïng tay vaø raûnh hai tay ñeå vaän haønh duïng cuï 11 KHOÂNG VÔÙI QUAÙ CAO ...

Page 13: ... ñai vaø löôõi caét Ñoàng thôøi ñeå daây traùnh xa chuùng 7 Khoâng ñöôïc duøng löïc ñoái vôùi duïng cuï hoaëc caét quaù nhanh ñoái vôùi tình traïng hieän taïi 8 Nhaû coâng taéc ngay laäp töùc neáu löôõi caét bò keït hoaëc duïng cuï ngöøng chaïy 9 Khoâng ñöôïc nhaác duïng cuï khoûi veát caét khi löôõi caét ñang quay 10 Löôõi caét seõ quay theo quaùn tính sau khi taét duïng cuï Luoân ñôïi ñeán khi l...

Page 14: ...an toaøn CAÛNH BAÙO Khi duøng duïng cuï naøy laøm cöa ñóa luoân giöõ voû an toaøn ôû ñuùng vò trí vaø trong tình traïng toát Khoâng ñöôïc cheøn hoaëc buoäc voû an toaøn Hình 14 Thaùo bu loâng coù tai ñieàu chænh ñoä saâu vaø di chuyeån ñeá xuoáng Laép vaønh trong 56 löôõi cöa vaønh ngoaøi 56 vaønh ngoaøi vaø ñai oác luïc giaùc vaøo truïc theo thöù töï ñaûm baûo raèng löôõi cöa ñöôïc laép vôùi raên...

Page 15: ...2 1 1 5 5 3 0 3 2 6 6 1 5 5 7 5 2 6 5 1 8 5 9 2 2 1 5 1 2 3 21 4 5 6 1 7 19 8 9 10 5 5 0 11 12 35 13 3 14 2 3 15 16 17 18 19 20 1 21 22 23 5 24 25 0 26 27 56 28 56 29 5 30 31 1 6 5 A 3 3 120 x 36 4 3 4 x 1 3 8 30 1 1 8 190 7 1 2 65 2 1 2 6 500 365 14 3 8 7 2 15 8 ...

Page 16: ... 5 5 D 13 2 4 6 E 1 F 14 2 5 5 5 15 OFF 6 16 5 5 17 5 5 C 5 3 5 6 6 5 18 5 6 5 6 6 5 5 0 F 5 6 5 2 B B C 5 C 2 19 1 2 5 1 20 2 6 2 1 21 8 B3 B B 5 8 G G 5 1 23 5 5 5 5 1 2 2 2 5 5 3 3 4 2 5 5 2 6 7 1 8 9 2 6 5 10 6 11 5 5 12 4 2 6 5 4 2 5 2 2 2 1 ...

Page 17: ...3 5 1 0 0 2 1 1 0 1 H 4 7 5 5 16 35 5 5 2 3 3 2 3 3 2 3 3 3 1 8 4 6 3 3 0 3 3 3 3 0 2 3 3 2 5 0 7 3 3 1 8 0 8 3 3 3 0 3 9 3 5 2 3 1 2 5 1 3 10 2 5 2 5 OFF 1 F 11 2 B 3 3 5 B3 A 5 12 13 5 2 2 1 A 2 0 2 1 1 0 1 0 1 H 1 0 ...

Page 18: ...56 1 5 2 E 15 3 3 1 16 2 4 2 5 B I 0 5 B 2 2 5 3 3 23 5 4 2 2 2 2 Makita 17 2 18 2 5 2 3 2 3 19 0 6J 0 B B 4 F 5 2 5 Makita C Makita 5 6 Makita 6 6 5 1 6 6 190 7 1 2 190 7 1 2 19 21 35 5 2 4 3 32 7 5 5 16 56 56 5 5 6 6 ...

Page 19: ...19 ...

Page 20: ...ALA Makita Corporation Anjo Aichi Japan 883008 374 www makita com ...

Reviews: