7
ASSEMBLY
CAUTION:
•
Always be sure that the tool is switched off and
unplugged before carrying out any work on the
tool.
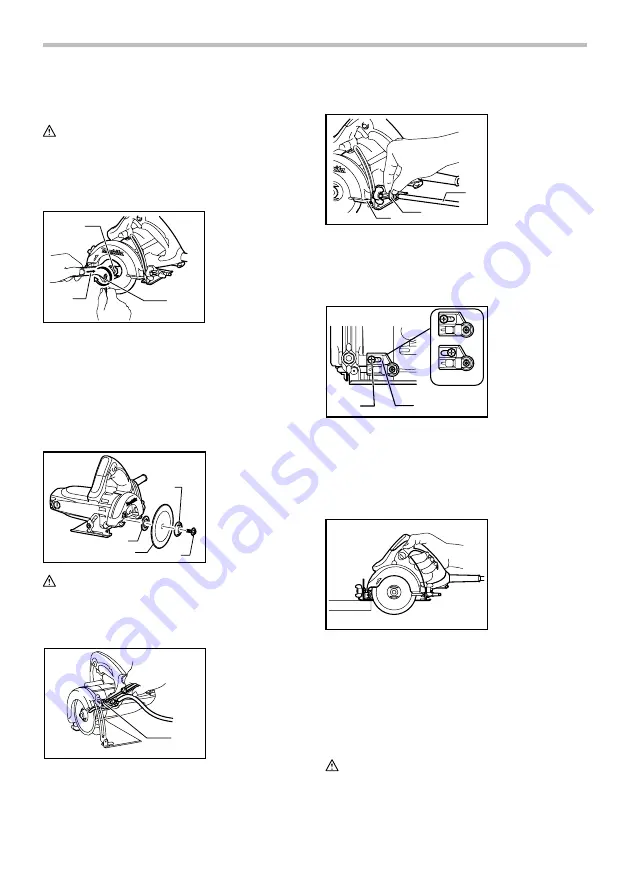
Installing or removing diamond wheel
1
2
3
009562
Hold the outer flange with the wrench and loosen the
hex bolt clockwise with the hex wrench. Then remove
the hex bolt, outer flange and diamond wheel.
To install the wheel, follow the removal procedure in
reverse. Always install the wheel so that the arrow on
the wheel points in the same direction as the arrow on
the blade case.
BE SURE TO TIGHTEN THE HEX BOLT SECURELY.
1
2
3
4
009564
CAUTION:
•
Use only the Makita wrench and hex wrench to
install or remove the wheel.
Installing water pipe (optional accessory)
1
009693
First, unplug the tool. Loosen the clamping nut on the
depth guide and move the base down. Install the water
pipe on the blade case using the screw.
Water flow
1
2
3
009557
Attach the vinyl tube onto the water pipe.
Adjust the amount of water flow by simply adjusting the
water cock..
Positioning of water pipe.
1
2
009694
There are two places for installing water pipe on the tool.
Install the water pipe in a proper position so that used
diamond wheel and bevel cutting operation cannot be
obstructed or interrupted.
OPERATION
009560
Adjust the amount of water flow. Hold the tool firmly. Set
the base plate on the workpiece to be cut without the
wheel making any contact. Then turn the tool on and
wait until the wheel attains full speed. Now simply move
the tool forward over the workpiece surface, keeping it
flat and advancing smoothly until the cutting is
completed. Keep your cutting line straight and your
speed of advance uniform.
CAUTION:
•
This tool should only be used on horizontal
surfaces.
1. Screw
2. Pipe holder
1. Water pipe
2. Water cock
3. Vinyl tube
1. Screw
1. Inner flange
2. Diamond wheel
3. Outer flange
4. Hex bolt
1. Outer flange
2. Wrench
3. Hex wrench
Summary of Contents for 4100NH2X
Page 9: ...9 ...
Page 10: ...10 ...
Page 11: ...11 ...
Page 12: ...12 Makita Corporation www makita com 885142 908 ...


