background image

7

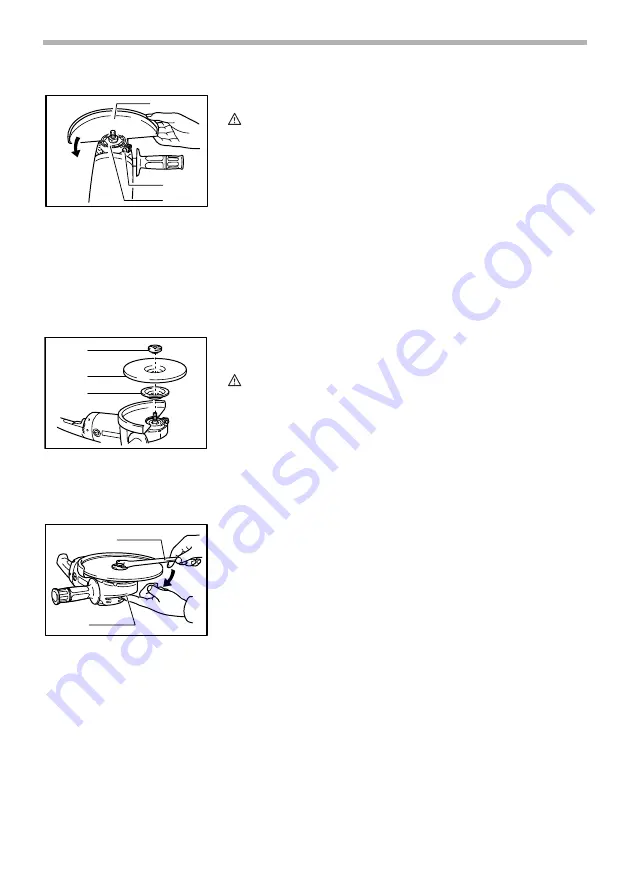
Installing or removing wheel guard

CAUTION:

When using a depressed center grinding wheel/Multi-
disc, flex wheel or wire wheel brush, the wheel guard
must be fitted on the tool so that the closed side of the
guard always points toward the operator.

Mount the wheel guard with the protrusion on the wheel
guard band aligned with the notch on the bearing box. Then
rotate the wheel guard around 180 degrees. Be sure to
tighten the screw securely.

To remove wheel guard, follow the installation procedure in
reverse.

Installing or removing depressed center grinding 
wheel/Multi-disc

WARNING:

Always use supplied guard when depressed center
grinding wheel/Multi-disc is on tool. Wheel can shatter
during use and guard helps to reduce chances of
personal injury.

Mount the inner flange onto the spindle. Fit the wheel/disc on
the inner flange and screw the lock nut onto the spindle.

To tighten the lock nut, press the shaft lock firmly so that the
spindle cannot revolve, then use the lock nut wrench and
securely tighten clockwise.

To remove the wheel, follow the installation procedure in
reverse.

1. Wheel guard
2. Bearing box
3. Screw

1

3

2

001064

1. Lock nut
2. Depressed center grinding wheel/

Multi-disc

3. Inner flange

1

2

3

001076

1. Lock nut wrench
2. Shaft lock

1

2

001089

Summary of Contents for 9067L

Page 1: ... N U A L WARNING For your personal safety READ and UNDERSTAND before using SAVE THESE INSTRUCTIONS FOR FUTURE REFERENCE w w w m a k i t a t o o l s c o m Angle Grinder 180 mm 7 MODEL 9067L 230 mm 9 MODEL 9069 DOUBLE INSULATION ...

Page 2: ...tools create sparks which may ignite the dust or fumes 3 Keep bystanders children and visitors away while operating a power tool Distrac tions can cause you to lose control Electrical Safety 4 Double insulated tools are equipped with a polarized plug one blade is wider than the other This plug will fit in a polarized outlet only one way If the plug does not fit fully in the outlet reverse the plug...

Page 3: ...er control of the tool in unexpected situations 14 Use safety equipment Always wear eye protection Dust mask non skid safety shoes hard hat or hearing protection must be used for appropriate conditions Ordinary eye or sun glasses are NOT eye protection Tool Use and Care 15 Use clamps or other practical way to secure and support the workpiece to a stable platform Holding the work by hand or against...

Page 4: ...ding wheel A guard protects operator from bro ken wheel fragments 2 Accessories must be rated for at least the speed recommended on the tool warning label Wheels and other accessories running over rated speed can fly apart and cause injury 3 Hold tool by insulated gripping surfaces when performing an operation where the cutting tool may contact hidden wiring or its own cord Contact with a live wir...

Page 5: ...l 15 Use the specified surface of the wheel to perform the grinding 16 Watch out for flying sparks Hold the tool so that sparks fly away from you and other persons or flammable materials 17 Do not leave the tool running Operate the tool only when hand held 18 Do not touch the workpiece immediately after operation it may be extremely hot and could burn your skin 19 ALWAYS wear proper apparel includ...

Page 6: ...rator comfort during extended use Apply caution when locking tool in ON position and maintain firm grasp on tool To start the tool simply pull the switch trigger Release the switch trigger to stop For continuous operation pull the switch trigger and then push in the lock lever To stop the tool from the locked position pull the switch trigger fully then release it ASSEMBLY CAUTION Always be sure th...

Page 7: ...ing depressed center grinding wheel Multi disc WARNING Always use supplied guard when depressed center grinding wheel Multi disc is on tool Wheel can shatter during use and guard helps to reduce chances of personal injury Mount the inner flange onto the spindle Fit the wheel disc on the inner flange and screw the lock nut onto the spindle To tighten the lock nut press the shaft lock firmly so that...

Page 8: ...y so that the spindle cannot revolve then use the lock nut wrench and securely tighten clockwise To remove the disc follow the installation procedure in reverse OPERATION WARNING It should never be necessary to force the tool The weight of the tool applies adequate pressure Forcing and excessive pressure could cause dangerous wheel breakage ALWAYS replace wheel if tool is dropped while grinding NE...

Page 9: ...th A and B direction Operation with wire cup brush optional accessory CAUTION Check operation of brush by running tool with no load insuring that no one is in front of or in line with brush Do not use brush that is damaged or which is out of balance Use of damaged brush could increase potential for injury from contact with broken brush wires Unplug tool and place it upside down allowing easy acces...

Page 10: ...d guard helps to reduce chances of personal injury Unplug tool and place it upside down allowing easy access to spindle Remove any accessories on spindle Thread wire wheel brush onto spindle and tighten with the wrenches When using wire wheel brush avoid applying too much pres sure which causes over bending of wires leading to prema ture breakage MAINTENANCE CAUTION Always be sure that the tool is...

Page 11: ...SORIES CAUTION These accessories or attachments are recommended for use with your Makita tool specified in this manual The use of any other accessories or attachments might present a risk of injury to persons Only use accessory or attachment for its stated purpose Your tool is supplied with a guard for use with a depressed center grinding wheel multi disc flex wheel and wire wheel brush If you dec...

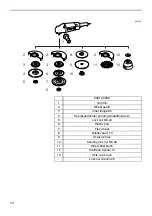
Page 12: ...sed center grinding wheel Multi disc 5 Lock nut 5 8 40 6 Plastic pad 7 Flex wheel 8 Rubber pad 170 9 Abrasive disc 10 Sanding lock nut 5 8 48 11 Wire wheel brush 12 Urethane washer 14 13 Wire cup brush Lock nut wrench 28 2 3 5 2 3 6 7 5 8 9 10 2 11 12 4 13 1 001184 ...

Page 13: ...13 First Class Postage Required Post Office will not deliver without proper postage Makita U S A Inc 14930 Northam Street La Mirada CA 90638 5753 Fold Cut ...

Page 14: ...ability Power Other Design Features Size Price Makita Brand 5 Any comments MAIL THIS PORTION Your answers to the following questions are appreciated BE SURE TO COMPLETE THE CUSTOMER S PORTION OF THIS FORM AND RETAIN FOR YOUR RECORDS DATE PURCHASED MODEL NO SERIAL NO INTL LAST NAME COMPANY NAME STREET ADRESS CITY STATE AGE ZIP CODE PHONE AREA CODE STATUS Married SEX M F Single MONTH DAY YEAR Under ...

Page 15: ...9754 MINNESOTA 6427 Penn Ave South Richfield MN 55423 612 869 5199 MISSOURI 9876 Watson Road St Louis MO 63126 2221 314 909 9889 NEBRASKA 4129 S 84th St Omaha NE 68127 402 597 2925 NEVADA 3375 S Decatur Blvd Suites 22 24 Las Vegas NV 89102 702 368 4277 NEW JERSEY 251 Herrod Blvd Dayton NJ 08810 1539 609 655 1212 NEW YORK 4917 Genessee Street Cheektowaga NY 14225 716 685 9503 131 35 31st Ave Flushi...

Page 16: ...one of Makita s Factory or Authorized Service Centers If inspection shows the trouble is caused by defective workmanship or material Makita will repair or at our option replace without charge This Warranty does not apply where repairs have been made or attempted by others repairs are required because of normal wear and tear the tool has been abused misused or improperly maintained alterations have...

Reviews: