background image

P 2 / 10

[2] LUBRICATION

[3] DISASSEMBLY/ASSEMBLY
[3] -1. Armature, Spiral Bevel Gear 11

Apply Makita grease SG No.00 to the portions designated with the black triangle, and apply Molybdenum
disulfide lubricant to the portions designated with gray triangle to protect parts and product from unusual abrasion.

[1] NECESSARY REPAIRING TOOLS

CAUTION: Unplug the machine and remove the wheel, the wheel cover, the inner flange and 
                     the outer flange from the machine for safety before repair/ maintenance in 
                     accordance with the instruction manual! 

Fig. 1

Fig. 2

Fig. 3

R

epair

DISASSEMBLY

Description

Code No.

Use for

Item No.

Description

Portion to lubricate

1R217

Ring 22

Holding Bearing box when removing Spiral bevel gear 38

Holding Gear housing complete when removing Pin for shaft lock 

1R268

1R269

1R291

Spring pin extractor M3

Removing Pin for shaft lock  

Removing Ball bearing 627DDW from Armature shaft

Removing / Assembling Retaining ring S-12 from / to Armature shaft

Removing / Assembling Bearing retainer

Bearing extractor

Retaining ring S and R pliers

1R340

Bearing retainer wrench

1R350

Ring 60

8

3

6

3

6

8

Gear housing complete

Spiral bevel gear 11

Lock spring 12

Gear room: Apply approx. 15g.

Inside

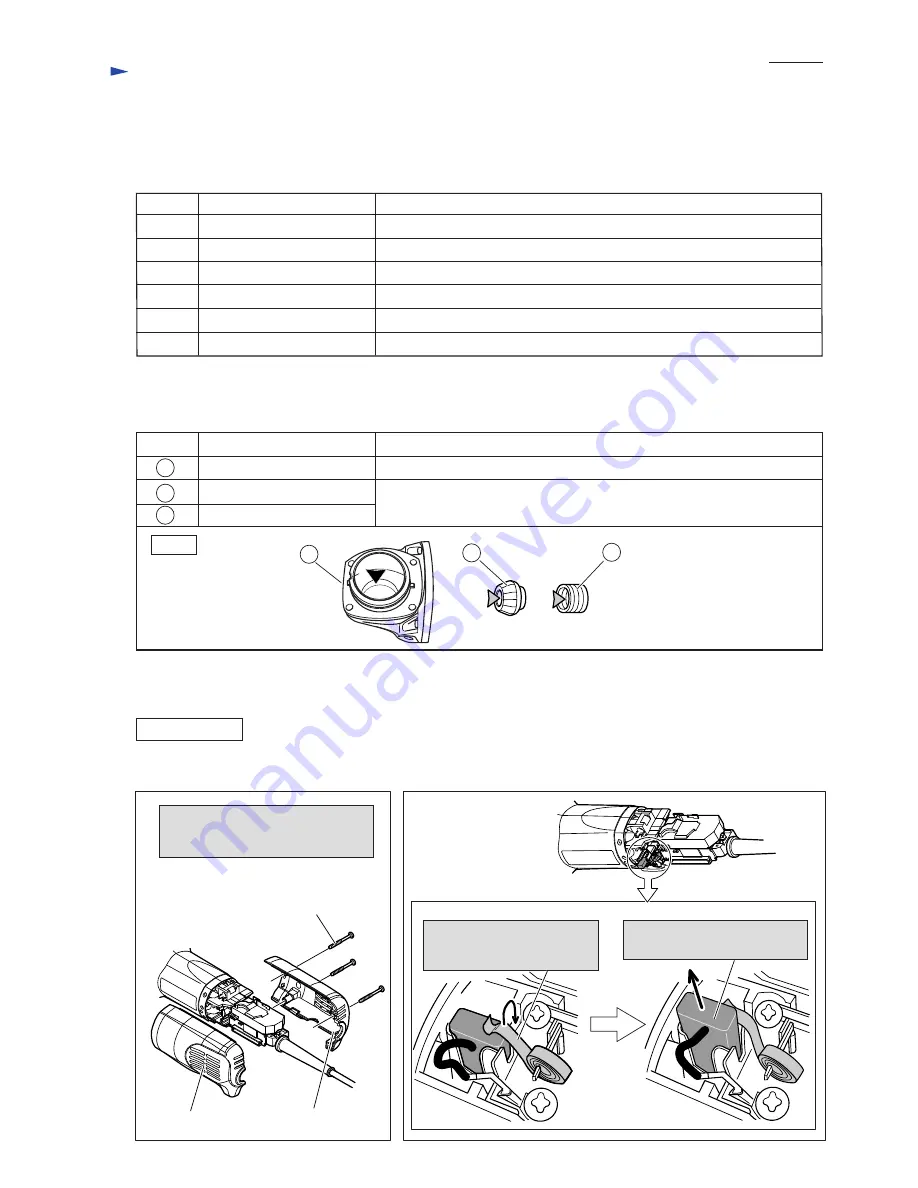
Shift the tail of Spiral spring
from the top of Carbon brush to
the side notch of Brush holder.

Disconnect the Carbon brush from
Armature's commutator by pulling.

Rear cover (L)

Rear cover (R)

4x40 Tapping screw: 3 pcs.

Disassemble Rear cover (L and R) 
from Motor housing by unscrewing
4x40 Tapping screws.

(1) Disconnect Carbon brush from Armature's commutator as illustrated in Figs. 2 and 3

Summary of Contents for 9564PC

Page 1: ...tput Max Output W 120 110 13 1 400 840 1 800 50 60 6 7 1 400 840 2 100 50 60 6 4 1 400 840 2 100 50 60 6 1 1 400 840 2 100 50 60 13 840 2 000 50 60 220 230 240 Current A Optional accessories Anti vibr...

Page 2: ...piral bevel gear 38 Holding Gear housing complete when removing Pin for shaft lock 1R268 1R269 1R291 Spring pin extractor M3 Removing Pin for shaft lock Removing Ball bearing 627DDW from Armature shaf...

Page 3: ...using cover from Motor housing Armature comes with Gear housing cover Motor housing Remove Spiral bevel gear 11 with 1R269 Remove Armature with arbor press Remove Retaining ring S 12 with 1R291 Hex nu...

Page 4: ...le Ball bearing 627DDW with Arbor press And cover Ball bearing 627DDW with Labyrinth rubber ring 22 2 If Wave washer 6 is assembled as illustrated in Fig 11 Magnet sleeve can not be stabilized on Arma...

Page 5: ...8 and Ball bearing 6201DDW are disassembled as illustrated in Figs 13 to 17 A Spiral bevel gear 38 Bearing retainer Bearing retainer Ball bearing 6201DDW Ball bearing 6201DDW Ball bearing 6201DDW Bear...

Page 6: ...anism Applying 1R268 to Pin through the small hole on Pin cap strike 1R268 with Plastic hammer Now Pin comes out from Gear housing complete Release 1R268 from Pin cap carefully so that Pin cap is not...

Page 7: ...r Controller Cord clamp Noise suppressor Power supply cord Connecting with Receptacle Tab A Lead wire A Brown for some countries instead of Black Lead wire B Blue for some countries instead of White L...

Page 8: ...ler Receptacle Tab Pre set dial b Field lead wire red c Field lead wire black a Controller s lead wire red a Fix Controller s lead wire red with Lead wire holders A and B b Fix Field lead wire red wit...

Page 9: ...e black Pass Field lead wire black on Rib A And connect to Brush holder Field lead wire red Pass Field lead wire red between Controller and Rib B Lead wire holder D Fix Field lead wires black and red...

Page 10: ...h Fix the following lead wires with the notch of Switch as illustrated above Controller s lead wire blue or white Controller s lead wire black Noise suppressor s lead wire white Fix Controller s lead...

Reviews: