1
Daily maintenance
The following maintenance work must be carried out each time
after the brushcutter has been used.
Cleaning the air filter
If the workplace is very dusty or sandy, the
filter must be cleaned at regular intervals, due
to the fact that only a clean air filter will gua-
rantee full engine performance. Coarse parti-
cles of dirt can destroy the engine!
Renew damaged air filters immediately!
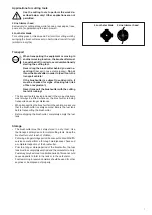
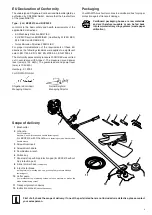
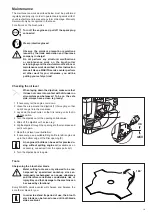
To clean the air filter, lay down the brushcutter so that it is resting
on its foot in stable position.
The tool you will require is the Phillips screwdriver.
1 Unscrew the screw (
1
).
2 Grab the air filter cover (
2
) at the bottom and pull it off.
3 Push the choke lever (
3
) all the way up to the limit stop.
Particles of dust can no longer drop into the carburetor
now.
4 Remove both air filters (
4
,
5
) and wash them off in lukewarm
alkaline soap solution with commercial-grade dish-washing
detergent.
5 Let the air filters dry completely.
6 Reinsert both air filters (first the white one (
5
) with the clip
facing downward on the left-hand side).
7 Place the air filter cover on the upper clips (
6
) first, and
then press the lower part of the cover in the direction of
the engine (you must be able to hear the cover snap into
place).
8 Retighten the screw firmly.
Weekly maintenance
The following maintenance work must be carried out once a
week during regular use.
Checking/replacing the spark plug
The engine must have cooled down completely before you can
begin to the check or replace the spark plugs.
Lay down the brushcutter first so that it is resting on its foot in
stable position.
The tools you will require is the combination wrench (plus the
screwdriver as a handle) as well as a pair of insulated pliers.
Materials: Use NGK-CMR 6A-type spark plugs only
(see extract from the spare parts list).
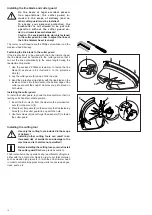
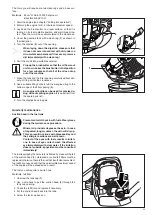
1 Turn out the screw (
1
).
Remove the spark plug cap (
2
).
3 Pull off the spark plug connector (
3
) from the spark plug.
4 Use the combination wrench to turn the spark plug (
4
) out
of the opening.
The spark plug must be replaced if its insulation
body is damaged or if its electrode is extremely
burned, soiled or oiled up, or if you can no lon-
ger see a spark during the spark test described
below.
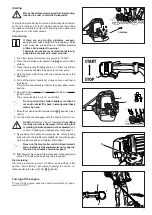
The gap between the electrodes must be
0.7-0.8 mm
(see illustration)
.
0,7–0,8 mm
4
2
1
3
5
6
4
2
1
3

