R
epair
P 11 / 15
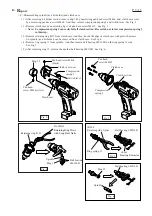
< 12 > Replacing switch unit, LED circuit and buzzer circuit
< 12 >
< 13 >
< 14 >
< 15 >
< 16 >
< 17 >
< 18 >
< 19 >
< 20 >
< 21 >
< 22 >
< 23 >
< 24 >
Fig. 51
Fig. 52
Fig. 53
Fig. 54
Fig. 55
Fig. 56
Fig. 57
Fig. 58
Fig. 59
Fig. 60
Fig. 61
Fig. 62
Fig. 63
Fig. 64
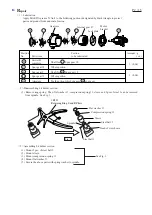
< 10 > Disassembling switch
(1) After removing F/R change lever, unscrew the screw with which micro switch is secured, and turn the micro
switch with pulling up as illustrated in Fig. 51.
Then, micro switch can be separated from switch.
< 11 > Assembling switch
(1) Secure micro switch to the ON/OFF switch, and fasten it with the screw, with fastening torque of 0.29 - 0.34N.m.
(2) Mount F/R change lever aligning its concave portion with the boss of ON/OFF switch. See Fig. 52.
(3) Mount the switch to housing R. See Fig. 53.
Screw
Micro switch
ON/OFF switch
Turning anti-clockwise,
pull off the micro switch.
F/R change lever
Concave portion
of F.R. change lever
Boss of ON/OFF switch
Connected to
controller
LED circuit
Buzzer circuit
Switch unit
Connector
Connector
Connector
(1) When removing LED circuit, Switch unit and Buzzer circuit, pull off the connector in the direction designated
with arrow. See Fig. 54.
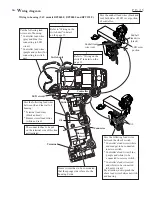
(2) Connect the connectors referring to the
"Circuit Diagram".
< Note > To avoid the disconnection of lead wires, do not hold the lead wires, when removing the above parts.
Always hold the connectors themselves.


