


P 11 /14
R
epair
[3] DISASSEMBLY/ASSEMBLY
[3] -6. Swash Bearing Section (cont.)
[3] -7. Needle Bearing Complete, Oil Seal 25
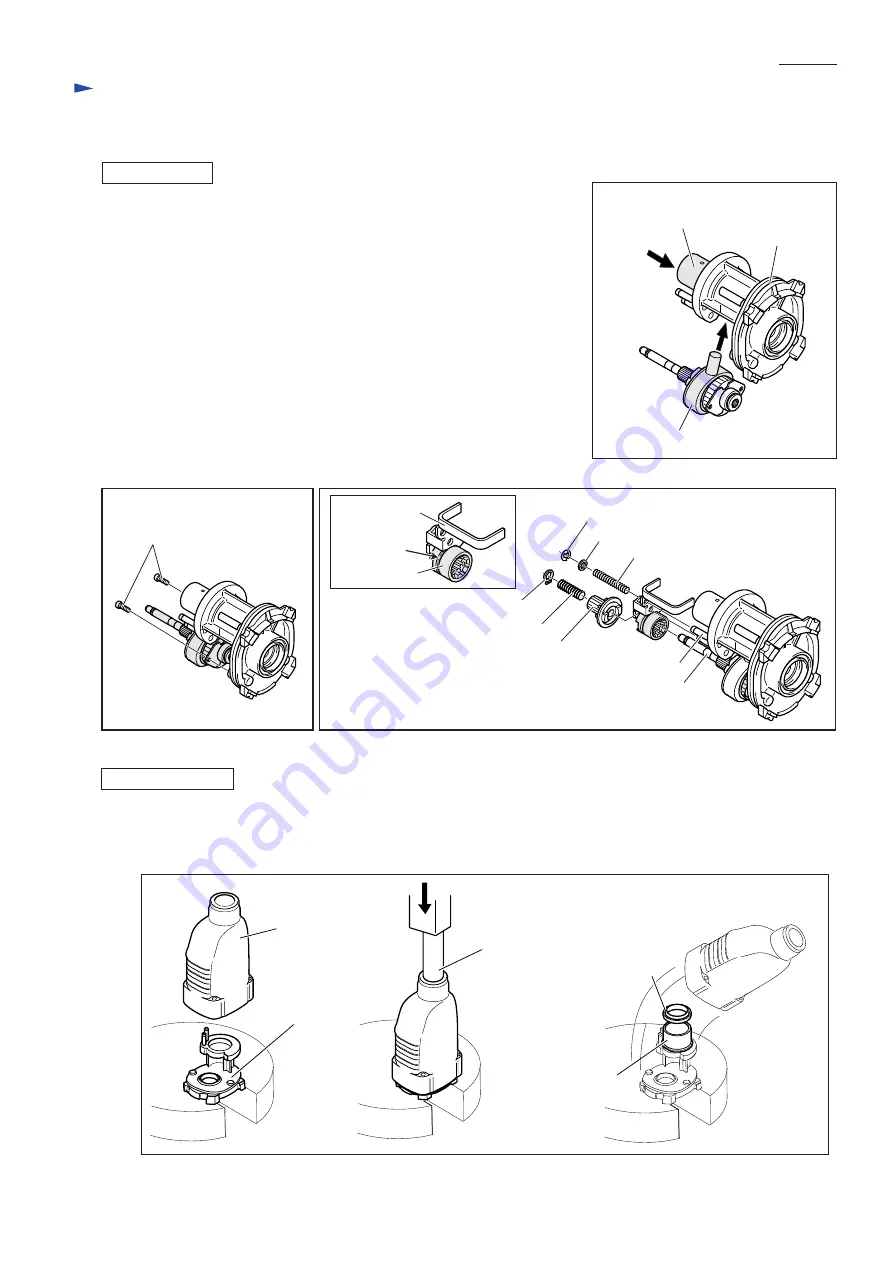
4) Move Piston cylinder to the rear dead center position. Tilt Swash bearing 10
to set at the same angle as in the rear dead position.
Insert the pin portion of Swash bearing 10 through Inner housing into the
hole of Piston joint. (Fig. 36)
5) Fasten Swash bearing section to Inner housing with two M4x12 Hex socket
head bolts (Fig. 37).
Note: M4x12 Hex socket bolt is a threadlocker coated fastener.
If you reuse the bolts removed from machine, be sure to apply such
threadlocker as Threebond 1321B/1342 or Loctite 242 before fastening.
6) Fitting the curved edge of Change plate in the groove on Clutch cam as
illustrated to top-left in Fig. 38, assemble Change plate to Inner housing and
Clutch cam to Cam shaft at the same time.
Put Spur gear 10 and Compression spring 7 through Cam shaft, and secure
them with Retaining ring S-7. Put Compression spring 6 and Flat washer 5
through the upper pin of Inner housing, and secure them with Stop ring E-4.
1) Set the disassembled inner housing to Gear housing complete. Press down 1R252 using arbor press.
Oil seal 25 and Needle bearing complete can now be removed from Gear housing complete. (Fig. 39)
Fig. 38
Fig. 37
ASSEMBLING
Hex socket head bolts M4x12
Fig. 36
Inner housing
Piston cylinder in the rear
dead center position
Swash bearing 10
Clutch cam
groove
Change plate
Cam shaft
upper pin of Inner housing
Spur gear 10
Compression spring 7
Retaining ring S-7
Compression spring 6
Stop ring E-4
Flat washer 5
DISASSEMBLING
Fig. 39
Inner Housing
Neeld Bearing
Complete
Gear Housing
Complete
1R252
Round Bar for
Arbor 30-100
Oil Seal 25


