background image

Installing or removing abrasive disc 


009102 

 
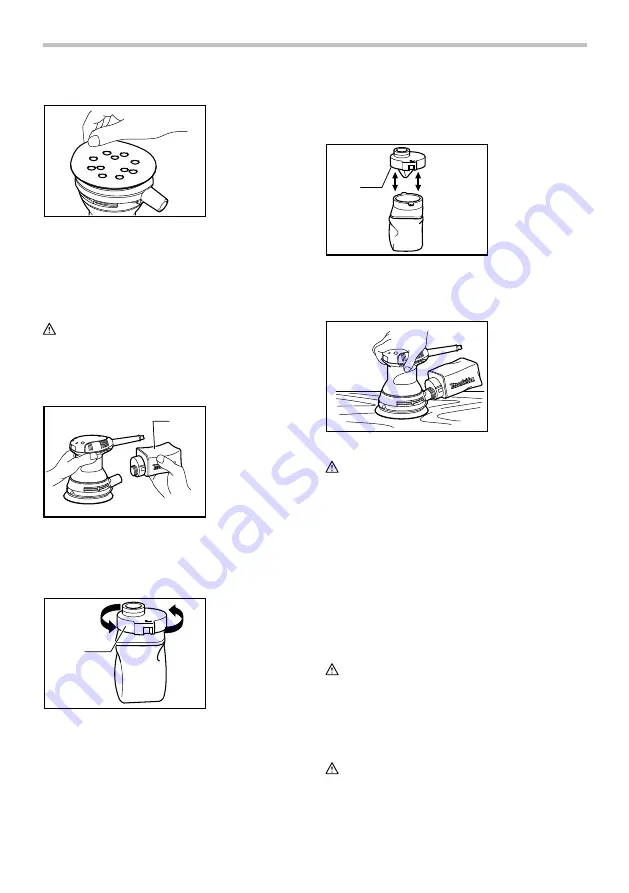
To install the abrasive disc, first remove all dirt or foreign 
matter from the pad. Then peel off the backing paper 
from the abrasive disc and attach the abrasive disc to 
the pad. Be careful to align the holes in the abrasive disc 
with those in the pad. 


CAUTION: 

• 

If you peel off the abrasive disc from the pad, its 
adhesion will become poor. Never attempt to stick 
it onto the pad for further use. 


Installing dust bag 

1


009104 

 
Install the dust bag on the tool so that the Makita logo on 
the dust bag will be upright (not upside down). 


Emptying dust bag 

1


003323 

 
When the dust bag is about half full, switch off and 
unplug the tool. Remove the dust bag from the tool. 
Then remove the dust nozzle from the dust bag after 
unlocking the dust nozzle by turning it slightly 
counterclockwise. Empty the dust bag by tapping it 
lightly. 

After emptying the dust bag, install the dust nozzle on 
the dust bag. Turn the dust nozzle slightly clockwise to 
lock it in place. Then install the dust bag on the tool as 
described in "Installing dust bag". 

1


003326 


OPERATION 

Sanding operation 


009103 


CAUTION: 

• 

Never switch on the tool when it is in contact with 
the workpiece, it may cause an injury to operator. 

• 

Never run the tool without the abrasive disc. You 
may seriously damage the pad. 

• 

Never force the tool. Excessive pressure may 
decrease the sanding efficiency, damage the 
abrasive disc or shorten tool life. 

• 

Using the tool with the pad edge contacting the 
workpiece may damage the pad. 

Hold the tool firmly. Turn the tool on and wait until it 
attains full speed. Then gently place the tool on the 
workpiece surface. Keep the pad flush with the 
workpiece and apply slight pressure on the tool. 


CAUTION: 

• 

The sanding pad rotates clockwise during the 
loaded operation, but it may rotate 
counterclockwise during the no-load operation. 


MAINTENANCE 


CAUTION: 

• 

Always be sure that the tool is switched off and 
unplugged before attempting to perform inspection 
or maintenance. 

1. Dust nozzle 

1. Dust nozzle 

1. Dust bag 

Summary of Contents for BO5031/2

Page 1: ...RUCTIONS FOR FUTURE REFERENCE AVERTISSEMENT Pour votre propre sécurité prière de lire attentivement avant l utilisation GARDER CES INSTRUCTIONS POUR RÉFÉRENCE ULTÉRIEURE ADVERTENCIA Para su seguridad personal LEA DETENIDAMENTE este manual antes de usar la herramienta GUARDE ESTAS INSTRUCCIONES PARA FUTURA REFERENCIA Random Orbit Sander Ponceuse Orbitale à Disque Lijadora orbital BO5030 BO5031 0091...

Page 2: ...r carrying pulling or unplugging the power tool Keep cord away from heat oil sharp edges or moving parts Damaged or entangled cords increase the risk of electric shock 8 When operating a power tool outdoors use an extension cord suitable for outdoor use Use of a cord suitable for outdoor use reduces the risk of electric shock 9 If operating a power tool in a damp location is unavoidable use a grou...

Page 3: ...ts This will ensure that the safety of the power tool is maintained 25 Follow instruction for lubricating and changing accessories 26 Keep handles dry clean and free from oil and grease USE PROPER EXTENSION CORD Make sure your extension cord is in good condition When using an extension cord be sure to use one heavy enough to carry the current your product will draw An undersized cord will cause a ...

Page 4: ...ugging in the tool always be sure that the tool is switched off To start the tool press the I ON side of the switch To stop press the O OFF side of the switch Speed adjusting dial For BO5031 only 1 009439 The tool speed can be infinitely adjusted between 4 000 and 12 000 orbit per minute by turning the adjusting dial Higher speed is obtained when the dial is turned in the direction of number 5 low...

Page 5: ...ust nozzle on the dust bag Turn the dust nozzle slightly clockwise to lock it in place Then install the dust bag on the tool as described in Installing dust bag 1 003326 OPERATION Sanding operation 009103 CAUTION Never switch on the tool when it is in contact with the workpiece it may cause an injury to operator Never run the tool without the abrasive disc You may seriously damage the pad Never fo...

Page 6: ...t prepaid to one of Makita s Factory or Authorized Service Centers If inspection shows the trouble is caused by defective workmanship or material Makita will repair or at our option replace without charge This Warranty does not apply where IN NO EVENT SHALL MAKITA BE LIABLE FOR ANY INDIRECT INCIDENTAL OR CONSEQUENTIAL DAMAGES FROM THE SALE OR USE OF THE PRODUCT THIS DISCLAIMER APPLIES BOTH DURING ...

Page 7: ... N utilisez aucun adaptateur de fiche sur les outils électriques avec mise à la terre En ne modifiant pas les fiches et en les insérant dans des prises de courant pour lesquelles elles ont été conçues vous réduirez les risques de choc électrique 5 Évitez tout contact corporel avec les surfaces mises à la terre telles que les tuyaux radiateurs cuisinières et réfrigérateurs Le risque de choc électri...

Page 8: ...es réduisent les risques de démarrage accidentel de l outil électrique 20 Après l utilisation d un outil électrique rangez le hors de portée des enfants et ne laissez aucune personne l utiliser si elle n est pas familiarisée avec l outil électrique ou les présentes instructions d utilisation Les outils électriques représentent un danger entre les mains de personnes qui n en connaissent pas le mode...

Page 9: ...onnez pas l outil alors qu il tourne Ne faites fonctionner l outil qu une fois que vous l avez bien en main 5 Cet outil n ayant pas été imperméabilisé la surface de la pièce à travailler doit être exempte d eau lors de son utilisation 6 Aérez votre aire de travail de manière adéquate lorsque vous effectuez des travaux de ponçage 7 Certains matériaux contiennent des produits chimiques qui peuvent ê...

Page 10: ...entre le chiffre de réglage et le type de travail Plage A Pour polissage Plage B Pour sablage fini Plage C Pour sablage régulier 1 2 3 Réglage de cadran Nombre d oscillations par minute 4000 12000 4 5 A B C 003291 NOTE La figure représente des applications standard Elles peuvent varier en fonction des conditions ASSEMBLAGE ATTENTION Avant d effectuer toute intervention sur l outil assurez vous tou...

Page 11: ...til sans le disque abrasif Vous risquer de sérieusement endommager le tampon Ne jamais forcer l outil Une pression excessive peut diminuer l efficacité de sablage endommager le disque abrasif ou raccourcir la durée de vie de l outil L utilisation de l outil avec le bord du plateau en contact avec la pièce peut endommager le plateau Tenez l outil fermement Mettez l outil sous tension et attendez qu...

Page 12: ...itement ou le remplacera à sa discrétion si un défaut de fabrication ou un vice de matériau est découvert lors de l inspection Cette garantie ne s applique pas dans les cas où MAKITA DÉCLINE TOUTE RESPONSABILITÉ POUR TOUT DOMMAGE ACCESSOIRE OU INDIRECT LIÉ À LA VENTE OU À L UTILISATION DU PRODUIT CET AVIS DE NON RESPONSABILITÉ S APPLIQUE À LA FOIS PENDANT ET APRÈS LA PÉRIODE COUVERTE PAR CETTE GAR...

Page 13: ...s deberán encajar perfectamente en la toma de corriente No modifique nunca la clavija de conexión de ninguna forma No utilice ninguna clavija adaptadora con herramientas eléctricas que tengan conexión a tierra puesta a tierra La utilización de clavijas no modificadas y que encajen perfectamente en la toma de corriente reducirá el riesgo de que se produzca una descarga eléctrica 5 Evite tocar con e...

Page 14: ...éctricas Dichas medidas de seguridad preventivas reducen el riesgo de que la herramienta se inicie accidentalmente 20 Guarde la herramienta eléctrica que no use fuera del alcance de los niños y no permita que las personas que no están familiarizadas con ella o con las instrucciones la operen Las herramientas eléctricas son peligrosas en manos de personas que no saben operarlas 21 Realice el manten...

Page 15: ...a herramienta con firmeza 4 No deje la herramienta en marcha Tenga en marcha la herramienta solamente cuando la tenga en la mano 5 Esta herramienta no es a prueba de agua por lo que no deberá utilizar agua en la superficie de trabajo 6 Ventile el área de trabajo adecuadamente cuando realice operaciones de lijado 7 Algunos materiales contienen sustancias químicas que pueden ser tóxicas Tome precauc...

Page 16: ...para obtener la relación entre el número fe ajuste seleccionado y el tipo de tarea a realizar Rango A Para lustrado Rango B Para acabado fino Rango C Para lijado común 1 2 3 Configuración del ajustador Órbitas por minuto 4000 12000 4 5 A B C 003291 NOTA La figura muestra las aplicaciones estándar Dichas apliciones pueden variar de acuerdo con la situación ENSAMBLE PRECAUCIÓN Asegúrese siempre de q...

Page 17: ... funcionar la herramienta sin el disco abrasivo Se puede dañar seriamente la almohadilla Nunca fuerce la herramienta Una presión excesiva puede disminuir la eficacia de la lijadora dañar el papel abrasivo o acortar la vida útil de la herramienta Puede que la almohadilla se dañe si el borde de ésta hace contacto con la pieza de trabajo al usar la herramienta Sostenga firmemente la herramienta Encie...

Page 18: ...muestra que el problema ha sido causado por mano de obra o material defectuoso Makita la reparará o a nuestra opción reemplazará sin cobrar Esta garantía no será aplicable cuando EN NINGÚN CASO MAKITA SE HARÁ RESPONSABLE DE NINGÚN DAÑO INDIRECTO FORTUITO O CONSECUENCIAL DERIVADO DE LA VENTA O USO DEL PRODUCTO ESTA RENUNCIA SERÁ APLICABLE TANTO DURANTE COMO DESPUÉS DEL TÉRMINO DE ESTA GARANTÍA MAKI...

Page 19: ...19 ...

Page 20: ... Algunos tipos de polvo creados por el lijado serrado amolado taladrado y otras actividades de la construccion contienen sustancias quimicas reconocidas por el Estado de California como causantes de cancer defectos de nacimiento y otros peligros de reproduccion Algunos ejemplos de estos productos quimicos son plomo de pinturas a base de plomo silice cristalino de ladrillos y cemento y otros produc...

Reviews: