background image

5

ASSEMBLY

CAUTION:

• Always be sure that the tool is switched off and

unplugged before carrying out any work on the tool.

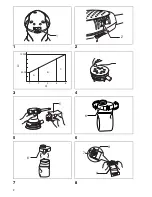
Installing or removing abrasive disc (Fig. 4)

To install the abrasive disc, first remove all dirt or foreign
matter from the pad. Then peel off the backing paper
from the abrasive disc and attach the abrasive disc to the
pad. Be careful to align the holes in the abrasive disc with
those in the pad.

CAUTION:

• If you peel off the abrasive disc from the pad, its adhe-

sion will become poor. Never attempt to stick it onto the
pad for further use.

Installing dust bag (Fig. 5)

Install the dust bag on the tool so that the Makita logo on
the dust bag will be upright (not upside down).

Emptying dust bag (Fig. 6 & 7)

When the dust bag is about half full, switch off and
unplug the tool. Remove the dust bag from the tool. Then
remove the dust nozzle from the dust bag after unlocking
the dust nozzle by turning it slightly counterclockwise.
Empty the dust bag by tapping it lightly.
After emptying the dust bag, install the dust nozzle on the
dust bag. Turn the dust nozzle slightly clockwise to lock it
in place. Then install the dust bag on the tool as
described in “Installing dust bag”.

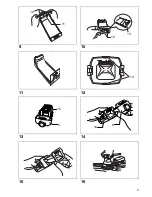
Installing paper dust bag

Place the paper dust bag on the paper dust bag holder
with its front side upward. Insert the front fixing card-
board of the paper dust bag into the groove of the paper
dust bag holder. 

(Fig. 8)

Then press the upper part of the front fixing cardboard in
arrow direction to hook it onto the claws. 

(Fig. 9)

Insert the notch of the paper dust bag into the guide of
the paper dust bag holder. Then install the paper dust
bag holder set on the tool. 

(Fig. 10 & 11)

Installing paper filter bag

Make sure that the logo on the cardboard lip and the logo
on the dust box are on the same side, then install the
paper filter bag by fitting the cardboard lip in the groove
of each holding tab. 

(Fig. 12)

Make sure that the logo on the cardboard lip and the logo
on the dust nozzle are on the same side, then install the
dust nozzle on the dust box. 

(Fig. 13)

Removing dust box and paper filter bag 
(Fig. 14 & 15)

Remove the dust nozzle by pushing the two latches.
Remove the paper filter bag first by pinching the logo
side of its cardboard lip, then by pulling the cardboard lip
downwards to move it out of the holding tab of the dust
box.

OPERATION

Sanding operation (Fig. 16)

CAUTION:

• Never switch on the tool when it is in contact with the

workpiece, it may cause an injury to operator.

• Never run the tool without the abrasive disc. You may

seriously damage the pad.

• Never force the tool. Excessive pressure may decrease

the sanding efficiency, damage the abrasive disc or
shorten tool life.

• Using the tool with the pad edge contacting the work-

piece may damage the pad.

Hold the tool firmly. Turn the tool on and wait until it
attains full speed. Then gently place the tool on the work-
piece surface. Keep the pad flush with the workpiece and
apply slight pressure on the tool.

CAUTION:

• The sanding pad rotates clockwise during the loaded

operation, but it may rotate counterclockwise during the
no-load operation.

MAINTENANCE 

CAUTION: 

• Always be sure that the tool is switched off and

unplugged before attempting to perform inspection or
maintenance. 

To maintain product SAFETY and RELIABILITY, repairs,
carbon brush inspection and replacement, any other
maintenance or adjustment should be performed by Mak-
ita Authorized Service Centers, always using Makita
replacement parts.

ACCESSORIES

CAUTION: 

• These accessories or attachments are recommended

for use with your Makita tool specified in this manual.
The use of any other accessories or attachments might
present a risk of injury to persons. Only use accessory
or attachment for its stated purpose.

If you need any assistance for more details regarding
these accessories, ask your local Makita service center.

• Abrasive discs
• Paper dust bag
• Paper dust bag holder
• Dust  box
• Paper filter bag

Summary of Contents for BO5031

Page 1: ...structions D Exzenterschleifer Betriebsanleitung I Levigatrice rotorbitale Istruzioni per l uso NL Excenter schuurmachine Gebruiksaanwijzing E Lijadora Orbital Manual de instrucciones P Lixadeira Roto...

Page 2: ...2 1 2 3 4 5 6 7 8 7 8 9 6 6 2 1 1 2 3 4 3 4000 12000 4 5 A B C 5...

Page 3: ...3 9 10 11 12 13 14 15 16 12 13 14 16 6 10 11 15 6...

Page 4: ...ly when hand held 4 This tool has not been waterproofed so do not use water on the workpiece surface 5 Ventilate your work area adequately when you perform sanding operations 6 Some material contains...

Page 5: ...e groove of each holding tab Fig 12 Make sure that the logo on the cardboard lip and the logo on the dust nozzle are on the same side then install the dust nozzle on the dust box Fig 13 Removing dust...

Page 6: ...can differ from the declared emission value depending on the ways in which the tool is used Be sure to identify safety measures to protect the oper ator that are based on an estimation of exposure in...

Page 7: ...ult rieure GEB021 4 MISES EN GARDE DE S CURIT POUR PONCEUSE 1 Utilisez toujours des lunettes de protection Des lunettes ordinaires ou de soleil NE sont PAS des lunettes de protection 2 Tenez l outil f...

Page 8: ...diqu par la fl che pour l accrocher aux griffes Fig 9 Ins rez l entaille du sac poussi re papier dans le guide du support de sac poussi re papier Installez ensuite l ensemble de support de sac poussi...

Page 9: ...ar e a t mesur e conform ment la m thode de test standard et peut tre utilis e pour comparer les outils entre eux La valeur d mission de vibrations d clar e peut aussi tre utilis e pour l valuation pr...

Page 10: ...ne nur im hand gef hrten Einsatz 4 Diese Maschine ist nicht wasserdicht Benetzen Sie daher die Bearbeitungsfl che nicht mit Was ser 5 Sorgen Sie f r ausreichende Bel ftung des Arbeitsplatzes beim Schl...

Page 11: ...ntieren des Papierfiltersacks Sicherstellen dass das Logo auf der Kartonlippe und das Logo auf dem Staubsammelbeh lter auf derselben Seite liegen dann den Papierfiltersack anbringen indem die Kartonli...

Page 12: ...m Einklang mit der Standardpr fmethode gemessen und kann f r den Vergleich zwischen Maschinen herange zogen werden Der angegebene Vibrationsemissionswert kann auch f r eine Vorbewertung des Gef hrdung...

Page 13: ...re gira Farlo funzio nare soltanto tenendolo in mano 4 Questo utensile non a prova d acqua per cui non usare acqua sulla superficie del pezzo 5 Ventilare adeguatamente l area di lavoro durante le oper...

Page 14: ...il sacchetto filtro di carta inserendo il labbro del car toncino nella tacca di ciascuna appendice di supporto Fig 12 Accertarsi che il logo sul labbro del cartoncino e il logo sul bocchettone polvere...

Page 15: ...one AVVERTIMENTO L emissione delle vibrazioni durante l uso reale dell utensile elettrico pu differire dal valore di emis sione dichiarato a seconda dei modi in cui viene usato l utensile Identificare...

Page 16: ...HEIDSWAARSCHUWINGEN SPECIFIEK VOOR VLAKSCHUURMACHINES 1 Draag altijd een veiligheidsbril Een gewone bril of een zonnebril is GEEN veiligheidsbril 2 Houd het gereedschap stevig vast 3 Schakel het geree...

Page 17: ...ts de papieren stofzak op de papieren stofzakhou der met de voorkant omhoog Steek het bevestigingskar ton aan de voorkant van de papieren stofzak in de gleuf van de papieren stofzakhouder Fig 8 Duw ve...

Page 18: ...5 m s2 Onnauwkeurigheid K 1 5 m s2 Model BO5031 Toepassing schuren van metalen plaat Trillingsemissie ah 4 0 m s2 Onnauwkeurigheid K 1 5 m s2 ENG901 1 De opgegeven trillingsemissiewaarde is gemeten vo...

Page 19: ...strucciones para futuras referencias GEB021 4 ADVERTENCIAS DE SEGURIDAD PARA LA LIJADORA 1 Utilice siempre gafas de seguridad o pantalla facial Las gafas normales o de sol NO sirven para proteger los...

Page 20: ...polvo de papel en el portabolsas de bolsa de polvo de papel con su lado frontal hacia arriba Inserte el cart n de fijaci n frontal de la bolsa de polvo de papel en la ranura del portabolsas de bolsa d...

Page 21: ...misi n de vibraci n ah 4 5 m s2 Error K 1 5 m s2 Modelo BO5031 Modo tarea lijado de placas met licas Emisi n de vibraci n ah 4 0 m s2 Error K 1 5 m s2 ENG901 1 El valor de emisi n de vibraci n declara...

Page 22: ...a Tra balhe com a m quina s quando a estiver a seg urar com a m o 4 Esta m quina n o prova de gua por isso n o utilize gua na pe a que estiver a trabalhar 5 Ventile a sua rea de trabalho adequadamente...

Page 23: ...bocal fiquem no mesmo lado e instale o bocal para o saco de p na caixa do colector de p Fig 13 Retirar a caixa do colector de p e o filtro de papel Fig 14 e 15 Retire o bocal para o saco de p pressio...

Page 24: ...utiliza o real da fer ramenta el ctrica pode diferir do valor de emiss o indi cado dependendo das formas como a ferramenta utilizada Certifique se de identificar as medidas de seguran a para protec o...

Page 25: ...vend derfor aldrig vand p emnets overflade 5 Hold arbejdsomr det tilstr kkeligt udluftet n r De udf rer slibearbejde 6 Nogle materialer indeholder kemikalier der kan v re giftige V r forsigtig s ind n...

Page 26: ...t p papkanten og logoet p sugestud sen er p samme side og monter derefter sugestudsen p st vboksen Fig 13 Afmontering af st vboks og papirfilterpose Fig 14 og 15 Tag sugestudsen af ved at trykke p de...

Page 27: ...maskinen kan v re forskellig fra den erkl rede emissi onsv rdi afh ngigt af den m de hvorp maskinen anvendes S rg for at identificere de sikkerhedsforskrifter til beskyttelse af operat ren som er base...

Page 28: ...28 1 2 3 4 5 6 7 8 9 10 11 12 13 14 15 16 BO5030 BO5031 125 125 1 12 000 4 000 12 000 x x 153 x 123 x 153 153 x 123 x 153 1 3 1 3 II II EPTA 01 2003 GEA010 1 GEB021 4 1 2 3 4 5 6 7 8 1 I ON OFF...

Page 29: ...29 2 3 BO5031 4 000 12 000 5 1 C 3 4 5 Makita 6 7 8 9 10 11 12 13 14 15...

Page 30: ...30 16 ENG104 2 EN60745 BO5030 LpA 80 dB A 3 dB A 80 dB A BO5031 LpA 80 dB A 3 dB A 80 dB A ENG211 2 EN60745 BO5030 ah 4 5 m s2 1 5 m s2 BO5031 ah 4 0 m s2 1 5 m s2 ENG901 1...

Page 31: ...on Makita v BO5030 BO5031 98 37 28 2009 2006 42 29 2009 EN60745 Makita International Europe Ltd Michigan Drive Tongwell Milton Keynes MK15 8JD England 30 2009 Tomoyasu Kato Makita Corporation 3 11 8 S...

Page 32: ...Makita Corporation Anjo Aichi Japan 884832C998...

Reviews: