background image

6

ENGLISH

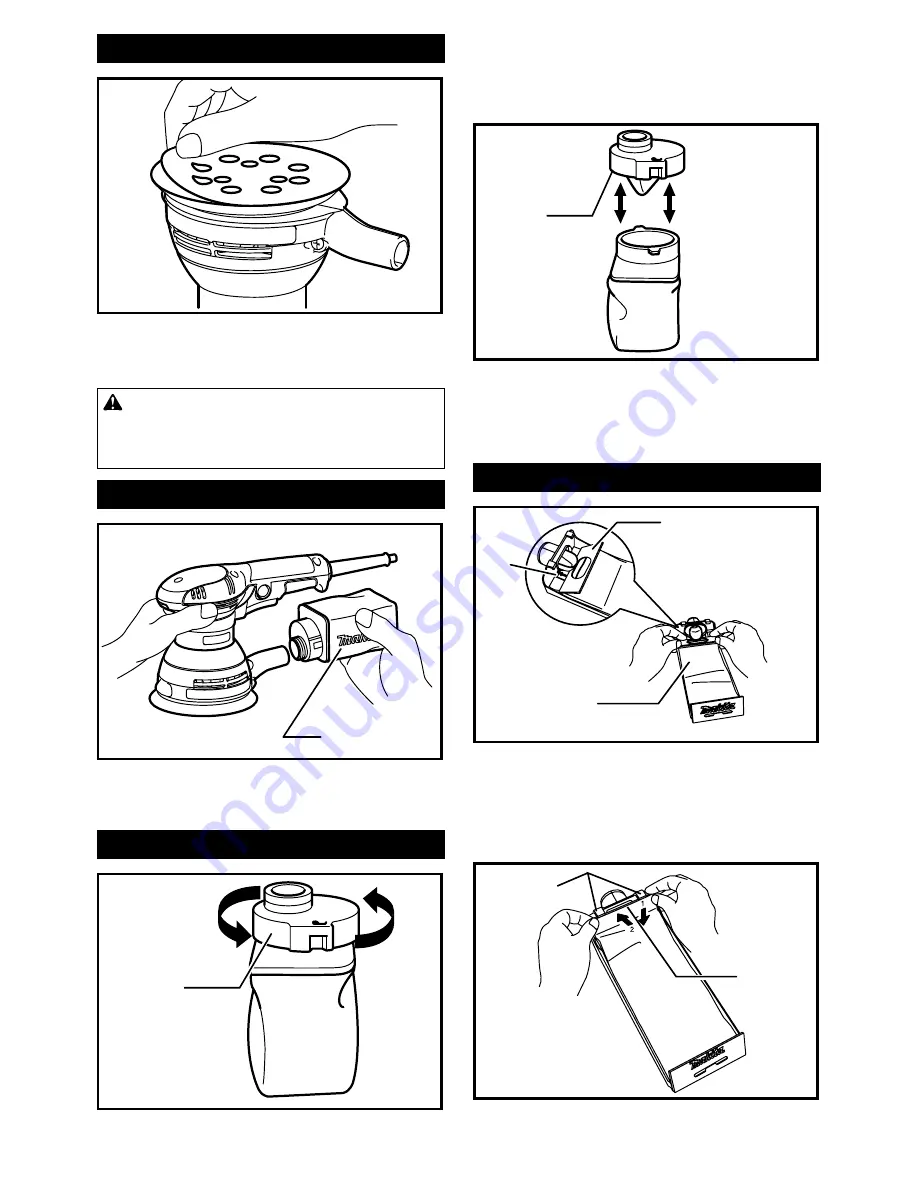
Installing or removing abrasive disc

To install the abrasive disc, irst remove all dirt or foreign 

matter from the pad. Then peel off the backing paper from the 

abrasive disc and attach the abrasive disc to the pad. Be care

-

ful to align the holes in the abrasive disc with those in the pad.

CAUTION:


• 

If you peel off the abrasive disc from the pad, 

its adhesion will become poor. Never attempt to 

stick it onto the pad for further use.

Installing dust bag

1


1.

 Dust bag

Install the dust bag on the tool so that the Makita logo 
on the dust bag will be upright (not upside down).

Emptying dust bag

1


1.

 Dust nozzle

When the dust bag is about half full, switch off and 

unplug the tool. Remove the dust bag from the tool. 

Then remove the dust nozzle from the dust bag after 

unlocking the dust nozzle by turning it slightly counter-
clockwise. Empty the dust bag by tapping it lightly.

1


1.

 Dust nozzle

After emptying the dust bag, install the dust nozzle on 
the dust bag. Turn the dust nozzle slightly clockwise to 
lock it in place. Then install the dust bag on the tool as 
described in "Installing dust bag".

Installing paper dust bag

1

2

3


1.

 Groove 

2.

 Front ixing cardboard 

3.

 Front side of 

paper dust bag

Place the paper dust bag on the paper dust bag holder 

with its front side upward. Insert the front ixing card

-

board of the paper dust bag into the groove of the paper 

dust bag holder.

1

2


1.

 Claws 

2.

 Upper part

Summary of Contents for BO5040

Page 1: ...INSTRUCTION MANUAL Random Orbit Sander BO5040 BO5041 ENGLISH Original instructions DOUBLE INSULATION Read before use...

Page 2: ...protection Vibration The vibration total value tri axial vector sum deter mined according to EN62841 Work mode sanding metal plate Vibration emission ah 3 5 m s 2 Uncertainty K 1 5 m s2 NOTE The decla...

Page 3: ...arting Ensure the switch is in the off position before connecting to power source and or battery pack picking up or carrying the tool Carrying power tools with your inger on the switch or energising p...

Page 4: ...4 This tool has not been waterproofed so do not use water on the workpiece surface 5 Ventilate your work area adequately when you perform sanding operations 6 Some material contains chemicals which m...

Page 5: ...C NOTE The igure shows standard applications They may differ under certain conditions ASSEMBLY CAUTION Always be sure that the tool is switched off and unplugged before carrying out any work on the t...

Page 6: ...Dust nozzle When the dust bag is about half full switch off and unplug the tool Remove the dust bag from the tool Then remove the dust nozzle from the dust bag after unlocking the dust nozzle by turn...

Page 7: ...t box are on the same side then install the paper ilter bag by itting the cardbord lip in the groove of each holding tab 1 2 1 Dust box 2 Dust nozzle Make sure that the logo on the cardboard lip and t...

Page 8: ...ed operation but it may rotate counterclock wise during the no load operation Polishing operation For Model BO5041 CAUTION Use only a Makita genuine sponge pad felt pad or wool pad optional accessorie...

Page 9: ...ters always using Makita replacement parts OPTIONAL ACCESSORIES CAUTION These accessories or attachments are recom mended for use with your Makita tool speciied in this manual The use of any other acc...

Page 10: ...10...

Page 11: ...11...

Page 12: ...w w w m a ki t a c o m M a ki t a E ur o p e N V M a ki t a C or p or at i o n 3 11 8 Sumiyoshi cho Anjo Aichi 446 8502 Japan Jan Baptist Vinkstraat 2 3070 Kortenberg Belgium 884946B222 EN 20170411...

Reviews: