background image

P 8/  9

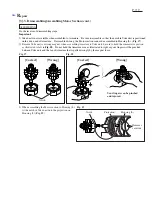
Fig. 20

[1] Lead Wire of Carbon Brush

As illustrated to left in Fig. 20, put each Carbon brush into
Brush holder so that its lead wire is placed outside.
Then route the lead wire of Carbon brush through the
outside slot in Brush holder as illustrated to left in Fig. 20.
(Illustrations in Fig. 20 is the Carbon brush section viewed from A.)

[Correct]

[Wrong]

Lead wire of Carbon brush

The lead wire correcltly routed

Torsion spring

Tail of torsion spring

Tail of torsion spring

C

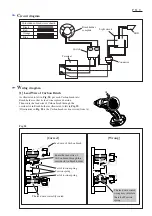
ircuit diagram

Color index of lead wires' sheath

Black
Red
Orange

Blue

LED

Light circuit

Switch

Brush holder
complete

Terminal

Connector

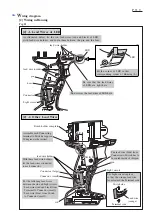
W

iring diagram

A

Route the lead wire of
Carbon brush through this
outside slot in Brush holder.

The lead wire routed
wrong may interfere
the tail of Torsion
spring.

Summary of Contents for BTD140

Page 1: ...ion Job light with afterglow function Belt clip Belt clip 1 Plastic carrying case 1 Assorted Phillips bits Assorted socket bits Bit piece Charger DC18SC Charger DC24SA Charger DC24SC Li ion Battery 1830 This new product will be available in the following variations BTD140SFE BTD140 BL1830 Li ion 3 0Ah DC18SC Model No type quantity Charger Offered to USA Canada Mexico Panama All countries except th...

Page 2: ...nism Fixing Hammer case 1R288 Screwdriver magnetizer 1R232 Pipe 30 1R291 Retaining ring S and R pliers 1R041 Vise plate 1R223 Torque wrench shaft 1R224 Ratchet head 134847 1 Socket 30 78 Socket 32 50 Fixing Hammer case 134848 9 Use for Fig 1 20 Hammer case complete Inside surface where twenty four 3 5 Steel balls are installed Whole surface Gear teeth Gear teeth that engages with Spur gear 22 Appl...

Page 3: ...ix Socket 32 50 in vise securely Then put the Hammer case section on Socket 32 50 while fitting the hexagonal portion of Bearing box in Socket 32 50 Fit Socket 30 78 over the hex agonal portion of Hammer case Then by turning Socket 30 78 with Torque wrench shaft 20 90N m No 1R223 and Ratchet head with 12 7mm square No 1R224 clockwise the Hammer case section can be disassembled Fig 4 1 2 A Brush ho...

Page 4: ...n Spindle Then take steel ball 5 6 2 pcs out of spindle using tweezers or a slotted screwdriver magnetized with Screwdriver Magnetizer No 1R288 Fig 7 9 Remove the Gear Extractor by turning the handle counterclockwise 10 Remove Spindle Compression spring 45 and Cup washer 14 from Hammer as illustrated in Fig 8 Important Be sure to lower the Hammer side so that Steel balls in Hammer cannot fall down...

Page 5: ...ox Fig 11 5 Assemble Hammer case complete to Bearing box as illustrated in Fig 12 Fig 12 Bearing box Hammer case complete Socket 32 50 for fixing Bearing box four projections Internal gear 51 ASSEMBLING Fig 11 Fig 10 Internal gear 51 O ring 40 Bearing box Hammering mechanism Hammer case Fit Hammer case complete over Internal gear 51 with the four grooves on the inside of Hammer case complete align...

Page 6: ...embling Assembling Motor Section 1 Separate the assembly of Armature and Yoke unit from the machine Refer to 1 to 4 of 3 1 Disassembling Hammering Mechanism 2 Put the assembly of Yoke unit and Armature on a work bench so that the drive end of the Armature touches the work bench Then separate Yoke unit from armature by pressing it down towards the work bench Fig 16 DISASSEMBLING No 1R232 Anvil Hamm...

Page 7: ... strong magnet when assembling Armature to Yoke unit be sure to hold the commutator portion as illustrated to left in Fig 18 Do not hold the Armature core as illustrated to right or your fingers will be pinched between Yoke unit and the fan of Armature that is pulled strongly by the magnet force Fig 17 Fig 18 ASSEMBLING 3 When assembling the Motor section to Housing L fit the notch in Yoke unit on...

Page 8: ...in Fig 20 is the Carbon brush section viewed from A Correct Wrong Lead wire of Carbon brush The lead wire correcltly routed Torsion spring Tail of torsion spring Tail of torsion spring Circuit diagram Color index of lead wires sheath Black Red Orange Blue LED Light circuit Switch Brush holder complete Terminal Connector Wiring diagram A Route the lead wire of Carbon brush through this outside slot...

Page 9: ...ner of LED in this corresponding corner of Housing L LED Connector large Connector small Light circuit rib Terminal side Switch side Do not cross the lead wires of LED here Lead wire orange pin lead wire holder With these lead wire holders fix the lead wires connected to each connector 20 2 2 Other Lead Wires Assemble each Connecting terminal to Switch at approx 20 degrees to the vertical Switch T...

Reviews: