background image

12

NOTE:

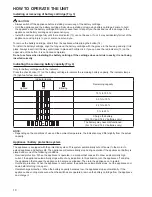
 • After the AC adaptor is connected, the cordless fan may take 3–5 seconds to start.

 • The adaptor might creak while using it for the power supply. This doesn’t affect normal use.

 • The AC adapter does not charge the battery inserted to the cordless fan.

MAINTENANCE

 WARNING

 • When servicing, ask Makita authorized service centers and with only identical replacement parts. Use of any other 

parts may create a hazard or cause product damage.

 • To avoid serious personal injury, always remove the battery cartridge or AC adapter (optional accessory) from the 

unit when cleaning or performing any maintenance.

 • Allow the cordless fan to cool completely before performing any inspection, maintenance, cleaning procedures or 

storage.

General maintenance

After the cordless fan is cooled, use clean clothes to remove dirt, dust, oil, grease etc. Never use gasoline, benzine, 

thinner, alcohol or the like. Discoloration, deformation or cracks may result.

 WARNING

 • All parts should be replaced at an Authorized Service Center.

Storage

To prevent fire or burning, allow the cordless fan to cool down completely before you store it.

Do not store the discharged battery for long periods, as it can shorten its service life.

For technical questions, please contact sales agent.

OPTIONAL ACCESSORY

 CAUTION:

These accessories or attachments are recommended for use with your Makita product specified in this manual. 

The use of any other accessories or attachments might present a risk of injury to persons. Only use accessory or 

attachment for its stated purpose.

If you need any assistance for more details regarding these accessories, ask your local Makita Service Center.

 • AC adaptor

 • Makita genuine battery and charger

NOTE:

Some items in the list may be included in the appliance package as standard accessories. They may differ from 

country to country.

MAKITA LIMITED WARRANTY

Please refer to the annexed warranty sheet for the most current warranty terms applicable to this product. If annexed 

warranty sheet is not available, refer to thewarranty details set forth at below website for your respective country.

 • United States of America: www.makitatools.com

 • Canada: www.makita.ca

 • Other countries: www.makita.com

Summary of Contents for CF101D

Page 1: ...l FRCA Ventilateur sans fil Manuel du proprietaire ESMX Ventilador Inal mbrico Manual del propietariio CF101D DCF102 IMPORTANT Read Before Using IMPORTANT Lire ce qui suit avant d utiliser cet outil I...

Page 2: ...2 CF101D 1 2 3 4 5 6 7 7 9 10 11 12 1 DCF102 1 2 3 4 5 6 7 7 9 10 11 8 12 2...

Page 3: ...3 CF101D DCF102 13 14 15 13 14 15 3 16 17 2 4 5 90 90 90 45 6...

Page 4: ...4 8 4 7 8 3 7 10 9 10 18 11...

Page 5: ...Do not handle the appliance with wet hands 6 Do not put any object into openings 7 Keep hair loose clothing finger and all parts of body away from openings and moving parts 8 Turn off all controls bef...

Page 6: ...section in this instruction manual or AC adaptor supplied as an optional accessory Use of any other batteries may create a risk of fire Recharge batteries only with the specified charger A charger th...

Page 7: ...fire 5 Under abusive conditions liquid may be ejected from the battery avoid contact If contact accidentally occurs flush with water If liquid contacts eyes additionally seek medical help Liquid eject...

Page 8: ...ore detailed national regulations Tape or mask off open contacts and pack up the battery in such a manner that it cannot move around in the packaging 21 Follow your local regulations relating to dispo...

Page 9: ...1 8 Net weight without battery 1 3 kg 2 8 lbs 1 3 kg 2 9 lbs CAUTION Only use the battery cartridges listed above Use of any other battery cartridges may cause injury and or fire Battery running time...

Page 10: ...17 on the battery cartridge to indicate the remaining battery capacity The indicator lamps 16 light up for few seconds Indicator lamps Remaining capacity Lighted Off Blinking 75 to 100 50 to 75 25 to...

Page 11: ...is running The duration to activate auto off timer changes every time you push the button 1 hour 2 hours 4 hours off The number under each auto off timer indicator shows the remaining hour s to turn...

Page 12: ...rvice Center Storage To prevent fire or burning allow the cordless fan to cool down completely before you store it Do not store the discharged battery for long periods as it can shorten its service li...

Page 13: ...les pi ces recommand es par le fabricant 4 Ne pas utiliser avec une batterie endommag e Si l appareil ne fonctionne pas comme il devrait apr s avoir t chapp endommag laiss dehors ou chapp dans l eau e...

Page 14: ...fil qui pr sente des signes d endommagement ou de fonctionnement anormal doit tre imm diatement mis hors service Inspectez l appareil avant chaque utilisation 24 Ne pas laisser le ventilateur sans fil...

Page 15: ...effectu e que par un personnel qualifi L ex cution de la r paration ou de la maintenance par un personnel non qualifi comporte un risque de blessure 2 Pour r parer un ventilateur sans fil utilisez uni...

Page 16: ...a batterie et 3 le produit aliment par la batterie 12 Ne pas d monter la batterie 13 Si l autonomie de la batterie devient tr s courte cessez imm diatement l utilisation Autrement il y a risque de sur...

Page 17: ...la batterie 1 Chargez la batterie avant qu elle ne soit compl tement d charg e Lorsque vous constatez une perte de puissance cessez toujours l utilisation et chargez la batterie 2 Ne rechargez jamais...

Page 18: ...Utilisez uniquement les batteries num r es ci dessus L utilisation de toute autre batterie peut causer une blessure et ou un incendie Autonomie de la batterie Le tableau suivant fait r f rence quelque...

Page 19: ...t pendant quelques secondes T moins Capacit restante Allum teint Clignotant 75 100 50 75 25 50 0 25 Chargez la batterie Pour les batteries de 18 V et 14 4 V uniquement La batterie a peut tre mal fonct...

Page 20: ...lation en retenant la t te de ventilation Pour l arr ter appuyez toujours sur le bouton d oscillation NOTE Selon la position de la t te de ventilation il se peut qu elle n oscille pas juste apr s la p...

Page 21: ...ire en option de l appareil avant d effectuer son nettoyage ou son entretien Laissez refroidir compl tement le ventilateur sans fil avant de le ranger ou d effectuer tout travail d inspection d entret...

Page 22: ...plus r cents termes de garantie qui s appliquent ce produit Si la feuille de garantie ci jointe n est pas disponible reportez vous aux d tails de garantie indiqu s sur le site Web ci dessous pour vot...

Page 23: ...el fabricante 4 No lo utilice con una bater a da ada Si el aparato no funciona correctamente se le ha ca do est da ado se ha dejado en exteriores o se le ha ca do al agua ll velo a nuestro centro de...

Page 24: ...ue su funcionamiento no sea normal se deber dejar de utilizar inmediatamente Inspecci nelo antes de cada utilizaci n 24 No deje el ventilador inal mbrico funcionando y desatendido 25 No maltrate el ad...

Page 25: ...omendados podr an ocasionar lesiones personales graves SERVICIO 1 El servicio del ventilador inal mbrico deber ser realizado solamente por personal de reparaci n cualificado Un servicio o mantenimient...

Page 26: ...tizar que se mantenga la seguridad del producto 10 No modifique ni intente reparar el aparato ni el cartucho de bater a salvo que se indique lo contrario en las instrucciones de uso y cuidado 11 Antes...

Page 27: ...N Utilice nicamente bater as originales de Makita El uso de bater as no originales de Makita o bater as que hayan sido alteradas puede provocar que la bater a explote ocasionando incendios lesiones pe...

Page 28: ...nicamente los cartuchos de bater a arriba indicados El uso de otros cartuchos de bater a podr a causar lesiones y o un incendio Duraci n de la bater a La siguiente tabla muestra algunos cartuchos de...

Page 29: ...ma el bot n de verificaci n 17 en el cartucho de bater a para indicar la capacidad restante de la bater a Las luces indicadoras 16 se encender n durante algunos segundos Luces indicadoras Capacidad re...

Page 30: ...del ventilador Oprima siempre el bot n de oscilaci n para detener la oscilaci n NOTA Dependiendo de la posici n de la cabeza del ventilador esta podr a no oscilar justo despu s de oprimir el bot n de...

Page 31: ...de CA accesorio opcional de la unidad cuando vaya a efectuar la limpieza o dar mantenimiento Permita que el ventilador inal mbrico se enfr e por completo antes de realizar cualquier tarea de inspecci...

Page 32: ...ja de garant a anexa para conocer los t rminos m s recientes de la garant a aplicables a este producto Si la hoja de garant a anexa no est disponible consulte los detalles de la garant a establecidos...

Reviews: