background image

11


014744 

NOTE:

• Do not attempt to repair cleaner by yourself.

Disposing cleaner

A Li-ion battery is built into this cleaner. Always remove it 
before disposing of the cleaner. 

Removing built-in battery

 CAUTION:

• Do not touch the terminals with any conductive 

material.

• Avoid storing battery unit in a container with other 

metal objects such as nails, coins, etc.

• Do not expose battery unit to water or rain.
• Do not disassemble or alter battery unit.
• The cleaner must be removed from the supply mains 

when removing the battery.

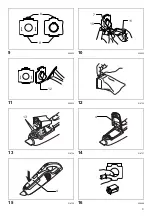
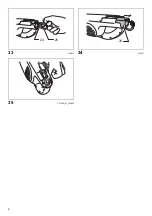
1. To remove the rear cover, push it in the direction of 

the arrow. 

(Fig. 32)


2. Slide the built-in battery halfway. Disconnect the lead 

wires from the battery by slightly moving back the 
battery while pressing the connector in the direction of 
arrow shown in the figure. 

(Fig. 33)


3. Then slide the battery unit completely. 

(Fig. 34)


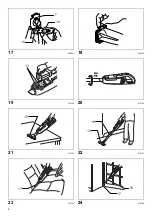
4. Put the removed battery unit in a carton box so that it 

is not circuit-shorted.

Installing replacement battery

To install the replacement battery, follow the removal
procedure in reverse.


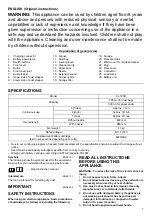
CAUTION: Route the lead so that it is completely 

stored inside the cleaner before putting the rear cover 
back in the original position.

 Failure to do this may 

damage the lead. 

(Fig. 35)

After installing the battery (see “SPECIFICATIONS”), 
charge the battery before use.
To maintain product SAFETY and RELIABILITY, repairs, 
any other maintenance or adjustment should be 
performed by Makita Authorized Service Centers, always 
using Makita replacement parts. 

OPTIONAL ACCESSORIES

CAUTION:

• These accessories or attachments are recommended 

for use with your Makita cleaner specified in this 
manual. The use of any other accessories or 
attachments might present a risk of injury to persons. 
Only use accessory or attachment for its stated 
purpose.

If you need any assistance for more details regarding 
these accessories, ask your local Makita Service Center.

• Extension wand (Straight pipe)
• Nozzle
• Nozzle for carpet
• Shelf brush
• Corner nozzle
• Round brush
• Flexible hose
• Paper pack
• Wall mount for cordless cleaner
• Replacement battery

NOTE:

• Some items in the list may be included in the tool 

package as standard accessories. They may differ 
from country to country.
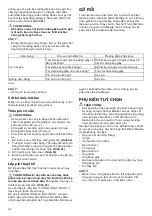
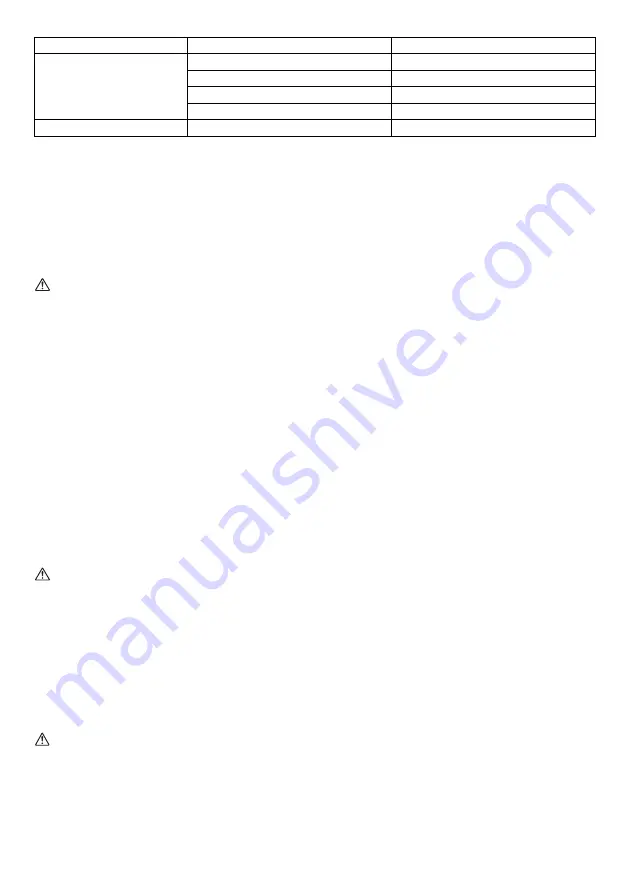
Symptom

Area to be investigated

Fixing method

Weak suction power

Is dust bag or paper pack full of dust?

Empty dust bag or paper pack.

Is dust bag clogged?

Dust down or wash the dust bag.

Is paper pack clogged?

Replace paper pack.

Is battery cartridge exhausted?

Charge the battery.

Not working

Is battery cartridge exhausted?

Charge the battery.

Summary of Contents for CL105DWX

Page 1: ...GB Cordless Cleaner Instruction manual ID Pembersih Nirkabel Petunjuk penggunaan VI Maùy huùt buïi chaïy pin Taøi lieäu höôùng daãn TH CL105D 014722 ...

Page 2: ...2 1 014724 2 014723 3 014725 4 014730 5 014731 6 014732 7 008920 8 008921 1 2 3 4 5 4 6 7 7 ...

Page 3: ...3 9 008930 10 008935 11 008932 12 014733 13 014734 14 014737 15 014735 16 008928 8 9 7 10 11 12 13 4 4 ...

Page 4: ...4 17 008931 18 008933 19 014736 20 014743 21 014726 22 014727 23 014728 24 014729 7 14 10 13 15 15 16 17 17 16 ...

Page 5: ...5 25 015596 26 015597 27 014739 28 008934 29 014741 30 014742 31 1050602 32 014815 18 19 20 21 22 23 ...

Page 6: ...6 33 014816 34 014817 35 CL105D_01_160823 24 25 26 ...

Page 7: ...ing the following READ ALL INSTRUCTIONS BEFORE USING THIS APPLIANCE WARNING To reduce the risk of fire electric shock or injury 1 Do not expose to rain Store indoors 2 Do not allow to be used as a toy Close attention is necessary when used by or near children 3 Use only as described in this manual Use only manufacturer s recommended attachments 4 Do not use with damaged battery If appliance is not...

Page 8: ...ine particle like concrete dust Such action may cause fire injury and or property damage 3 Stop operation immediately if you notice anything abnormal 4 If you drop or strike the cleaner check it carefully for cracks or damage before operation 5 Do not charge the cleaner close to dangerous flammable materials such as gasoline gas paint or adhesives 6 Do not charge the cleaner on papers cloth carpet...

Page 9: ...nditions ASSEMBLY Disposing of Dust CAUTION Empty the cleaner before it becomes too full or the suction force weakens Be sure to empty out the dust inside the cleaner itself Failure to do so may cause the sponge filter to be clogged or the motor to be damaged Never throw away the dust stopper because it should be used whenever either the dust bag or the paper pack is used 1 Push the button to open...

Page 10: ... After use When storing or charging the cleaner lock the nozzle head and hang it from a hook available in the market Fig 25 CAUTION Putting the cleaner against the wall without a hook may cause the cleaner to fall down and be damaged Fig 26 Cleaning Fig 27 From time to time wipe off the outside cleaner body of the cleaner using a cloth dampened in soapy water Clean out also the suction opening dus...

Page 11: ...al position Failure to do this may damage the lead Fig 35 After installing the battery see SPECIFICATIONS charge the battery before use To maintain product SAFETY and RELIABILITY repairs any other maintenance or adjustment should be performed by Makita Authorized Service Centers always using Makita replacement parts OPTIONAL ACCESSORIES CAUTION These accessories or attachments are recommended for ...

Page 12: ...da mengerti makna masing masing simbol sebelum menggunakan alat ini Baca petunjuk penggunaan Maksud penggunaan ENE017 1 Alat ini dimaksudkan untuk mengumpulkan debu kering PENTING ENA005 5 PETUNJUK KESELAMATAN Saat menggunakan perkakas listrik tindakan pencegahan dasar harus selalu dilakukan termasuk yang berikut ini 1 Konektor pengisian 2 Lampu daya baterai 3 Tombol sakelar 4 Penutup depan 5 Tomb...

Page 13: ...lah dari benda logam lain seperti klip kertas koin kunci paku sekrup atau benda logam kecil lainnya yang dapat menjadi penghubung antara terminal terminalnya 18 Bila disalahgunakan baterai dapat mengeluarkan cairan hindari terkena cairan ini Jika terkena cairan ini secara tidak sengaja bilaslah dengan air SIMPAN PETUNJUK INI Perkakas ini dimaksudkan untuk penggunaan dalam rumah tangga KAIDAH KESEL...

Page 14: ...h pengisian selesai Gunakan hanya pengisi baterai charger Makita DC1001 untuk mengisi baterai pembersih ini Penggunaan pengisi baterai jenis lain dapat menyebabkan baterai meledak yang mengakibatkan cedera dan kerusakan Isilah baterai pembersih ketika akan menggunakannya untuk pertama kalinya atau setelah lama tidak diisi Hubungkan steker pengisian ke konektor pengisian kemudian tancapkan pengisi ...

Page 15: ...an dalam gambar Gb 17 3 Tidak ada perbedaan antara sisi atas dan bawah pak kertas Anda dapat memasukkan tonjolan sisi mana pun ke dalam alur bawah penghenti debu Gb 11 4 Tumpang tindihkan bingkai penghenti debu dengan bingkai pak kertas Gb 18 5 Tempatkan penghenti debu dan pak kertas bersama ke dalam rongga pembersih pada arah yang sama seperti tanda panah pada penghenti debu Masukkan sepenuhnya k...

Page 16: ...k pembersih tanpa kabel terpasang dengan kuat sebelum menggantung pembersih Gb 31 PERHATIAN Jangan gantung pembersih pada gantungan dinding dengan paksa atau menggantung peralatan lain selain pembersih CATATAN Ketika Anda tidak mengisi daya pembersih steker dapat disimpan pada gantungan dinding untuk pembersih tanpa kabel seperti gambar PEMECAHAN MASALAH Sebelum meminta perbaikan lakukan pemeriksa...

Page 17: ...AN Aksesori atau alat tambahan ini dianjurkan untuk digunakan dengan pembersih Makita milik Anda yang disebutkan dalam buku petunjuk ini Penggunaan aksesori atau alat tambahan lain dapat menimbulkan risiko cedera pada orang Gunakan aksesori atau alat tambahan sesuai kegunaannya Jika Anda membutuhkan bantuan perihal informasi lebih terperinci mengenai aksesori aksesori ini tanyakan kepada Pusat Ser...

Page 18: ...ghóa cuûa caùc kyù hieäu naøy tröôùc khi söû duïng Ñoïc taøi lieäu höôùng daãn Muïc ñích söû duïng ENE017 1 Duïng cuï ñöôïc duøng ñeå huùt buïi khoâ QUAN TROÏNG ENA005 5 HÖÔÙNG DAÃN AN TOAØN Khi söû duïng thieát bò ñieän caùc phoøng ngöøa cô baûn phaûi luoân ñöôïc tuaân theo bao goàm caùc muïc sau 1 Ñaàu noái saïc 2 Ñeøn baùo naêng löôïng pin 3 Nuùt coâng taéc 4 Naép tröôùc 5 Nuùt 6 Khôùp noái naé...

Page 19: ...tieáp xuùc vôùi chaát loûng naøy haõy röûa saïch baèng nöôùc LÖU GIÖÕ CAÙC HÖÔÙNG DAÃN NAØY Thieát bò naøy duøng ñeå söû duïng trong nhaø QUY TAÉC AN TOAØN BOÅ SUNG ENB106 3 1 Ñoïc kyõ taøi lieäu höôùng daãn naøy vaø taøi lieäu höôùng daãn daønh cho boä saïc tröôùc khi söû duïng 2 Khoâng huùt nhöõng vaät lieäu sau Vaät lieäu noùng nhö thuoác laù ñang chaùy hoaëc tia löûa buïi kim loaïi do maøi caé...

Page 20: ...3 Laàn nhaán ñaàu tieân vaøo nuùt naøy laø cho toác ñoä cao vaø laàn nhaán thöù hai laø cho toác ñoä thaáp Ngoaøi ra moãi laàn nhaán vaøo nuùt naøy seõ laëp laïi chu kyø toác ñoä cao thaáp Trong khi nhaán nuùt 1 2 3 maùy huùt buïi naøy chaïy vôùi tuabin Cheá ñoä naøy phuø hôïp ñeå laøm saïch khu vöïc ñaëc bieät buïi Hình 3 Ñeøn baùo naêng löôïng pin Hình 2 Khi löôïng pin coøn laïi thaáp ñeøn baùo ...

Page 21: ...oà noäi thaát v v Voøi huùt deã daøng gaén vaøo Voøi huùt OÁng noái keùo daøi OÁng truï Hình 22 OÁng noái keùo daøi vöøa khít giöõa voøi huùt vaø maùy huùt buïi Thieát bò naøy raát thuaän tieän ñeå veä sinh saøn nhaø khi ñöùng thaúng Voøi huùt goùc Hình 23 Laép voøi huùt goùc ñeå veä sinh caùc goùc vaø keõ hôû cuûa oâ toâ hoaëc ñoà noäi thaát Voøi huùt goùc OÁng noái keùo daøi OÁng truï Hình 24 Tr...

Page 22: ...Laép pin thay theá Ñeå laép pin thay theá haõy thöïc hieän ngöôïc laïi vôùi quy trình thaùo THAÄN TROÏNG Ñi daây daãn sao cho daây ñöôïc giaáu hoaøn toaøn beân trong maùy huùt buïi tröôùc khi laép laïi naép sau vaøo vò trí ban ñaàu Khoâng laøm nhö vaäy coù theå laøm hö haïi daây daãn Hình 35 Sau khi laép pin haõy xem THOÂNG SOÁ KYÕ THUAÄT haõy saïc pin tröôùc khi söû duïng Ñeå duy trì ÑOÄ AN TOAØN...

Page 23: ...0 4 EPTA 01 2003 END315 1 456 7 56 8 4 456 7 7 ENE017 1 8 7 1 7 6 2 3 76 4 5 6 7 7 8 9 10 11 12 13 7 14 4 15 16 17 18 19 20 21 22 G 23 H 24 25 26 CL105D 500 330 4 7 3 6 5 7 2 5 10 1 5 20 446 983 N 1 1 O D C 10 8 V 7 632D82 4 ...

Page 24: ...7 7 7 5 6 1 5 8 5 9 4 8 10 1 1 11 5 71 7 12 1 6 13 14 5 5 5 15 5 15 5 71 7 7 6 7 7 R 8 8 7 7 R 16 5 5 7 7 R 17 5 0 6 5 1 1 0 6 18 3 4 5 7 7 7 3 ENB106 3 1 1 5 1 5 2 1 1 7 A B A 1 5 A A 1 9 5 0 8 5 1 7 4 A 7 2 7 4 3 0 7 0 5 3 0 7 4 1 2 5 5 5 5 1 2 5 B 6 1 2 7 D D 7 1 2 2 8 1 2 1 5 1 9 5 6 ...

Page 25: ... D D 3 5 3 9 2 5 1 7 6 0 5 5 3 31 1 50 C 122 F 7 5 3 7 5 5 3 5 3 8 5 5 0 15 5 1 1 5 3 1 5 5 2 5 0 5 5 5 3 5 3 31 10 C 40 C 50 F 104 F 5 3 0 4 5 4 H 76 7 5 7 6 G 7 6 7 6 7 7 6 Makita DC1001 7 6 7 7 6 R 7 6 7 7 6 7 G 7 6 7 6 G 7 6 8 7 6 7 6 7 5 3 7 7 6 56 1 2 7 4 6 U8 H 7 O 7 7 1 2 3 H 0 1 2 3 U X 1 2 3 6 3 3 ...

Page 26: ... H H 3 4 5 H 5 H 90 7 3 5 2 8 X 3 6 3 3 7 5 8 4 7 7 4 7 U 4 R 7 7 4 9 7 7 1 R 3 10 2 5 3 11 3 U 3 12 4 7 7 7 3 13 5 3 14 6 H 3 15 1 4 3 16 4 7 7 3 9 2 4 R 3 17 3 4 5 3 11 4 4 U 3 18 5 4 7 7 7 3 19 6 4 3 14 7 H 4 7 7 6 U8 6 4 H 4 7 7 U 5 7 4 4 4 5 7 ...

Page 27: ... 7 X 1 3 21 6 6 1 1 3 22 7 5 1 3 23 X 6 6 6 1 1 3 24 5 U8 8 7 H 76 G 4 0 7 6 U 3 25 7 3 26 27 7 7 7 R 7 5 4 7 7 U 6 _ 6 R U 7 7 N R 6 7 3 28 4 R 7 7 0 4 3 29 4 3 30 6 7 1 0 8 8 8 U8 8 8 3 31 U 5 1 2 5 7 5 5 1 2 5 7 6 G R ...

Page 28: ... 56 5 6 Makita U U 7 7 Makita 014744 U U 1 N O R 7 X 7 7 1 3 32 2 R 8 R 3 33 3 8 3 34 4 3 Z 5 0 1 2 2 Z 7 3 35 7 6 7 R 5b6 R R 5b6 6 Makita U U 4 7 Makita 7 56 Makita 5 7 56 5 56 6 Makita 5 7 4 5 N U U 4 4 4 4 7 6 7 6 ...

Page 29: ...29 56 56 d 7 ...

Page 30: ...30 ...

Page 31: ...31 ...

Page 32: ...Makita Corporation 3 11 8 Sumiyoshi cho Anjo Aichi 446 8502 Japan 885378C377 www makita com ALA ...

Reviews: