background image

P 3/ 7

R

epair

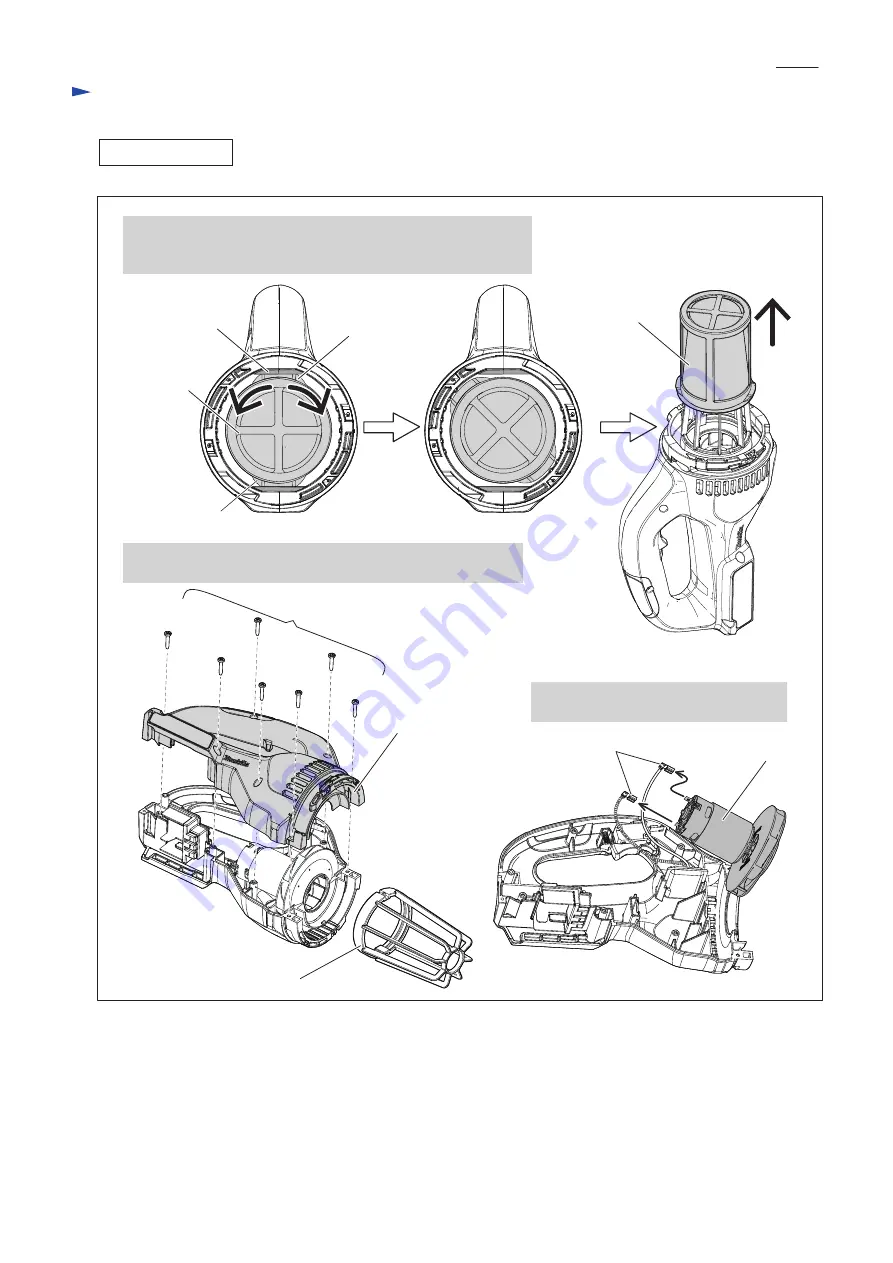
[2] -2. Motor section

DISASSEMBLING

(b)

1. Prefilter (a) is held with Housing rib (b).  

    Turn Prefilter (a) to make Tab (c) free from Housing rib (b).

    Remove Prefilter (a).

2. Unscrew seven 3x16 Tapping screws (d) from Housing R (e).

    Remove Stay (f).

3. Disconnect Flag terminals (g).

    Remove DC Motor (h).

(e)

(h)

(g)

Fig. 2

(a)

(a)

(f)

(c)

(c)

Note

: Blow dust out of Housing before assembling.

(d)

Summary of Contents for CL183D

Page 1: ...ith easy on off trigger Quick dust disposal You can easily dispose of dust simply by removing front housing Disposable paper bag is not necessary resulting in reduced maintenance cost Standard equipme...

Page 2: ...l tools are available for repairing this product DISASSEMBLING Fig 1 3 Remove 4x18 Tapping screw d and Flat washer 4 e to disassemble Valve f from Capsule c d e f Assemble Capsule section by reversing...

Page 3: ...ousing rib b Turn Prefilter a to make Tab c free from Housing rib b Remove Prefilter a 2 Unscrew seven 3x16 Tapping screws d from Housing R e Remove Stay f 3 Disconnect Flag terminals g Remove DC Moto...

Page 4: ...le Housing R c with seven 3x16 Tapping screws d 3 Assemble Stay e while fitting its Groove f to Protrusion of Housing g 1 Connect Flag terminals with DC Motor s terminals Fig D 2 2 Mount DC Motor and...

Page 5: ...P 5 7 Repair 2 3 Switch lever ASSEMBLING 1 Assemble Compression spring 4 a to Switch lever b by pressing the Spring until it stops 2 Assemble Switch lever b into Housing c b Fig 4 a a b c...

Page 6: ...witch a Flag receptacle with lock 250 t 0 8 a Flag receptacle w o lock 187 t 0 5 White Color index of lead wires sheath Black Red Blue Yellow Orange DC Motor 18AWG American Wire Gauge Red marking 18AW...

Page 7: ...al parts to Housing L d h i Be careful not to put Lead wires on Rib B i g Put Lead wires between Rib A h and the inner wall of Housing L d Controller e a Wiring to Switch DC Motor Terminal Wiring in H...

Reviews: