background image

9 ENGLISH

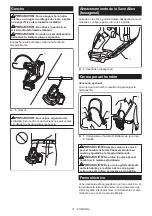
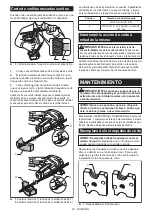
Hex wrench storage

When not in use, store the hex wrench as shown in the 

figure to keep it from being lost.

1

►    

1.

 Hex wrench

Shoulder strap

Optional accessory

Shoulder strap is useful for carrying the tool.

1

2

2

3

3

►    

1.

 Shoulder strap 

2.

 Belt end 

3.

 Buckle

CAUTION:


Always wear the shoulder strap 

crossed over your body and adjusted in proper 

length.

CAUTION:


Do not use the shoulder strap if it 

is damaged.

CAUTION:


Leave an sufficient length between 

the buckle and belt end to prevent the belt end 

from slipping through the buckle.

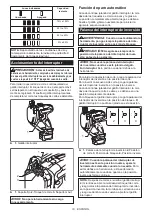
Electric brake

This tool is equipped with an electric brake. If the tool 

consistently fails to quickly stop after the switch trigger 

is released, have the tool serviced at a Makita service 

center.

ASSEMBLY

CAUTION:


Always be sure that the tool is 

switched off and the battery cartridge is removed 

before carrying out any work on the tool.

Installing the cutting dies

CAUTION:


Always install the cutting dies in 

the correct directions and secured firmly.

 Incorrect 

or loose attachment may cause breakage of the cutting 

die, resulting personal injury by flown off fractions.

NOTICE:


Remove the burr on the cutting dies 

using a file if any.

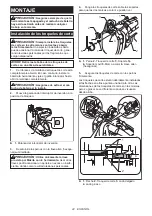
1.


Check if the jaw of the cutting die is fully opened. If not, install 

the battery and pull the switch trigger until the jaw is fully opened.

CAUTION:


Be sure to remove the battery 

cartridge if you installed.

2.


Set the reversing switch lever to the lock position.

1

►    

1.

 Reversing switch lever

3.


Unscrew the bolts with the supplied hex wrench.

CAUTION:


Use only the Makita wrench provided 

with the tool.

 Using other wrenches may result in overtight

-

ening or insufficient tightening which causes personal injury.

4.


Set the cutting dies onto the mounts so that the 

two colored markings can be seen.

1

2

3

4

5

6

1

2

►    

1.

 Bolt 

2.

 Cutting die 

3.

 Stationary mount 

4.

 Movable 

mount 

5.

 Colored marking 

6.

 Hex wrench

Summary of Contents for CS01

Page 1: ...INSTRUCTION MANUAL MANUAL DE INSTRUCCIONES Cordless Threaded Rod Cutter Cortadora Inalámbrica de Varilla CS01 IMPORTANT Read Before Using IMPORTANTE Lea antes de usar ...

Page 2: ... tool Work area safety 1 Keep work area clean and well lit Cluttered or dark areas invite accidents 2 Do not operate power tools in explosive atmo spheres such as in the presence of flammable liquids gases or dust Power tools create sparks which may ignite the dust or fumes 3 Keep children and bystanders away while operating a power tool Distractions can cause you to lose control Electrical Safety...

Page 3: ...f the reach of chil dren and do not allow persons unfamiliar with the power tool or these instructions to operate the power tool Power tools are dangerous in the hands of untrained users 5 Maintain power tools and accessories Check for misalignment or binding of moving parts breakage of parts and any other condition that may affect the power tool s operation If dam aged have the power tool repaire...

Page 4: ...ot disassemble battery cartridge 3 If operating time has become excessively shorter stop operating immediately It may result in a risk of overheating possible burns and even an explosion 4 If electrolyte gets into your eyes rinse them out with clear water and seek medical attention right away It may result in loss of your eyesight 5 Do not short the battery cartridge 1 Do not touch the terminals w...

Page 5: ...shortens the battery service life 3 Charge the battery cartridge with room tem perature at 10 C 40 C 50 F 104 F Let a hot battery cartridge cool down before charging it PARTS DESCRIPTION 13 14 5 7 12 9 11 10 6 15 8 1 2 3 4 4 1 Stationary mount 2 Movable mount 3 Cutting die 4 Bolt 5 Hook 6 Shoulder strap base for optional accessory 7 Hex Wrench 8 Lamp inside 9 Front face 10 Switch trigger 11 Revers...

Page 6: ...ery protection sys tem This system automatically cuts off power to the motor to extend tool and battery life The tool will auto matically stop during operation if the tool or battery is placed under one of the following conditions Overload protection When the tool is operated in a manner that causes it to draw an abnormally high current the tool automatically stops without any indication In this s...

Page 7: ...ition To reverse the cutting sequence set the reversing switch lever to the reversing position When you con tinue to pull the switch trigger the jaw of the cutting die opens and stops at fully opened position To lock the switch trigger set the reversing switch lever to the lock position The switch trigger cannot be pulled in this position 1 2 3 4 1 Reversing switch lever 2 Cutting position 3 Lock ...

Page 8: ... tool Rod guide For a precise cutting set the rod guide in position depending on the diameter of the threaded rod to be cut 1 2 1 Rod guide Position 1 2 Rod guide Position 2 There are two rod guide positions Position Size of threaded rod 1 W3 8 3 8 16UNC M10 2 W5 16 W1 4 5 16 18UNC 1 4 20UNC M8 M6 Hook CAUTION Never hook the tool on a windy location or a potentially unstable surface CAUTION Do not...

Page 9: ...ed before carrying out any work on the tool Installing the cutting dies CAUTION Always install the cutting dies in the correct directions and secured firmly Incorrect or loose attachment may cause breakage of the cutting die resulting personal injury by flown off fractions NOTICE Remove the burr on the cutting dies using a file if any 1 Check if the jaw of the cutting die is fully opened If not in...

Page 10: ...the cutting dies before cutting CAUTION Before pulling the switch trigger be sure to set the threaded rod so that its thread fits with those of cutting dies Incorrect alignment of the threads may break the cutting die and cause personal injury by flown off fractions CAUTION Replace the cutting dies if the cutting edge is chipped or deformed When cutting place the threaded rod perpendicular to the ...

Page 11: ...with the rod guide fit the thread of the rod with that of the cutting die on the stationary mount 3 Pull and hold the switch trigger until the cutting is finished and the jaw of the cutting die comes to fully opened position When cutting a long threaded rod which is hard to hold by hand place the tool as illustrated The tool can be placed flat The cover also can be used for supporting the end of t...

Page 12: ... storing the tool CAUTION When the tool is not used always attach the supplied cover to the cutting portion Attach the cover when carrying the tool When storing the tool remove the battery cartridge and the guide scale from the tool Clean dust on the cutting dies and the moving part After that attach the cover 1 1 Cover OPTIONAL ACCESSORIES CAUTION These accessories or attachments are recommended ...

Page 13: ...éctrica incendio y o lesiones graves Conserve todas las advertencias e instrucciones como referencia en el futuro En las advertencias el término herramienta eléctrica se refiere a su herramienta eléctrica de funcionamiento con conexión a la red eléctrica con cableado eléctrico o herramienta eléctrica de funcionamiento a batería inalámbrica Seguridad en el área de trabajo 1 Mantenga el área de trab...

Page 14: ...jas y el cabello largo suelto podrían engancharse en estas piezas móviles 7 Si dispone de dispositivos para la conexión de equipos de extracción y recolección de polvo asegúrese de conectarlos y utilizarlos debida mente Hacer uso de la recolección de polvo puede reducir los riesgos relacionados con el polvo 8 No permita que la familiaridad adquirida debido al uso frecuente de las herramientas haga...

Page 15: ...a calificada repare la herramienta eléctrica utilizando sólo piezas de repuesto idénticas Esto asegura que se man tenga la seguridad de la herramienta eléctrica 2 Nunca dé servicio a baterías que estén daña das El servicio a las baterías solamente deberá ser efectuado por el fabricante o un agente de servicio autorizado 3 Siga las instrucciones para la lubricación y cambio de accesorios 4 No modif...

Page 16: ...es de transporte se deben tomar en cuenta los requisitos especiales relativos al empaque y el etiquetado Para efectuar los preparativos del artículo que se va a enviar se requiere consultar a un experto en materiales peligrosos Si es posible consulte además otras regulaciones nacionales más deta lladas Pegue o cubra con cinta adhesiva los contactos abiertos y empaque la batería de manera que ésta ...

Page 17: ...móvil 3 Troquel de corte 4 Perno 5 Gancho 6 Base de la correa para el hombro para accesorio opcional 7 Llave allen hexagonal 8 Lámpara en el interior 9 Cara frontal 10 Gatillo interruptor 11 Palanca del interruptor de inversión 12 Guía de la varilla 13 Guía a medida 14 Tornillo de fijación 15 Cubierta ...

Page 18: ...da con un sistema de protección para la herramienta batería Este sistema corta en forma auto mática el suministro de energía al motor para prolongar la vida útil de la herramienta y la batería La herramienta se detendrá automáticamente durante la operación si la herramienta o la batería se someten a una de las siguientes condiciones En algunas condiciones los indicadores pueden encenderse Protecci...

Page 19: ...ca del inte rruptor de inversión en la posición de bloqueo PRECAUCIÓN Asegúrese siempre de la posición de la palanca del interruptor de inver sión antes de la operación AVISO No mueva la palanca del interruptor de inversión cuando se esté jalando del gati llo interruptor Esto podría ocasionar daños a la herramienta Para iniciar la operación de corte ponga la palanca del interruptor de inversión en...

Page 20: ...s rosca das de la misma longitud Inserte la guía a medida en el orificio tal como se muestra en la ilustración 1 2 1 Guía a medida 2 Tornillo de fijación Alinee el valor de la longitud que desee en la guía a medida con la línea de corte Luego apriete el tornillo de fijación 2 1 3 1 Guía a medida 2 Línea de corte 3 Tornillo de fijación PRECAUCIÓN No sostenga la guía a medida como forma de cargar o ...

Page 21: ...ra en la figura para evitar que se pierda 1 1 Llave Allen hexagonal Correa para el hombro Accesorio opcional La correa para el hombro resulta útil para cargar la herramienta 1 2 2 3 3 1 Correa para el hombro 2 Extremo de la correa 3 Hebilla PRECAUCIÓN Siempre coloque la correa para el hombre de forma transversal sobre su cuerpo y ajustada a la longitud adecuada PRECAUCIÓN No utilice la correa para...

Page 22: ...er el car tucho de batería si lo instaló 2 Mueva la palanca del interruptor de inversión a la posición de bloqueo 1 1 Palanca del interruptor de inversión 3 Desatornille los pernos con la llave allen hexago nal suministrada PRECAUCIÓN Utilice únicamente la llave provista por Makita con la herramienta Usar otras llaves podría ocasionar un apriete en exceso o insufi ciente dando como resultado lesio...

Page 23: ...una varilla roscada de metal dúctil como el acero inoxidable se pueden producir rebabas en el extremo de corte Remueva las reba bas con una lima en este caso 1 2 1 Varilla roscada 2 Rebabas Corte de varillas roscadas sujetadas Cuando se corte una varilla roscada la cual esté afian zada a la estructura de construcción como el techo un muro piso etc siga el procedimiento a continuación 1 2 1 Varilla...

Page 24: ...ir la acción de corte a mitad de la misma PRECAUCIÓN Nunca intente retirar la herra mienta forzadamente de la varilla roscada Puede ocasio nar que esta arranque de manera inesperada y ocasionar una lesión personal o daños al troquel de corte y a la herramienta Cuando interrumpa la acción de corte a la mitad de la misma ajuste la palanca del interruptor de inversión a la posición de inversión y jal...

Page 25: ...ta especificada en este manual El empleo de cualquier otro accesorio o aditamento puede conllevar el riesgo de lesiones personales Utilice los accesorios o aditamentos solamente para su fin establecido Si necesita cualquier ayuda para más detalles en relación con estos accesorios pregunte a su centro de servicio local Makita Troqueles de corte Correa para el hombro Batería y cargador originales de...

Page 26: ...26 ...

Page 27: ...27 ...

Page 28: ...eados por el lijado aserrado esmerilado taladrado y otras actividades de la construcción contienen sustancias químicas reconocidas por el Estado de California como causantes de cáncer defectos de nacimiento y otros peligros de reproducción Algunos ejemplos de estos productos químicos son plomo de pinturas a base de plomo sílice cristalino de ladrillos y cemento y otros productos de albañilería y a...

Reviews: