background image

6

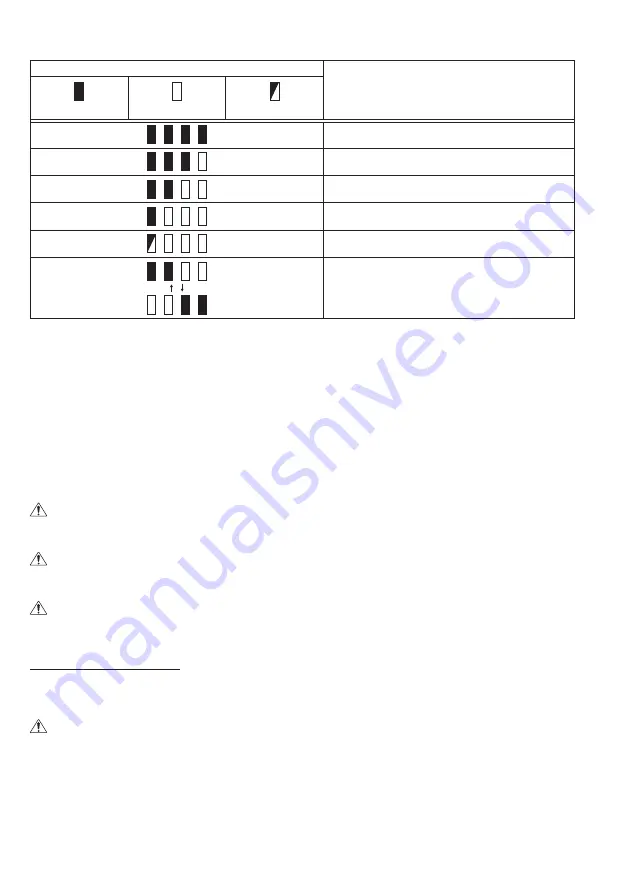
Press the check button on the battery cartridge to indicate the remaining battery capacity. The indicator lamps light 

up for few seconds.

Indicator lamps

Remaining capacity

Lighted

Off

Blinking

75% to 100%

50% to 75%

25% to 50%

0% to 25%

Charge the battery.

The battery may have malfunctioned.

NOTE:

•  Depending on the conditions of use and the ambient temperature, the indication may differ slightly from the actual 

capacity.

Timer setting

The portable fan can set a run time for 1 hour, 2 hours, or 4 hours by the timer switch (5 in 

Fig. 1-1

).

The number underneath the LED shows the remaining hour for turn off.

NOTE:

•  The cordless fan may run less time than the time you set when you use the battery cartridge.

Adjustable base

The portable fan base can be set in a variety of positions. To switch base positions, adjust base to desired position.

MAINTENANCE

 WARNING

•  When servicing, ask Makita authorized service centers and with only identical replacement parts. Use of any other 

parts may create a hazard or cause product damage.

 WARNING

•  To avoid serious personal injury, always remove the AC adaptor or battery cartridge from the unit when cleaning or 

performing any maintenance.

 WARNING

• 

Do not incinerate this fan, even if it is severely damaged. The batteries can explode in a fire. Dispose of the fan in 

accordance with the local regulations.

GENERAL MAINTENANCE

Avoid using solvents when cleaning plastic parts. Most plastics are susceptible to damage from various types of 

commercial solvents and may be damaged by their use. After the portable fan cooled, use clean clothes to remove 

dirt, dust, oil, grease etc.

 WARNING

• 

Do not at any time let brake fluids, gasoline, petroleum-based products, penetrating oils etc., contact with plastic 

parts. Chemicals can damage, weaken or destroy plastic which may result in serious personal injury. 

•  All parts should be replaced at an Authorized Service Center.

STORAGE

To prevent fire or burning, allow the portable fan to cool down completely before you store it.

Do not store the discharged battery for long periods, as it can shorten its service life.

For technical questions, please contact sales agent.

Summary of Contents for DCF201

Page 1: ...ateur Sans Fil Manuel du proprietaire E Ventilador Inal mbrico Manual del propietariio Model DCF201 Mod le DCF201 Modelo DCF201 IMPORTANT Read Before Using IMPORTANT Lire ce qui suit avant d utiliser...

Page 2: ...2 6 7 5 4 2 3 1 1 10 8 9 2 4 5 2 1 3 1 1 15V 3 15V 4 5 6 11 12 7...

Page 3: ...This appliance is not intended for use by persons including children with reduced physical sensory or mental capabilities or lack of experience and knowledge unless they have been given supervision or...

Page 4: ...tructions may create a risk of electric shock or injury SPECIFICATIONS Timer set 1 2 4 hour s Battery cartridge Makita 18V 14 4V Li ion rechargeable battery AC adaptor Input 100 240V 50 60 Hz 1 2A MAX...

Page 5: ...low overheating possible burns and even a breakdown 7 Do not store the tool and battery cartridge in locations where the temperature may reach or exceed 50 C 122 F 8 Do not incinerate the battery cart...

Page 6: ...her parts may create a hazard or cause product damage WARNING To avoid serious personal injury always remove the AC adaptor or battery cartridge from the unit when cleaning or performing any maintenan...

Page 7: ...ces en mouvement 8 D sactiver toutes les commandes avant de retirer la batterie 9 Utiliser uniquement l adaptateur secteur ou le chargeur fourni par le fabricant Les accessoires ad quats pour un vent...

Page 8: ...de ranger le ventilateur Ces mesures pr ventives peuvent r duire le risque de d marrage accidentel du ventilateur D branchez toujours le ventilateur de la prise de courant avant de proc der son inspe...

Page 9: ...puyez sur le bouton d interrupteur d alimentation 1 sur la Fig 1 pour teindre l appareil d branchez l adaptateur secteur de l alimentation principale et laissez le ventilateur sans fil refroidir compl...

Page 10: ...r la batterie Pour retirer la batterie faites la glisser hors de l outil tout en faisant glisser le bouton qui se trouve l avant de la batterie Pour poser la batterie alignez sa languette sur la rainu...

Page 11: ...ion locale pour la mise au rebut du ventilateur MAINTENANCE G N RALE vitez d utiliser des solvants pour nettoyer les pi ces en plastique La plupart des plastiques peuvent tre endommag s par les solvan...

Page 12: ...l fabricante Los accesorios que pueden ser apropiados para un ventilador inal mbrico pueden resultar peligrosos cuando se utilicen en otros 10 No cargue la bater a en exteriores 11 Este aparato no ha...

Page 13: ...mantenimiento o limpieza 5 Cuando el cartucho de bater a no est siendo utilizado mant ngalo alejado de otros objetos met licos Si se cortocircuitan los terminales de la bater a podr n producirse chis...

Page 14: ...velocidad mostrar el modo de velocidad baja Pulse el bot n interruptor de la alimentaci n 1 en la Fig 1 para apagar la unidad despu s de terminar de utilizarla despu s desenchufe el adaptador de CA de...

Page 15: ...o utilizado por un per odo prolongado m s de seis meses Instalaci n o extracci n del cartucho de bater a Fig 5 y 6 Apague siempre la herramienta antes de instalar o extraer el cartucho de bater a Para...

Page 16: ...ente da ado Las bater as podr an explotar al entrar en contacto con el fuego Deseche el ventilador en conformidad con las disposiciones locales MANTENIMIENTO GENERAL Evite utilizar disolventes cuando...

Reviews: