background image

9

ENGLISH

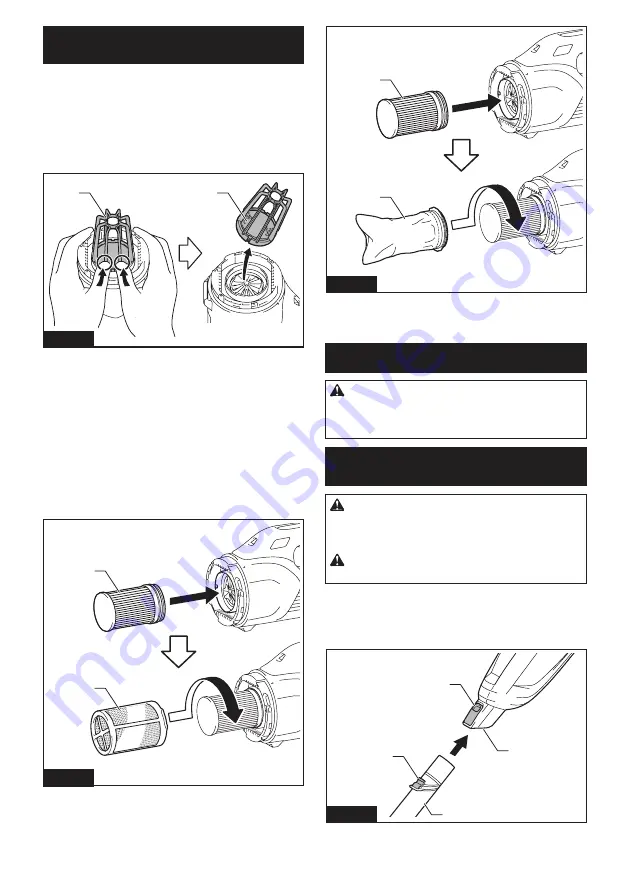
Installing or removing stay / HEPA 

filter

Optional accessory

For the stay and sponge filter

To remove the stay, push up the bottom part of pillars 

of the stay with your fingers and release its groove from 

the protrusion on the cleaner. After that, remove the 

sponge filter.

1

2

Fig.17

►    

1.

 Stay 

2.

 Sponge filter

To install, align the grooves on the stay with the protru-
sion on the cleaner and push until it clicks.

Insert the sponge filter between the pillars and set it in 

the original position.

For the HEPA filter

When installing the HEPA filter, fit the groove of the 

HEPA filter with the protrusion on the cleaner. Then, put 

the prefilter or the high performance filter on the HEPA 

filter and twist it to secure. To remove, follow the instal

-

lation procedure in reverse.

1

2

Fig.18

►    

1.

 HEPA filter 

2.

 Prefilter

1

2

Fig.19

►    

1.

 HEPA filter 

2.

 High performance filter

OPERATION

CAUTION:


Do not move your face close to 

the air vent when operating the cleaner.

 If foreign 

objects are blown into eyes, it may result in personal 

injury.

Installing and removing cleaner 
attachments

CAUTION:


After installing attachments, check 

if they are securely installed.

 If the attachments are 

installed imperfectly, they may come off and cause 

personal injury.

CAUTION:


Be careful not to hit your hand on 

the wall etc. when removing the attachments.

When using attachment with lock function

To install attachment, insert it to the suction inlet of the cleaner 
until it clicks. Make sure that the attachment is locked.

1

2

3

4

Fig.20

►    

1.

 Suction inlet 

2.

 Attachment with lock function 

3.

 Hook 

4.

 Release button

Summary of Contents for DCL284ZWX1

Page 1: ...INSTRUCTION MANUAL Cordless Cleaner DCL284F ENGLISH Original instructions Read before use ...

Page 2: ...untry to country The weight does not include accessories but battery cartridge s The lightest and heaviest combination weight of the appliance and battery cartridge s are shown in the table Applicable battery cartridge and charger Battery cartridge BL1815N BL1820B BL1830B BL1840B BL1850B BL1860B Charger DC18RC DC18RD DC18RE DC18SD DC18SE DC18SF DC18SH DC18WC Some of the battery cartridges and char...

Page 3: ...be ejected from the battery avoid contact If con tact accidentally occurs flush with water 19 Do not use a battery pack or appliance that is damaged or modified Damaged or modified batteries may exhibit unpredictable behaviour resulting in fire explosion or risk of injury 20 Do not expose a battery pack or appliance to fire or excessive temperature Exposure to fire or temperature above 130 C may c...

Page 4: ...regulations Tape or mask off open contacts and pack up the battery in such a manner that it cannot move around in the packaging 11 When disposing the battery cartridge remove it from the tool and dispose of it in a safe place Follow your local regulations relating to disposal of battery 12 Use the batteries only with the products specified by Makita Installing the batteries to non compliant produc...

Page 5: ... it is not being inserted correctly Tool battery protection system The tool is equipped with tool battery protection system This system automatically cuts off power to the motor to extend tool and battery life The tool will automatically stop during operation if the tool or battery is placed under one of the following conditions Overloaded The tool battery is operated in a manner that causes it to...

Page 6: ... can change the suction power before turning on the cleaner NOTE The cleaner starts the operation with the same suction power as the last operation Lighting up the lamp CAUTION Do not look in the light or see the source of light directly To turn on the lamp push the suction power change button The lamp goes off in approximately 10 seconds While the cleaner is running the lamp turns on The lamp goe...

Page 7: ...t on the HEPA filter 2 1 Fig 8 1 High performance filter 2 Stay designed for high performance filter Disposing of dust CAUTION Empty the cleaner before it becomes too full or the suction force weakens CAUTION Be sure to empty the inside of the cleaner itself of dust Failure to do so may cause the filter to be clogged or the motor to be damaged In order to drop dust sticking on the filter in the ca...

Page 8: ...ce filter 1 Fig 14 1 Securing lip NOTICE Always be sure to check that high per formance filter is loaded correctly prior to using cleaner If it is not loaded correctly dust will get into the motor housing and cause motor failure If the problem as described later occurs high perfor mance filter is not loaded correctly Reload it correctly to rectify problem Attach the capsule Align the mark on capsu...

Page 9: ...A filter and twist it to secure To remove follow the instal lation procedure in reverse 1 2 Fig 18 1 HEPA filter 2 Prefilter 1 2 Fig 19 1 HEPA filter 2 High performance filter OPERATION CAUTION Do not move your face close to the air vent when operating the cleaner If foreign objects are blown into eyes it may result in personal injury Installing and removing cleaner attachments CAUTION After insta...

Page 10: ... secure the connection during use To disconnect the attachment twist and extract it also in direction of the arrow If the attachment is twisted in the opposite direction the capsule may become loose Fig 22 Cleaning Suction Nozzle Attach the nozzle to clean off tables desks furniture etc The nozzle slips on easily 1 Fig 23 1 Nozzle Nozzle Extension wand Straight pipe The extension wand fits in betw...

Page 11: ...st without nozzle Fig 28 For picking up dust on a floor in a standing position it is convenient to attach the extension wand to the cleaner 1 Fig 29 1 Extension wand Straight pipe MAINTENANCE CAUTION Always be sure that the tool is switched off and the battery cartridge is removed before attempting to perform inspection or maintenance To maintain product SAFETY and RELIABILITY repairs any other ma...

Page 12: ...om time to time wipe off the outside cleaner body of the cleaner using a cloth dampened in soapy water Clean out also the suction opening and filter mounting area Fig 31 High performance filter Wash the filter in soapy water when it is clogged with dust and the cleaner power becomes weak Dry it out thoroughly before use Fig 32 HEPA filter Optional accessory NOTICE Do not rub or scratch the HEPA fi...

Page 13: ...tigated Fixing method Weak suction power Is the capsule full of dust Empty the capsule of dust Is the filter clogged Clean or wash the filter Is the battery cartridge discharged Charge the battery cartridge Not working Is the battery cartridge discharged Charge the battery cartridge Noise and vibration Is the filter clogged Clean or wash the filter Is the nozzle pipe or suction inlet of the applia...

Page 14: ...TICE When the cyclone attachment is attached do not use the cleaner in a horizontal or upward facing position Doing so may cause the mesh filter to become clogged NOTICE Always use the cleaner with the filters installed even when using the cyclone attach ment Using the cleaner without the filters installed may result in a motor malfunction NOTE Check that the cyclone attachment cleaner and extensi...

Page 15: ...e an electrical shock or damage to the appliance When the dust case becomes dirty or the mesh filter is clogged remove and wash them with water Refer to Disposing of dust for the removal procedure Dry the parts thoroughly before reinstallation and use 2 1 Fig 39 1 Dust case 2 Mesh filter When the mesh filter gets dirty badly clean it in the following procedures 1 Turn the mesh filter in the direct...

Page 16: ...www makita com Makita Europe N V Makita Corporation 3 11 8 Sumiyoshi cho Anjo Aichi 446 8502 Japan Jan Baptist Vinkstraat 2 3070 Kortenberg Belgium 885A25 225 EN 20221111 ...

Reviews: