background image

7

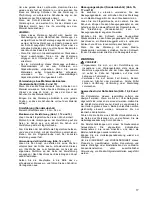
Switch action (Fig. 4)

CAUTION:

• Before installing the battery cartridge into the tool,

always check to see that the slide switch actuates
properly and returns to the “OFF” position when the
rear of the slide switch is depressed.

To start the tool, slide the slide switch toward the “I (ON)”
position. For continuous operation, press the front of the
slide switch to lock it.
To stop the tool, press the rear of the slide switch, then
slide it toward the “O (OFF)” position.

Accidental re-start preventive function

Even if the battery cartridge is installed on the tool with
the slide switch in the “I (ON)” position, the tool does not
start.
To start the tool, first slide the slide switch toward the
“O (OFF)” position and then slide it toward the “I (ON)”
position.

ASSEMBLY

CAUTION:

• Always be sure that the tool is switched off and the

battery cartridge is removed before adjusting or
checking function on the tool.

Installing or removing bit (Fig. 5)

CAUTION:

• Do not tighten the collet nut without installing a bit, or

the collet cone may break.

Press the shaft lock to prevent shaft rotation when
installing or removing the bit.
To install the bit, place it in the collet cone as far as it
goes and then tighten the collet nut securely with the
shoe as a wrench.
To remove the bit, follow the installation procedure in
reverse.

Changing the collet cone (country specific) 

(Fig. 6)

CAUTION:

• Use the correct size collet cone for the bit which you

intended to use.

• Do not tighten the collet nut without installing a bit, or

the collet cone may break.

To change the collet cone, loosen the collet nut and
remove. Remove the installed collet cone and replace
with desired collet cone. Reinstall collet nut.

OPERATION

CAUTION:

• Avoid forcing the bit to bend or twist. It may snap.
• Before turning the tool on, make sure the bit and collet

nut are securely tightened.

Hold the tool securely with the bit pointing in a safe
direction not contacting any surface. Turn the tool on and
wait until the tool reaches full speed. 

(Fig. 7)

When using the drywall guide bit into a drywall, carefully
insert the bit straight until the shoe base contacts the
material fully.
Move the tool slowly with a constant pressure in a
clockwise direction to make the cut. 

(Fig. 8)

When cutting straight line, clamp a straight board firmly
to the material and use it as a guide. Move the tool in the
direction of the arrow with the shoe base flush with the
side of the guide board.
When the cut is complete, turn the tool off and wait for
the bit to stop rotating and then carefully remove it from
the material.

NOTE:

• When using this tool, the rotating action causes the tool

to pull. The less pressure applied to the tool causes
less pull and provides a more accurate cut. Excessive
pressure or fast cutting can cause the bit to dull or
break premature.

• When cutting drywall around outlet boxes, cut in a

counterclockwise direction for ease of cut.

• The standard bit included with this tool is for cutting

drywall only. When cutting materials other than drywall,
do not use the standard drywall guide bit.

Using multipurpose bit (optional accessory) 

(Fig. 9 & 10)

When using the multipurpose bit into the material, hold
the tool at approximately a 45 degree angle with the
edge of the shoe base contacting the material.
Bring the tool carefully to a straight position so the shoe
base contacts the material fully.

Circular guide (optional accessory)

Circular cutting diameters: 10 cm – 34 cm

Installing circular guide (Fig. 11, 12 & 13)

Release the thumb screw which secures the shoe.
Align the projections in the circular guide with the
grooves in the shoe, and secure the shoe and circular
guide with the thumb screw.
To adjust the cutting depth, loose the thumb screw and
then slide the shoe with the circular guide. After the
proper adjustment, tighten the thumb screw securely.

Using circular guide (Fig. 14 & 15)

Loosen the knob, and adjust its position in accordance
with the size of the circle to be cut. (The hole dimensions
to be cut are indicated on the side of the circular guide as
a general guideline.) After completion of the adjustment,
tighten the knob securely.
Install the end of the knob into the center of the circle to
be cut, and proceed to cut in a clockwise direction.

Vacuum cover (optional accessory) (Fig. 16, 17 & 

18)

To perform cleaner operations, use the vacuum cover
and connect the tool to Makita vacuum cleaner or dust
collector.
Loosen the thumb screw and remove the shoe. Attach
the vacuum cover, and fasten it securely with the thumb
screw.
The circular guide (optional accessory) can be installed
on the vacuum cover.
Connect the hose of a vacuum cleaner/dust collector to
the vacuum cover. When connecting to Makita vacuum
cleaner, use an optional hose 28 mm in inner diameter.
When connecting to Makita dust collector, connect the
hose for the dust collector directly to the dust nozzle.

Summary of Contents for DCO140

Page 1: ...leitung I Rifilatore a batteria Istruzioni per l uso NL Snoerloze decoupeerboor Gebruiksaanwijzing E Recortadora Inalámbrica Manual de instrucciones P Recortadora de Gesso a Bateria Manual de instruções DK Akku skæremaskine Brugsanvisning GR Εργαλείο κοπής μπαταρίας Οδηγίες χρήσεως TR Akülü Kesici Alet Kullanma kılavuzu DCO140 DCO180 ...

Page 2: ...2 1 2 3 4 5 6 7 8 1 2 3 4 5 6 7 8 6 9 10 11 12 13 8 014849 014854 014852 014857 012128 014856 014853 014858 ...

Page 3: ...3 9 10 11 12 13 14 15 16 5 6 14 6 5 15 6 11 10 16 10 11 16 5 17 014870 014863 014867 014864 014851 014871 014865 014866 ...

Page 4: ...4 17 18 19 20 21 18 17 19 20 21 18 17 19 22 23 24 25 26 25 014859 001145 014869 014860 014868 ...

Page 5: ...te your work area adequately 5 Check the bit carefully for cracks or damage before operation Replace cracked or damaged bit immediately 6 Check for the proper clearance beneath the workpiece before cutting so that the bit will not strike a hard surface such as the floor workbench etc 7 Do not cut metal objects such as nails and screws Inspect for and remove all nails screws and other foreign mater...

Page 6: ...hed off and the battery cartridge is removed before adjusting or checking function on the tool Installing or removing battery cartridge Fig 1 CAUTION Always switch off the tool before installing or removing of the battery cartridge Hold the tool and the battery cartridge firmly when installing or removing battery cartridge Failure to hold the tool and the battery cartridge firmly may cause them to...

Page 7: ... Move the tool in the direction of the arrow with the shoe base flush with the side of the guide board When the cut is complete turn the tool off and wait for the bit to stop rotating and then carefully remove it from the material NOTE When using this tool the rotating action causes the tool to pull The less pressure applied to the tool causes less pull and provides a more accurate cut Excessive p...

Page 8: ...in the list may be included in the tool package as standard accessories They may differ from country to country ENG905 1 Noise The typical A weighted noise level determined according to EN60745 Sound pressure level LpA 77 dB A Uncertainty K 3 dB A The noise level under working may exceed 80 dB A Wear ear protection ENG900 1 Vibration The vibration total value tri axial vector sum determined accord...

Page 9: ...ques exposées de l outil électrique causant ainsi un choc électrique chez l utilisateur 2 Utilisez des dispositifs de serrage ou autres moyens pratiques pour fixer et soutenir la pièce sur une surface stable La pièce sera instable et vous risquez d en perdre la maîtrise si vous la tenez dans vos mains ou l appuyez contre votre corps 3 Portez des protections pour les yeux et un masque anti poussièr...

Page 10: ...RUCTIONS Conseils pour assurer la durée de vie optimale de la batterie 1 Rechargez la batterie avant qu elle ne soit complètement déchargée Arrêtez toujours l outil et rechargez la batterie quand vous remarquez que la puissance de l outil diminue 2 Ne rechargez jamais une batterie complètement chargée La surcharge réduit la durée de service de la batterie 3 Chargez la batterie alors que la tempéra...

Page 11: ...abot comme une clé Pour retirer le foret inversez les étapes de la procédure d installation Changement de la douille de serrage selon le pays Fig 6 ATTENTION La taille de la douille de serrage doit être adaptée au foret que vous voulez utiliser Ne serrez pas l écrou de la douille de serrage sans installer de foret sous peine de casser la douille de serrage Pour changer la douille de serrage desser...

Page 12: ...ussières ENTRETIEN ATTENTION Avant d effectuer tout travail d inspection ou de maintenance non mentionné dans la section de dépannage suivante concernant la lampe assurez vous toujours que l outil est hors tension et que la batterie est retirée N utilisez jamais d essence benzine diluant alcool ou autre produit similaire Cela risquerait de provoquer la décoloration la déformation ou la fissuration...

Page 13: ...té à prendre pour protéger l utilisateur doivent être basées sur une estimation de l exposition dans des conditions réelles d utilisation en tenant compte de toutes les composantes du cycle d utilisation comme par exemple le moment de sa mise hors tension lorsqu il tourne à vide et le moment de son déclenchement ENH101 17 Pour les pays d Europe uniquement Déclaration de conformité CE Makita déclar...

Page 14: ... so dass der Benutzer einen elektrischen Schlag erleiden kann 2 Verwenden Sie Klemmen oder eine andere praktische Methode um das Werkstück auf einer stabilen Unterlage zu sichern und abzustützen Wenn Sie das Werkstück nur mit der Hand oder gegen Ihren Körper halten befindet es sich in einer instabilen Lage die zum Verlust der Kontrolle führen kann 3 Tragen Sie einen Augenschutz und eine Staubmaske...

Page 15: ...en mit anderen Metallgegenständen wie z B Nägel Münzen usw 3 Setzen Sie den Akku weder Wasser noch Regen aus Ein Kurzschluss des Akkus verursacht starken Stromfluss der Überhitzung Verbrennungen und einen Defekt zur Folge haben kann 6 Lagern Sie Maschine und Akku nicht an Orten an denen die Temperatur 50 C erreichen oder überschreiten kann 7 Versuchen Sie niemals den Akku zu verbrennen selbst wenn...

Page 16: ...derseite ein Zum Ausschalten des Werkzeugs die Rückseite des Schiebeschalters drücken und dann den Schalter auf die Stellung O AUS schieben Funktion zur Verhütung eines versehentlichen Wiederanlaufs Das Werkzeug startet nicht selbst wenn der Akku in der Position I EIN des Schiebeschalters am Werkzeug angebracht wird Um das Werkzeug zu starten schieben Sie den Schiebeschalter zuerst auf die Positio...

Page 17: ...gemeine Richtlinie an der Seite der Kreisführung angegeben Nach Abschluss der Einstellung den Knopf wieder festziehen Setzen Sie die Knopfspitze in die Mitte des zu schneidenden Kreises ein und führen Sie den Schnitt im Uhrzeigersinn aus Absaugungsadapter Sonderzubehör Abb 16 17 und 18 Um sauberer zu arbeiten verwenden Sie den Absaugungsadapter und schließen Sie das Werkzeug an ein Makita Sauggerä...

Page 18: ...s2 oder weniger Ungewissheit K 1 5 m s2 ENG901 1 Der angegebene Vibrationsemissionswert wurde im Einklang mit der Standardprüfmethode gemessen und kann für den Vergleich zwischen Maschinen herangezogen werden Der angegebene Vibrationsemissionswert kann auch für eine Vorbewertung des Gefährdungsgrads verwendet werden WARNUNG Die Vibrationsemission während der tatsächlichen Benutzung des Elektrowerk...

Page 19: ...pezzo su una piattaforma stabile Se si tiene il pezzo con la mano o lo si appoggia al corpo lo si rende instabile e si potrebbe causare una perdita di controllo 3 Portare la protezione per gli occhi e la mascherina antipolvere 4 Ventilare adeguatamente l area di lavoro 5 Prima di cominciare un lavoro controllare attentamente che la punta non presenti crepe o danni Sostituire immediatamente la punt...

Page 20: ...cia della batteria prima che si scarichi completamente Smettere sempre di usare l utensile e caricare la cartuccia della batteria quando si nota che la potenza dell utensile è diminuita 2 Non ricaricare mai una cartuccia della batteria completamente carica La sovraccarica riduce la durata della batteria 3 Caricare la cartuccia batteria a una temperatura ambiente di 10 C 40 C Lasciar raffreddare un...

Page 21: ...iusura dipendente dal mercato Fig 6 ATTENZIONE Usare il cono della bussola di chiusura con le dimensioni corrette per la punta che si intende usare Non si deve stringere il dado della bussola di chiusura senza aver installato una punta perché altrimenti il cono della bussola potrebbe rompersi Per cambiare il cono della bussola di chiusura allentare il dado della bussola e rimuovere Rimuovere il co...

Page 22: ...ze simili Potrebbero causare scolorimenti deformazioni o crepe Sostituzione delle spazzole di carbonio Figg 19 20 e 21 Rimuovere e controllare regolarmente le spazzole di carbonio Sostituirle quando sono usurate fino al segno di limite Mantenere le spazzole di carbonio pulite in modo da poter scorrere liberamente nei portaspazzole Le spazzole di carbone devono essere sostituite entrambe allo stess...

Page 23: ... dell operatore basate sulla stima dell esposizione nelle condizioni reali d utilizzo tenendo presente tutte le parti del ciclo operativo come le volte in cui l utensile viene spento e quando gira a vuoto oltre al tempo di funzionamento ENH101 17 Modello per l Europa soltanto Dichiarazione CE di conformità Makita dichiara che la macchina seguente Designazione della macchina Rifilatore a batteria M...

Page 24: ...ingen om uw werkstuk aan een stabiele ondergrond vast te klemmen Als u het werkstuk met de hand vasthoudt of tegen uw lichaam klemt zou u de beheersing over het gereedschap kunnen verliezen 3 Draag een veiligheidsbril en stofmasker 4 Zorg dat uw werkruimte goed geventileerd is 5 Controleer de snijboor zorgvuldig op barstjes of andere beschadigingen voordat u aan het werk gaat Vervang een gebarsten...

Page 25: ...0 C of hoger 7 Werp de accu nooit in het vuur ook niet wanneer hij zwaar beschadigd of volledig versleten is De accu kan namelijk ontploffen in het vuur 8 Wees voorzichtig dat u de accu niet laat vallen en hem niet blootstelt aan schokken of stoten 9 Gebruik nooit een beschadigde accu 10 Volg bij het wegwerpen van de accu de plaatselijk geldende voorschriften BEWAAR DEZE VOORSCHRIFTEN Tips voor ee...

Page 26: ...u eerst de schakelaar naar de O UIT stand en dan schuift u die weer in de I AAN stand INEENZETTEN LET OP Zorg altijd dat het gereedschap is uitgeschakeld en de accu ervan is verwijderd alvorens de functies op het gereedschap af te stellen of te controleren Aanbrengen en verwijderen van een snijboor Fig 5 LET OP Draai de klembusmoer niet aan zonder dat er een snijboor aanwezig is anders kan de klem...

Page 27: ...n zet het stevig vast met de duimschroef De cirkelgeleider optioneel accessoire kan op het stofzuigdeksel worden gemonteerd Sluit de slang van een stofzuiger stofopvanger aan op het stofzuigdeksel Voor het aansluiten op een Makita stofzuiger gebruikt u een optionele slang met een binnendiameter van 28 mm Voor het aansluiten op een Makita stofopvanger maakt u de slang van de stofopvanger rechtstree...

Page 28: ...erschillen van de opgegeven trillingsemissiewaarde afhankelijk van de manier waarop het gereedschap wordt gebruikt Zorg ervoor dat veiligheidsmaatregelen worden getroffen ter bescherming van de operator die zijn gebaseerd op een schatting van de blootstelling onder praktijkomstandigheden rekening houdend met alle fasen van de bedrijfscyclus zoals de tijdsduur gedurende welke het gereedschap is uit...

Page 29: ... metálicas expuestas de la herramienta eléctrica y podrá soltar una descarga eléctrica al operario 2 Utilice mordazas u otros medios de sujeción prácticos para sujetar y apoyar la pieza de trabajo en una plataforma estable Sujetada con la mano o contra el cuerpo la pieza de trabajo estará inestable y podrá ocasionar la pérdida del control 3 Póngase protección para los ojos y máscara contra el polv...

Page 30: ...ón de corriente un recalentamiento posibles quemaduras e incluso una rotura de la misma 6 No guarde la herramienta ni el cartucho de batería en lugares donde la temperatura pueda alcanzar o exceder los 50 C 7 Nunca incinere el cartucho de batería incluso en el caso de que esté dañado seriamente o ya no sirva en absoluto El cartucho de batería puede explotar si se tira al fuego 8 Tenga cuidado de n...

Page 31: ...nción de puesta en marcha accidental Aunque se instale el cartucho de batería en la herramienta con el interruptor deslizable en la posición I ON la herramienta no se pondrá en marcha Para poner en marcha la herramienta primero deslice el interruptor deslizable hacia la posición O OFF y después deslícelo hacia la posición I ON MONTAJE PRECAUCIÓN Asegúrese siempre de que la herramienta está apagada...

Page 32: ...la firmemente con el tornillo de palometa La guía circular accesorio opcional se puede instalar en la tapa de vacío Conecte la manguera de un aspirador colector de polvo a la tapa de vacío Cuando la conecte a un aspirador Makita utilice una manguera opcional de 28 mm de diámetro interior Cuando la conecte a un colector de polvo Makita conecte la manguera para el colector de polvo directamente a la...

Page 33: ...eal de la herramienta eléctrica puede variar del valor de emisión declarado dependiendo de las formas en las que la herramienta sea utilizada Asegúrese de identificar medidas de seguridad para proteger al operario que estén basadas en una estimación de la exposición en las condiciones reales de utilización teniendo en cuenta todas las partes del ciclo operativo tal como las veces cuando la herrami...

Page 34: ...o a peça em que está a trabalhar deixa a instável e pode levar a perda de controlo 3 Use protecção ocular e máscara contra poeiras 4 Ventile a área de trabalho adequadamente 5 Antes de utilizar a ferramenta verifique cuidadosamente se a broca não está trincada ou danificada Substitua imediatamente as brocas trincadas ou danificadas 6 Verifique se há uma folga suficiente por baixo da peça de trabal...

Page 35: ...arregada Carregamento excessivo diminui a vida útil da bateria 3 Carregue a bateria à temperatura ambiente de 10 C 40 C Deixe que uma bateria quente arrefeça antes de a carregar 4 Carregue a bateria uma vez a cada seis meses se não for utilizá la por um longo período de tempo DESCRIÇÃO FUNCIONAL PRECAUÇÃO Certifique se sempre de que a ferramenta está desligada e a bateria retirada antes de regular...

Page 36: ...e aperte a porca de engaste em segurança utilizando a sapata como chave Para retirar a broca siga o procedimento de instalação pela ordem inversa Mudar o cone de engaste específico do país Fig 6 PRECAUÇÃO Utilize o cone de engaste do tamanho correcto relativamente à broca que pretende utilizar Não aperte a porca de engaste sem instalar uma broca caso contrário o cone de engaste pode partir se Para...

Page 37: ...ferramenta excepto ao solucionar os problemas seguintes relacionados com a lâmpada Nunca utilize gasolina benzina diluente álcool ou produtos semelhantes Pode ocorrer a descoloração deformação ou rachaduras Substituição das escovas de carvão Fig 19 20 e 21 Retire e verifique regularmente as escovas de carvão Substitua as quando estiverem gastas até à marca limite Mantenha as escovas de carvão limp...

Page 38: ...a de exposição em condições reais de utilização considerando todas as partes do ciclo de operação tal como quando a ferramenta está desligada e quando está a funcionar em marcha lenta além do tempo de accionamento ENH101 17 Só para países Europeus Declaração de conformidade CE A Makita declara que a s seguinte s máquina s Designação da ferramenta Recortadora de Gesso a Bateria Modelos n Tipo DCO14...

Page 39: ...er at miste herredømmet over det 3 Brug øjenbeskyttelse og støvmaske 4 Sørg for tilstrækkelig ventilation på arbejdsstedet 5 Kontroller omhyggeligt boret for revner eller beskadigelse inden brug Skift straks et revnet eller beskadiget bor ud 6 Kontroller at afstanden under arbejdsstykket er korrekt inden De skærer således at boret ikke rammer en hård overflade som f eks gulvet arbejdsbænken etc 7 ...

Page 40: ...måned hvis den ikke anvendes i et længere tidsrum FUNKTIONSBESKRIVELSE FORSIGTIG Vær altid sikker på at værktøjet er afbrudt og akkuen fjernet inden De justerer eller kontrollerer funktionen af værktøjet Installation og fjernelse af akkuen Fig 1 FORSIGTIG Sluk altid for værktøjet inden De installerer eller fjerner akkuen Hold godt fast i værktøjet og akkuen når akkuen installeres eller fjernes For...

Page 41: ...terialet helt Bevæg værktøjet langsomt med et konstant tryk i retningen med uret for at udføre snittet Fig 8 Når der skæres i en lige linje skal man spænde en plan plade fast på materialet og bruge det som en guide Bevæg værktøjet i retningen vist med pilen med skoens underside ud for siden af guidepladen Når snittet er fuldført skal man slukke for værktøjet og vente til boret er holdt op med at d...

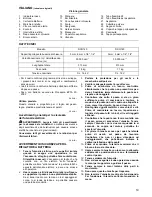
Page 42: ...eres lokale Makita service center Tørmursguidebor Multifunktionsbor Spændepatronkegle Nøgle Rund guide Vakuumdæksel Original Makita akku og oplader BEMÆRK Nogle ting på denne liste kan være inkluderet i værktøjspakken som standardtilbehør Det kan være forskelligt fra land til land ENG905 1 Lyd Det typiske A vægtede støjniveau bestemt i overensstemmelse med EN60745 Lydtryksniveau LpA 77 dB A Usikke...

Page 43: ...ίου να καταστούν τα ίδια ηλεκτροφόρα και να προκαλέσουν ηλεκτροπληξία στο χειριστή 2 Να χρησιμοποιείτε σφιγκτήρες ή κάποιο άλλο πρακτικό μέσο για να ασφαλίζετε και να στηρίζετε το τεμάχιο εργασίας σε μια σταθερή πλατφόρμα Αν κρατάτε το τεμάχιο εργασίας με το χέρι σας ή επάνω στο σώμα σας αυτό θα είναι ασταθές και μπορεί να χάσετε τον έλεγχο 3 Φοράτε προστασία ματιών και προσωπίδα κατά της σκόνης 4...

Page 44: ...ή ρεύματος υπερθέρμανση πιθανά εγκαύματα ακόμη και σοβαρή βλάβη 6 Μην αποθηκεύετε το εργαλείο και την κασέτα μπαταρίας σε τοποθεσίες όπου η θερμοκρασία μπορεί να φτάσει ή να ξεπεράσει τους 50 C 7 Μη καίτε την κασέτα μπαταρίας ακόμη και εάν έχει σοβαρή ζημιά ή είναι εντελώς φθαρμένη Η κασέτα μπαταρίας μπορεί να εκραγεί στην φωτιά 8 Προσέχετε να μη ρίξετε κάτω ή χτυπήσετε την μπαταρία 9 Μην χρησιμοπ...

Page 45: ...κασέτα μπαταρίας έχει τοποθετηθεί στο εργαλείο και ο κυλιόμενος διακόπτης βρίσκεται στη θέση I ON η λειτουργία του εργαλείου δεν ξεκινά Για να ξεκινήσετε τη λειτουργία του εργαλείου πρώτα ολισθήστε τον κυλιόμενο διακόπτη στη θέση O OFF και κατόπιν ολισθήστε τον στη θέση I ON ΣΥΝΑΡΜΟΛΟΓΗΣΗ ΠΡΟΣΟΧΗ Να φροντίζετε πάντα για την απενεργοποίηση του εργαλείου και την αφαίρεση της κασέτας μπαταρίας πριν α...

Page 46: ... τον εύκαμπτο σωλήνα της ηλεκτρικής σκούπας συλλέκτη σκόνης με το κάλυμμα αναρρόφησης Όταν συνδέετε με ηλεκτρική σκούπα της Makita χρησιμοποιήστε προαιρετικό εύκαμπτο σωλήνα με εσωτερική διάμετρο 28 χιλ Όταν συνδέετε με συλλέκτη σκόνης της Makita συνδέστε τον εύκαμπτο σωλήνα για το συλλέκτη σκόνης απευθείας στο ακροφύσιο σκόνης ΣΥΝΤΗΡΗΣΗ ΠΡΟΣΟΧΗ Πάντα να βεβαιώνεστε ότι το εργαλείο είναι σβηστό κα...

Page 47: ...ύ εργαλείου σε πραγματικές συνθήκες μπορεί να διαφέρει από τη δηλωμένη τιμή εκπομπής ανάλογα με τον τρόπο χρήσης του εργαλείου Φροντίστε να λάβετε τα κατάλληλα μέτρα προστασίας του χειριστή βάσει υπολογισμού της έκθεσης σε πραγματικές συνθήκες χρήσης λαμβάνοντας υπόψη όλες τις συνιστώσες του κύκλου λειτουργίας όπως τους χρόνους που το εργαλείο είναι εκτός λειτουργίας και όταν βρίσκεται σε αδρανή λ...

Page 48: ...lük ve toz maskesi takın 4 Çalışma alanınızı yeteri kadar havalandırın 5 İşleme başlamadan önce çatlak veya hasara karşı kesici ucu dikkatlice kontrol edin Çatlamış veya hasar görmüş ucu derhal değiştirin 6 Kesmeden önce aletin kesici ucunun zemin ya da tezgah gibi sert bir yüzeye çarpmaması için iş parçasının altında uygun açıklık olduğundan emin olun 7 Çivi ve vida gibi metal nesneleri kesmeyin ...

Page 49: ...L AÇIKLAMALAR DİKKAT Alet üzerinde ayarlama ya da işleyiş kontrolü yapmadan önce aletin kapalı ve batarya kartuşunun çıkartılmış olduğundan daima emin olun Batarya kartuşunun takılması veya çıkarılması Şek 1 DİKKAT Batarya kartuşunu takmadan ya da çıkarmadan önce aleti daima kapatın Batarya dönüştürücüyü takarken veya çıkarırken aleti ve batarya dönüştürücüyü sıkıca tutun Aletin ve batarya dönüştü...

Page 50: ...leti saat yönünde sürekli bir basınçla yavaşça hareket ettirin Şek 8 Düz bir çizgi keserken düz bir tahtayı malzeme üzerine sıkıca sabitleyin ve kılavuz olarak kullanın Aleti destek ayağı tabanı kılavuz tahtanın yanıyla aynı hizada olacak şekilde ok yönünde hareket ettirin Kesim tamamlandığında aleti kapatın ve dönen kesici ucun durmasını bekleyin daha sonra dikkatlice malzemeden çıkarın NOT Bu al...

Page 51: ...uygun olarak kullanın Bu aksesuarlarla ilgili daha fazla bilgiye ihtiyaç duyarsanız bulunduğunuz yerdeki Makita servis merkezi başvurun Alçı panel kılavuz kesici ucu Çok amaçlı kesici uç Tutucu pens kovanı İngiliz anahtarı Dairesel kılavuz Elektrikli süpürge kapağı Orijinal Makita batarya ve şarj aleti NOT Listedeki bazı parçalar standart aksesuar olarak ürün paketinin içine dahil edilmiş olabilir...

Page 52: ...885347 998 IDE Makita Jan Baptist Vinkstraat 2 3070 Belgium Makita Corporation Anjo Aichi Japan www makita com ...

Reviews: