background image

5

• Do not use force when inserting the battery cartridge. If 

the cartridge does not slide in easily, it is not being 
inserted correctly.

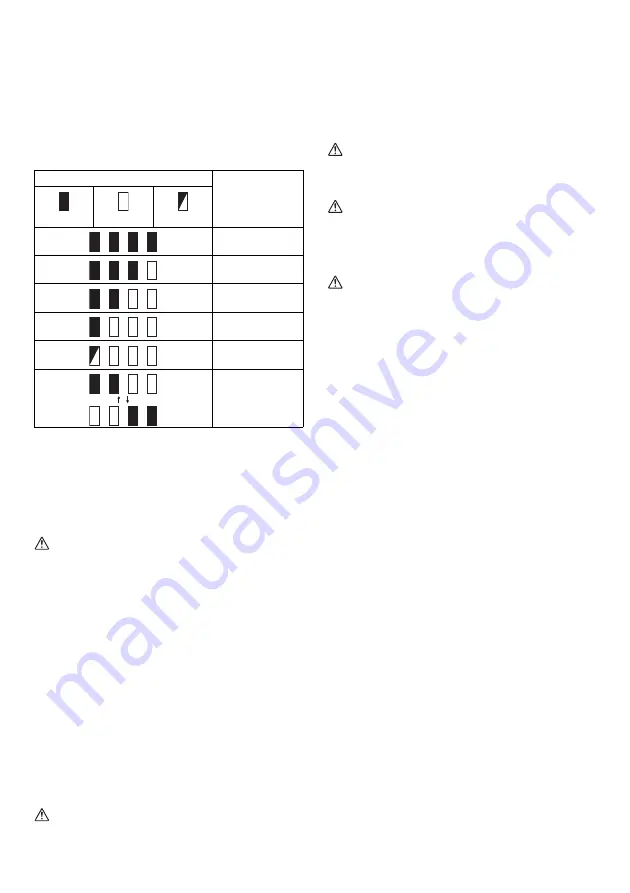
Indicating the remaining battery capacity

(Only for battery cartridges with “B” at the end of the 
model number.) 

(Fig. 2)

Press the check button on the battery cartridge to indicate 
the remaining battery capacity. The indicator lamps light 
up for few seconds.

015658

NOTE:

• Depending on the conditions of use and the ambient 

temperature, the indication may differ slightly from the 
actual capacity.

Lighting up the lamp (Fig. 3)

 CAUTION:

• Do not look in the light or see the source of light 

directly.

• Push the switch to light up the light. To turn off, push 

the switch again.

NOTE:

When remaining battery capacity becomes lower, 
light turns off automatically. So you should charge 
the battery cartridge soon.

Operating time may be shortened according to 
environments and battery conditions.

Installing the band (Fig. 4)

Insert the band through the rings of the unit and install it 
with its Velcro surface facing outward in order shown in 
the figure.

OPERATION

How to use (Fig. 5)

 CAUTION:

Fasten the band so that flashlight and a band are tightly 
secured.

Install the battery cartridge.
Slide fingers through the band and grip the unit as shown 
in the figure.
Adjust the length of the band and then secure it in Velcro 
section.
Operate the switch with a thumb.

MAINTENANCE

 CAUTION:

To maintain product safety and reliability, repairs, 
maintenance or adjustment should be carried out by a 
Makita Authorized Service Center.

 CAUTION:

Never use gasoline, benzine, thinner, alcohol or the like. 
Discoloration, deformation or cracks may result.

OPTIONAL ACCESSORIES

CAUTION:

• These accessories or attachments are recommended 

for use with your Makita tool specified in this manual. 
The use of any other accessories or attachments might 
present a risk of injury to persons. Only use accessory 
or attachment for its stated purpose.

If you need any assistance for more details regarding 
these accessories, ask your local Makita Service Center.
• Battery Charger
• Battery Cartridge

NOTE:

• Some items in the list may be included in the tool 

package as standard accessories. They may differ from 
country to country.

Indicator lamps

Remaining 

capacity

Lighted

Off

Blinking

75% to 100%

50% to 75%

25% to 50%

0% to 25%

Charge the 

battery.

The battery may 

have 

malfunctioned.

Summary of Contents for DEBDML186

Page 1: ...manual F Lampe Bracelet L E D Manuel d instructions D Akku L E D Lampe Betriebsanleitung I Torcia elettrica a LED Istruzioni per l uso NL LED zaklamp Gebruiksaanwijzing E Linterna Luminiscente Manual...

Page 2: ...2 1 2 3 4 5 1 2 3 4 5 6 7 10 8 9 8 5 9...

Page 3: ...ay have a negative impact on the environment and human health Do not dispose of electrical and electronic appliances or batteries with household waste In accordance with the European Directive on wast...

Page 4: ...a Authorized Service Center SAVE THESE INSTRUCTIONS FUNCTIONAL DESCRIPTION CAUTION 1 SAVE THESE INSTRUCTIONS This manual contains important safety and operating instructions for battery charger 2 Befo...

Page 5: ...ON How to use Fig 5 CAUTION Fasten the band so that flashlight and a band are tightly secured Install the battery cartridge Slide fingers through the band and grip the unit as shown in the figure Adju...

Page 6: ...osants dangereux dans l quipement les d chets d quipements lectriques et lectroniques les accumulateurs et les batteries peuvent avoir un impact n gatif sur l environnement et la sant humaine Ne jetez...

Page 7: ...t n obturez pas la lampe avec du tissu du carton ou autre Vous risqueriez de d clencher un incendie 13 Ne d montez pas le chargeur ni la batterie amenez la un r parateur qualifi si un entretien ou une...

Page 8: ...autonomie r elle restante Allumage de la lampe Fig 3 ATTENTION Ne regardez pas directement la lumi re ou la source lumineuse Appuyez sur l interrupteur pour allumer la lampe Pour l teindre appuyez no...

Page 9: ...9 Chargeur de batterie Batterie REMARQUE Certains l ments de la liste peuvent tre inclus en tant qu accessoires standard dans le coffret de l outil envoy Ils peuvent varier suivant les pays...

Page 10: ...z F hren Sie Akkus immer dem Recycling Prozess zu Nur f r EU L nder Aufgrund des Vorhandenseins gef hrlicher Komponenten in der Ausr stung k nnen Elektro und Elektronik Altger te Akkumulatoren und Bat...

Page 11: ...den Akku 8 Wenn das Ger t nicht verwendet wird schalten Sie es stets aus und entfernen Sie den Akkublock aus dem Ger t 9 Werkzeug und Akkublock d rfen nicht an Orten aufbewahrt werden an denen Temper...

Page 12: ...auf der Taste sehen k nnen ist der Block nicht ganz eingerastet Setzen Sie den Akku ganz ein bis der rote Bereich nicht mehr zu sehen ist Andernfalls kann der Block versehentlich aus dem Werkzeug fall...

Page 13: ...en f hren SONDERZUBEH R ACHTUNG F r das in diesem Handbuch beschriebene Makita Ger t werden die folgenden Zubeh r und Zusatzteile empfohlen Bei Verwendung anderer Zubeh r und Zusatzteile kann es zu Ve...

Page 14: ...sa della presenza di componenti pericolosi nelle apparecchiature i rifiuti di apparecchiature elettriche ed elettroniche accumulatori e batterie potrebbero produrre un impatto negativo sull ambiente e...

Page 15: ...pericolo di incendi 13 Non smontare il caricabatteria o la batteria per l assistenza o le riparazioni rivolgersi a un tecnico qualificato Un rimontaggio errato pu determinare il rischio di incendi o s...

Page 16: ...tal caso caricare al pi presto la batteria Il tempo di funzionamento pu diminuire a seconda delle condizioni della batteria e dell ambiente Installazione del nastro Fig 4 Inserire il nastro attraverso...

Page 17: ...omponenten in het apparaat kunnen oude elektrische en elektronische apparaten accu s en batterijen negatieve gevolgen hebben voor het milieu en de gezondheid van mensen Gooi elektrische en elektronisc...

Page 18: ...ar een vakbekwame reparateur voor onderhoud of reparatie Door onjuist in elkaar zetten kan een risico van elektrische schokken of brand ontstaan 14 Als zich een probleem voordoet neemt u contact op me...

Page 19: ...de lamp automatisch uit U dient de accu dan op te laden De gebruiksduur kan korter worden afhankelijk van de omgevingsomstandigheden en toestand van de accu De handriem bevestigen zie afb 4 Steek de h...

Page 20: ...r as desechados pueden tener un impacto negativo para el medioambiente y la salud humana No tire los aparatos el ctricos y electr nicos ni las bater as junto con los residuos dom sticos De conformidad...

Page 21: ...cuando deba revisarse o deban realizarse reparaciones Un montaje incorrecto puede tener como resultado un riesgo de descarga el ctrica o fuego 14 Si surge cualquier problema consulte con su distribuid...

Page 22: ...Cuando la capacidad restante de la bater a es baja la luz se apaga autom ticamente En ese caso debe cargar el cartucho de la bater a pronto El tiempo de funcionamiento puede acortarse en funci n de l...

Page 23: ...23...
Page 24: ...DML186 6L 2309 Makita Europe N V Jan Baptist Vinkstraat 2 3070 Kortenberg Belgium Makita Corporation 3 11 8 Sumiyoshi cho Anjo Aichi 446 8502 Japan ALA...

Reviews: