background image

10

3.

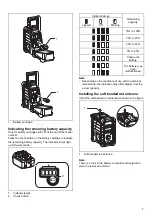
Press the desired Preset button momentarily. The 
preset number and station frequency will appear in the 
display.

Language options

There are eight language options available in the radio: 
English, German, Italian, French, Dutch, Danish, 
Norwegian, and Polish.

1.

Press Advanced setting button.

2.

Rotate the Volume/Tuning Control/Select knob until 
“Language” shown on the display. Press the Volume/ 
Tuning Control/Select knob to enter the setting.

3.

Rotate the Volume/Tuning Control/Select knob to 
choose your desired language. Press the Volume/ 
Tuning Control/Select knob to confirm your setting.

Brightness control

The backlight of the display can be adjusted.

1.

Press the Advanced setting button.

2.

Rotate the Volume/Tuning Control/Select knob until 
“Backlight” shown on the display. Press the Volume/ 
Tuning Control/Select knob to enter the setting.

3.

Rotate the Volume/Tuning Control/Select knob to 
choose to enable or disable the backlight function, 
then press the Volume/Tuning Control/Select knob to 
confirm the setting.

System reset

If your radio fails to work correctly, or some digits on the 
display are missing or incomplete, carry out the following 
procedure.

1.

Press the Advanced setting button.

2.

Rotate the Volume/Tuning Control/Select knob until 
“Factory Reset” shown on the display. Press the 
Volume/Tuning Control/Select knob to enter the 
setting.

3.

Rotate the Volume/Tuning Control/Select knob to 
choose “Yes”. Press the Volume/Tuning Control/ 
Select knob to confirm the setting and a full reset will 
be performed.

Software version

1.

Press the Advanced setting button.

2.

Rotate the Volume/Tuning Control/Select knob until 
“SW Version” shown on the display. Press the Volume/
Tuning Control/Select knob to view the software 
version installed in the radio.

Micro USB port for software upgrade

Software updates for your radio may be available in the 
future.
As software updates become available software and 
information on how to update your radio can be found at 
Makita website.

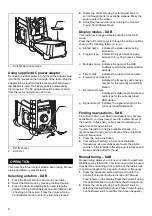
How to play other audios

 CAUTION:

Unplug this apparatus before connecting other audios.

• There are 2 AUX IN sockets. AUX IN 1 is located on 

the front panel, and AUX IN 2 is located in the battery 
compartment.

• Connect a stereo or mono source (i.e. iPod, MP3, or 

CD player) to either AUX IN 1 or AUX IN 2 by audio 
cord.

• Repeatedly press and release the Band button until 

“AU1” or “AU2” is displayed, then AUX function is 
activated.

 CAUTION:

• Never use gasoline, benzine, thinner, alcohol or the 

like. Discoloration, deformation or cracks may result.

Power requirements

AC power adaptor

DC 12 V 1A, center pin positive

Battery

Cluster battery: 7.2 V - 10.8 V 
Slide battery: 10.8 V - 18 V

Frequency coverage FM 87.50 - 108 MHz

DAB/DAB+ 174.928 - 
239.200 MHz

DAB/DAB+ Channel block

DAB (Band III) 5A-13F

Compatible standard DAB/DAB+

Circuit feature

Loudspeaker

3 inches 8 ohm

Output power

7.2 V: 0.5 W X 2
10.8 V:1.2 W X 2
14.4 V: 2.2 W X 2
18 V: 3.5 W X 2

Input terminal

3.5 mm dia. (AUX IN1/AUX IN2)

Antenna system

DAB/FM: soft bended rod antenna

Dimension (L x W x H) in mm

280 x 163 x 302

Weight

4.0 kg (without battery)

MAINTENANCE

SPECIFICATIONS

Summary of Contents for DMR110W

Page 1: ...ENGLISH Original instructions Job Site Radio DMR110 INSTRUCTION MANUAL IMPORTANT Read Before Using ...

Page 2: ...frigerators There is an increased risk of electric shock if your body is grounded 10 Under abusive conditions liquid may be ejected from the battery avoid contact If contact accidentally occurs flush with water If liquid contacts eyes additionally seek medical help Liquid ejected from the battery may cause irritation or burns 11 The MAINS plug is used as the disconnect device and it shall remain r...

Page 3: ...aining maximum battery life 1 Charge the battery cartridge before completely discharged Always stop tool operation and charge the battery cartridge when you notice less tool power 2 Never recharge a fully charged battery cartridge Overcharging shortens the battery service life 3 Charge the battery cartridge with room temperature at 10 C 40 C 50 F 104 F Let a hot battery cartridge cool down before ...

Page 4: ...e button 7 Volume Tuning Control Select knob 8 DC IN socket 9 AUX IN 1 10 LCD display 11 Soft bended rod antenna 12 Handle 13 Battery compartment cover covering battery cartridge 14 Speaker 15 Battery compartment locker 16 Input terminal AUX IN 2 17 Micro USB port for software upgrade 1 2 3 4 5 11 12 15 10 9 13 6 7 8 14 16 17 ...

Page 5: ...e with a little click If you can see the red indicator on the upper side of the button it is not locked completely Install it fully until the red indicator cannot be seen If not it may accidentally fall out of the radio causing injury to you or someone around you Do not use force when installing the battery cartridge If the cartridge does not slide in easily it is not being inserted correctly To r...

Page 6: ...attery cartridge CAUTION Always switch off the radio before removing the battery cartridge To insert the battery cartridge align the tongue on the battery cartridge with the groove in the housing and slip it into place To remove the battery cartridge take the battery out of the terminal while pressing the buttons on the side of cartridge Return the battery compartment locker to the original positi...

Page 7: ...on Note Depending on the conditions of use and the ambient temperature the indication may differ slightly from the actual capacity Installing the soft bended rod antenna Install the soft bended rod antenna as shown in the figure 1 Soft bended rod antenna Note There is a click in the battery compartment designed to store the removed antenna 1 1 2 1 Indicator lamps Remaining capacity Lighted Off Bli...

Page 8: ...e DAB multiplex to which the current station belongs d Time date Indicates the current time and date e Frequency and channel Indicates the frequency and channel number for the currently tuned DAB station f Bit rate Audio type Indicates the digital audio bit rate and audio type for the currently tuned DAB station g Signal strength Indicates the signal strength for the currently tuned DAB station Fi...

Page 9: ...get the desired sound level The LCD display will show sound level changes Note In order to use the Volume Tuning Control Select knob to find your desired station press and hold the Volume Tuning Control Select knob to switch to the tuning control mode 5 To turn off the radio press the Power button FM scan zone When using FM mode your radio can be set to scan either local stations or to scan all st...

Page 10: ...trol Select knob to confirm the setting and a full reset will be performed Software version 1 Press the Advanced setting button 2 Rotate the Volume Tuning Control Select knob until SW Version shown on the display Press the Volume Tuning Control Select knob to view the software version installed in the radio Micro USB port for software upgrade Software updates for your radio may be available in the...

Page 11: ...11 ...

Page 12: ...12 Makita Corporation 3 11 8 Sumiyoshi cho Anjo Aichi 446 8502 Japan DMR110 ENAU 0216 www makita com ALA ...

Reviews: