background image

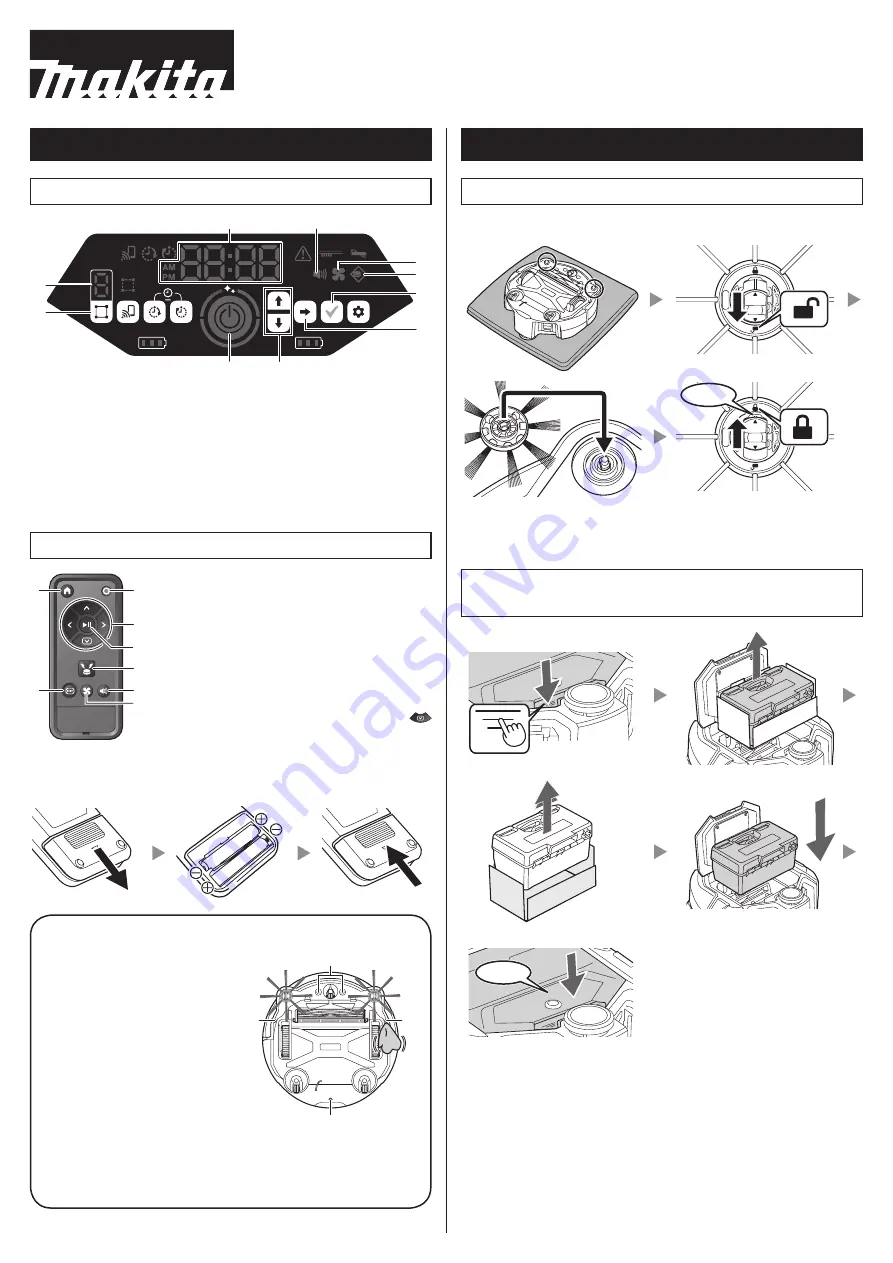
Name of Each Part

Robotic Cleaner (operation panel (display))

1

2

3

4
5

6

7

8

9

10

*For details, refer to the instruction manual of the robotic cleaner.

1.  Time indicator (green)
2.  Sound lamp (green)
3.  Vacuum fan lamp (green)
4.  Boundary-sensing lamp (green)
5.  Confirmation button

6.  Next button
7.  Up button, down button
8.  Start/stop button
9.  Mode switch button
10. Mode/room number display

Remote control

1

2

3

5

6

7

8

4

1.  Power OFF button
2.  Action buttons
3.  Start/stop button
4.  Location beacon buzzer/light button
5.  Sound ON/OFF button
6.  Vacuum fan ON/OFF button
7.  Shift button*
8.  Start point button

*  While pressing this button, press the 


action button to make the robotic cleaner 

move backward.

Putting batteries in the remote control

To prevent the robotic cleaner from falling

•  Refrain from using the robotic 

cleaner on a mezzanine floor, a 

loft, a stairwell, a place without 

walls, or a place with a slope of 

10° or more.

•  In places where the robotic 

cleaner may fall, set up a wall 

(25 cm or more in height) that 

cannot be moved or tipped over 

even if it is hit by the robotic 

cleaner.

•  If dirt or water droplets stick to 

the cliff sensor* on the underside 

of the robotic cleaner, wipe them 

off with a dry, soft cloth, a cotton 

swab, etc.

*

*

*

*

Assembly

Attaching the side brushes

Spread out a mat, place the robotic cleaner on it upside down, and attach 

the 2 side brushes on the left and right.

1

2

3

4

Click

Removing the packing material from inside 

the robotic cleaner

1

2

3

5

4

Click

Quick Start Guide

885891-375 CRE

Robotic cleaner

DRC300

ENGLISH

Summary of Contents for DRC300

Page 1: ...eaner move backward Putting batteries in the remote control To prevent the robotic cleaner from falling Refrain from using the robotic cleaner on a mezzanine floor a loft a stairwell a place without w...

Page 2: ...When cleaning ends the robotic cleaner returns to the starting point To confirm the location of the robotic cleaner press the location beacon buzzer light button on the remote control The buzzer soun...

Page 3: ...1 2 3 4 5 6 7 8 9 10 1 2 3 4 5 6 7 8 9 10 1 2 3 5 6 7 8 4 1 2 3 4 5 6 7 SHIFT 8 10 25 2 1 2 3 4 1 2 3 5 4 DRC300...

Page 4: ...1 1 2 3 00 00 AM PM 24H 4 2 3 5 1 2 3 F 4 10 LED 3 1 30 2 3 4 Wi Fi Google Play App Store Makita Google Play App Store...

Page 5: ...an pembersih robotik ke arah belakang Memasang baterai di pengendali jarak jauh Untuk mencegah pembersih robotik terjatuh Jangan gunakan pembersih robotik di lantai mezanin loteng tangga tempat tanpa...

Page 6: ...at pembersihan selesai pembersih robotik kembali ke titik awal Untuk mengonfirmasi lokasi pembersih robotik tekan tombol lampu bel penanda lokasi di pengendali jarak jauh Bel berbunyi selama sekitar 1...

Page 7: ...tik ke belakang Meletakkan bateri ke dalam kawalan jauh Untuk mengelakkan pembersih robotik daripada terjatuh Elakkan daripada menggunakan pembersih robotik pada lantai mezanin loteng tangga tempat ya...

Page 8: ...an kembali ke titik permulaan Untuk mengesahkan lokasi pembersih robotik tekan butang pembaz cahaya mata arah lokasi pada kawalan jauh Pembaz akan berbunyi selama 10 saat dan LED posisi akan berkelip...

Page 9: ...ho t ng b ng pin l i v ph a sau L p pin v o b i u khi n t xa ng n ng a kh n ng m y h t b i b r i Tr nh s d ng m y h t b i robot ho t ng b ng pin tr n t ng l ng g c x p c u thang n i kh ng c t ng bao h...

Page 10: ...b t u x c nh n v tr c a m y h t b i robot ho t ng b ng pin h y nh n n t c i b o v tr n tr n b i u khi n t xa C i b o s ph t ra m thanh trong kho ng 10 gi y v n LED nh v s nh p nh y 3 ng k th ng tin p...

Page 11: ...1 2 3 4 5 6 7 8 9 10 1 2 3 4 5 6 7 8 9 10 1 2 3 5 6 7 8 4 1 2 3 4 5 6 7 8 10 25 2 1 2 3 4 1 2 3 5 4 DRC300...

Page 12: ...1 1 2 3 00 00 AM PM 24H 4 2 3 5 1 2 3 F 4 10 LED 3 1 30 2 3 4 Wi Fi Makita Google Play App Store Google Play App Store...

Reviews: