9
Overheat protection
This protection works when the tool or battery is
overheated. In this situation, let the tool and battery cool
before turning the tool on again.
Overdischarge protection
This protection works when the remaining battery capacity
gets low. In this situation, remove the battery from the tool
and charge the battery.
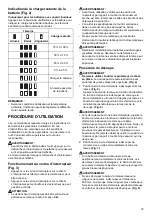
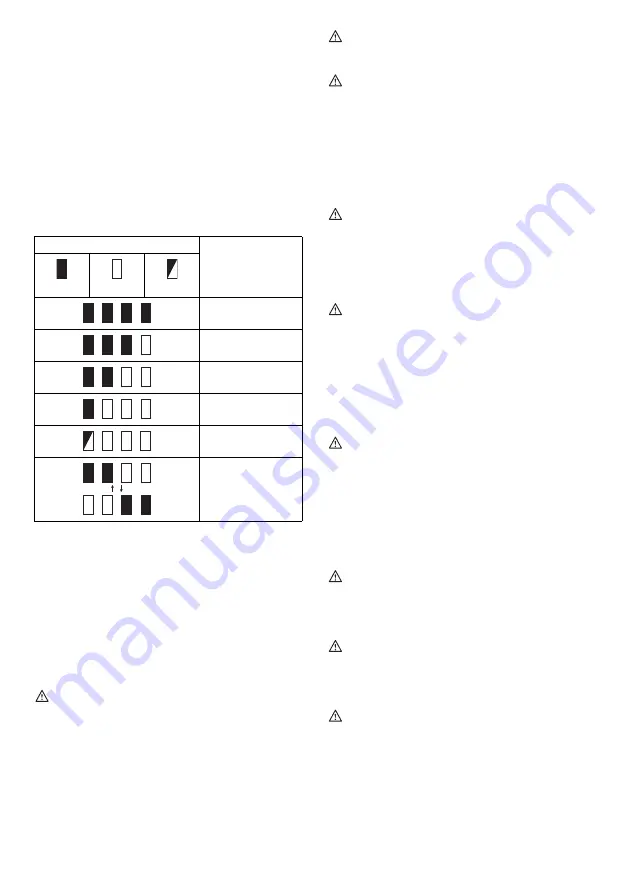
Indicating the remaining battery capacity
(Fig. 2)
Only for battery cartridges with the indicator
Press the check button on the battery cartridge to indicate
the remaining battery capacity. The indicator lamps light
up for a few seconds.
NOTE:
• Depending on the conditions of use and the ambient
temperature, the indication may differ slightly from the
actual capacity.
OPERATING PROCEDURE
Read, understand and follow all safety instructions and
operating procedures. If you do not understand the
instructions, or if conditions are not correct for proper
operation, do not operate this tool. Consult your
supervisor or other responsible person.
WARNING:
• Before the Battery is inserted into the tool, pull and
release the switch trigger to ensure that it returns when
released.
The motor is on when the switch trigger is pulled and off
when the switch trigger is released.
Switch Lock Operation (Fig. 3)
• Push in the Switch Lock on side A. The Switch is un-
locked and the Trigger can be operated.
• Push in the Switch Lock on side B. The Switch is
locked and the Trigger cannot be operated.
CAUTION:
• The switch trigger should be locked at all times when
not in use.
WARNING:
• Before operation, confirm that the position of the
operator, relative to the tool, and the surrounding area
is safe for operation. Put on safety glasses and wear
protective clothing.
• Refer to the tool specifications in this manual and do
not cut rebar of size or hardness that exceeds the
cutting capacity of the tool.
• Do not cut material other than rebar. Please ask the
manufacturer if you want to cut other materials.
WARNING:
• Replace damaged (chipped, broken, cracked) or
deformed blades immediately. The blade will not cut
true and may fracture or break causing serious
personal injury.
Cutting Procedure
WARNING
•
Never use the tool without the protector in place.
Failure to do so can cause serious personal injury.
(Fig. 4)
1. Position the rebar to be cut between the blades.
(Fig. 5)
Adjust the Hold Bolt according to the diameter of the
rebar to be cut so that the rebar is at 90 degrees to the
blades. The Hold Bolt supports the rebar and keeps it
perpendicular to the blades when cutting.
(Fig. 6)
WARNING
• When cutting rebar, adjust the Hold Bolt according to
the diameter of the rebar to be cut so that the rebar is
at 90 degrees to the blades. Without this adjustment,
the cut piece may fly off and cause serious injury to the
operator or bystanders. Never fail to check the position
of the operator relative to the tool and confirm the
safety of the operator and surrounding area.
2. Position the rebar to be cut so that it is fully between
the blades.
(Fig. 7)
WARNING
• If the rebar to be cut is not positioned fully between the
blades, the blades will be damaged; the rebar will be
ejected violently and may cause serious personal
injury.
WARNING
• Do not cut rebar when the piece to be cut off is less
than 200 mm in length. Cutting shorter length may
cause the rebar to fly off during cut and may result in
serious personal injury.
(Fig. 8)
WARNING
• Do not cut rebar when it is not properly supported by
the Hold Bolt. When cutting, hold the rebar on the Hold
Bolt side.
(Fig. 9)
If not, the cut piece may fly off and
cause serious injury to the operator or bystanders.
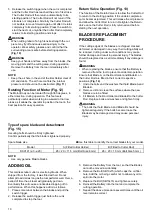
3. Push in the Switch Lock on Side A. The switch is
unlocked and the trigger can be operated.
4. Press the switch trigger to start cutting operation. The
Cutter Rod will move forward to cut the rebar. Keep
the Switch depressed until the Cutter Rod stops at the
end of its stroke.
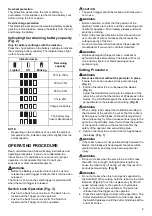
Indicator lamps
Remaining
capacity
Lighted
Off
Blinking
75% to 100%
50% to 75%
25% to 50%
0% to 25%
Charge the battery.
The battery may
have malfunctioned.


