background image

17 ENGLISH

MAINTENANCE

CAUTION:


Always be sure that the tool is 

switched off and the battery cartridge is removed 

before attempting to perform inspection or 

maintenance.

CAUTION:


Always wear gloves when perform-

ing any inspection or maintenance.

NOTICE:


Never use gasoline, benzine, thinner, 

alcohol or the like. Discoloration, deformation or 

cracks may result.

To maintain product SAFETY and RELIABILITY, 

repairs, any other maintenance or adjustment should 

be performed by Makita Authorized or Factory Service 

Centers, always using Makita replacement parts.

Sharpening the saw chain

Sharpen the saw chain when:

• 

Mealy sawdust is produced when damp wood is 

cut;

• 

The chain penetrates the wood with difficulty, even 

when heavy pressure is applied;

• 

The cutting edge is obviously damaged;

• 

The saw pulls to the left or right in the wood. 

(caused by uneven sharpening of the saw chain or 

damage to one side only)

Sharpen the saw chain frequently but a little each time. 

Two or three strokes with a file are usually sufficient for 

routine resharpening. When the saw chain has been 

resharpened several times, have it sharpened in our 

authorized service center.

Sharpening criteria:

WARNING:


An excessive distance between 

the cutting edge and depth gauge increases the 

risk of kickback.

2

2

1

1

3

1

Fig.34

►    

1.

 Cutter length 

2.

 Distance between cutting edge 

and depth gauge 

3.

 Minimum cutter length (3 mm)

—  All cutter length must be equal. Different cutter 

lengths prevent the saw chain from running 

smoothly and may cause the saw chain to break.

—  Do not sharpen the chain when the cutter length 

has reached 3 mm or shorter. The chain must be 

replaced with new one.

—  The chip thickness is determined by the distance 

between the depth gauge (round nose) and the 

cutting edge.

—  The best cutting results are obtained with following 

distance between cutting edge and depth gauge.
• 

Chain blade 90PX : 0.65 mm

30

30

55

55

Fig.35

—  The sharpening angle of 30° must be the same on 

all cutters. Different cutter angles cause the chain 

to run roughly and unevenly, accelerate wear, and 

lead to chain breaks.

—  Use a suitable round file so that the proper sharp

-

ening angle is kept against the teeth.
• 

Chain blade 90PX : 55°

File and file guiding

—  Use a special round file (optional accessory) for 

saw chains to sharpen the chain. Normal round 

files are not suitable.

—  Diameter of the round file for each saw chain is as 

follows:
• 

Chain blade 90PX : 4.5 mm

—  The file should only engage the cutter on the for

-

ward stroke. Lift the file off the cutter on the return 

stroke.

—  Sharpen the shortest cutter first. Then the length 

of this shortest cutter becomes the standard for all 

other cutters on the saw chain.

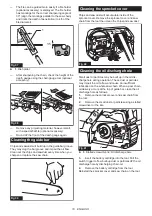
—  Guide the file as shown in the figure.

1

2

Fig.36

►    

1.

 File 

2.

 Saw chain

Summary of Contents for DUC357

Page 1: ...INSTRUCTION MANUAL Cordless Chain Saw DUC307 DUC357 DUC407 ENGLISH Original instructions Read before use ...

Page 2: ... guide bar and sprocket combination Saw chain type 90PX Number of drive links 46 52 56 Guide bar Guide bar length 300 mm 350 mm 400 mm Cutting length 275 mm 330 mm 370 mm Pitch 3 8 Gauge 1 1 mm Type Sprocket nose bar Sprocket Number of teeth 6 Pitch 3 8 WARNING Use appropriate combination of the guide bar and saw chain Otherwise personal injury may result Applicable battery cartridge and charger B...

Page 3: ...o EN62841 4 1 Model DUC307 Sound pressure level LpA 86 dB A Sound power level LWA 97 dB A Uncertainty K 3 dB A Model DUC357 Sound pressure level LpA 86 dB A Sound power level LWA 97 dB A Uncertainty K 3 dB A Model DUC407 Sound pressure level LpA 86 dB A Sound power level LWA 97 dB A Uncertainty K 3 dB A NOTE The declared noise emission value s has been measured in accordance with a standard test m...

Page 4: ...n extension cord suitable for outdoor use Use of a cord suitable for outdoor use reduces the risk of electric shock 6 If operating a power tool in a damp location is unavoidable use a residual current device RCD protected supply Use of an RCD reduces the risk of electric shock 7 Power tools can produce electromagnetic fields EMF that are not harmful to the user However users of pacemakers and othe...

Page 5: ... create a risk of fire when used with another battery pack 2 Use power tools only with specifically desig nated battery packs Use of any other battery packs may create a risk of injury and fire 3 When battery pack is not in use keep it away from other metal objects like paper clips coins keys nails screws or other small metal objects that can make a connection from one terminal to another Shorting...

Page 6: ...e guide bar up and back towards the operator Pinching the saw chain along the top of the guide bar may push the guide bar rapidly back towards the operator Either of these reactions may cause you to lose control of the saw which could result in serious personal injury Do not rely exclusively upon the safety devices built into your saw As a chain saw user you should take several steps to keep your ...

Page 7: ...uctions for battery cartridge 1 Before using battery cartridge read all instruc tions and cautionary markings on 1 battery charger 2 battery and 3 product using battery 2 Do not disassemble or tamper with the battery cartridge It may result in a fire excessive heat or explosion 3 If operating time has become excessively shorter stop operating immediately It may result in a risk of overheating poss...

Page 8: ...g causing fires personal injury and damage It will also void the Makita warranty for the Makita tool and charger Tips for maintaining maximum battery life 1 Charge the battery cartridge before completely discharged Always stop tool operation and charge the battery cartridge when you notice less tool power 2 Never recharge a fully charged battery car tridge Overcharging shortens the battery service...

Page 9: ... to you or someone around you CAUTION Do not install the battery cartridge forcibly If the cartridge does not slide in easily it is not being inserted correctly Indicating the remaining battery capacity Only for battery cartridges with the indicator 1 2 Fig 4 1 Indicator lamps 2 Check button Press the check button on the battery cartridge to indi cate the remaining battery capacity The indicator l...

Page 10: ...nter for repairs WARNING Never disable the lock function or tape down the lock off button CAUTION Before installing the battery cartridge into the tool always check to see that the switch trigger actuates properly and returns to the OFF position when released NOTICE Do not pull the switch trigger forcibly with out pressing the lock off button The switch may break 1 2 Fig 5 1 Lock off button 2 Swit...

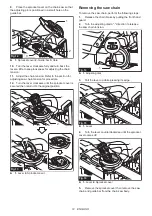
Page 11: ... install the saw chain perform the following steps 1 Release the chain brake by pulling the front hand guard 2 Pull the lever up while pressing its edge 1 Fig 7 1 Lever 3 Turn the lever counterclockwise until the sprocket cover comes off 1 2 Fig 8 1 Lever 2 Sprocket cover 4 Remove the sprocket cover 5 Check the direction of the saw chain Match the direction of the saw chain with that of the mark o...

Page 12: ...lockwise until the sprocket cover is secured then return it to the original position 1 2 Fig 13 1 Lever 2 Sprocket cover Removing the saw chain To remove the saw chain perform the following steps 1 Release the chain brake by pulling the front hand guard 2 Turn the adjusting dial to direction to release the saw chain tension 1 Fig 14 1 Adjusting dial 3 Pull the lever up while pressing its edge 1 Fi...

Page 13: ...sition Make sure the saw chain fits snugly against the lower side of the bar OPERATION Lubrication CAUTION Do not operate the chain saw when the tank is empty Replenish the oil in due time before the tank is empty CAUTION Prevent the oil from coming into con tact with the skin and eyes Contact with the eyes causes irritation In the event of eye contact flush the affected eye immediately with clear...

Page 14: ...hain saw CAUTION The first time user should as a minimum practice do cutting logs on a saw horse or cradle CAUTION When sawing precut timber use a safe support saw horse or cradle Do not steady the workpiece with your foot and do not allow anyone else to hold or steady it CAUTION Secure round pieces against rotation CAUTION Keep all parts of the body away from the saw chain when the motor is opera...

Page 15: ...bar from becoming trapped A B A B Fig 27 Limbing CAUTION Limbing may only be performed by trained persons A hazard is presented by the risk of kickback When limbing support the chain saw on the trunk if possible Do not cut with the tip of the bar as this pres ents a risk of kickback Pay particular attention to branches under tension Do not cut unsupported branches from below Do not stand on the fe...

Page 16: ...diagonally to the rear of the expected line of fall as illustrated in figure 1 2 2 3 3 Fig 30 1 Felling direction 2 Danger zone 3 Escape route When felling trees follow the procedures below 1 Cut a scarf as close to the ground as possible First make the horizontal cut to a depth of 1 5 1 3 of the trunk diameter Do not make the scarf too large Then make the diagonal cut Fig 31 NOTE The scarf determ...

Page 17: ...f kickback 2 2 1 1 3 1 Fig 34 1 Cutter length 2 Distance between cutting edge and depth gauge 3 Minimum cutter length 3 mm All cutter length must be equal Different cutter lengths prevent the saw chain from running smoothly and may cause the saw chain to break Do not sharpen the chain when the cutter length has reached 3 mm or shorter The chain must be replaced with new one The chip thickness is d...

Page 18: ...n Fig 39 Cleaning the sprocket cover Chips and saw dust will accumulate inside of the sprocket cover Remove the sprocket cover and saw chain from the tool then clean the chips and saw dust Fig 40 Cleaning the oil discharge hole Small dust or particles may be built up in the oil dis charge hole during operation These dust or particles may impair the oil to flow and cause an insufficient lubrication...

Page 19: ...ys fit a new locking ring when replacing the sprocket 1 2 Fig 43 1 Locking ring 2 Sprocket NOTICE Make sure that the sprocket is installed as shown in the figure Storing the tool 1 Clean the tool before storing Remove any chips and sawdust from the tool after removing the sprocket cover 2 After cleaning the tool run it under no load to lubri cate the saw chain and guide bar 3 Cover the guide bar w...

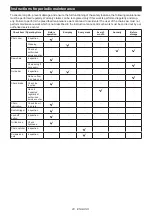
Page 20: ...ot described in the instruction manual All such work must be carried out by our authorized service center Check item Operating time Before operation Everyday Every week Every 3 month Annually Before storage Chain saw Inspection Cleaning Check at authorized service center Saw chain Inspection Sharpening if necessary Guide bar Inspection Remove from the chain saw Chain brake Check the function Have ...

Page 21: ...rvice center in your region for repair Chain does not stop even the chain brake is activated Stop the tool immediately The brake band is worn down Ask the authorized service center in your region for repair Abnormal vibration Stop the tool immediately Loose guide bar or saw chain Adjust the guide bar and saw chain tension Tool malfunction Ask the authorized service center in your region for repair...

Page 22: ...22 ...

Page 23: ...23 ...

Page 24: ...www makita com Makita Europe N V Makita Corporation 3 11 8 Sumiyoshi cho Anjo Aichi 446 8502 Japan Jan Baptist Vinkstraat 2 3070 Kortenberg Belgium 885980 225 EN 20220414 ...

Reviews: