background image

Off

Blinking

Lighted

Indicator lamps

Charge the  

battery.

0

% to 25%

25% to 5

0

%

5

0

% to 75%

75% to 1

00

%

Remaining  

capacity

The battery  

may have  

malfunctioned.


015658 

NOTE: 

• 

Depending on the conditions of use and the 
ambient temperature, the indication may differ 
slightly from the actual capacity. 

Power switch action 


WARNING: 

• 

Before inserting the battery cartridge in the 
tool, always check to see that the switch 
trigger actuates properly and returns to the 
"OFF" position when released. Do not pull the 
switch trigger hard without pressing in the 
lock-off button. This can cause switch 
breakage.

 Operating a tool with a switch that does 

not actuate properly can lead to loss of control and 
serious personal injury. 

1

2


012397 

To prevent the switch trigger from being accidentally 
pulled, a lock-off button is provided. 
To start the tool, move the lock-off button forward and 
pull the switch trigger. Release the switch trigger to stop. 

Indication lamp 

1


012441 

Running the tool allows the indication lamp to show the 
battery cartridge capacity status. 
When the tool is also overloaded and has stopped 
during operation, the lamp lights up in red. 
Refer to the following table for the status and action to 
be taken for the indication lamp. 

Note 1:

The time at which the indication lamp lights up varies by the temperature 
around the work area and the battery cartridge conditions.

Indication lamp

The lamp blinks in red.

The lamp lights up in red. 
(Note 1)

The lamp lights up in red. 
(Note 1)

Status

This indicates the appropriate 
time to replace the battery 
cartridge when the battery 
power becomes low.

This function works when the 
battery power is almost used 
up. At this time, tool stops 
immediately.

Autostop due to overload.

Action to be taken

Recharge the battery cartridge 
as soon as possible.

Recharge the battery cartridge.

Turn off the tool.


012443 

1. Indication lamp 

1. Lock-off button 
2. Switch trigger 

Summary of Contents for DUR181Z

Page 1: ...1 ENGLISH Original instructions INSTRUCTION MANUAL IMPORTANT Read Before Using Cordless String Trimmer DUR141 DUR181 012390...

Page 2: ...s Wear sturdy boots with nonslip soles Steeltoed safety boots are recommended Do not expose to moisture Top permissible tool speed Only for EU countries Do not dispose of electric equipment or battery...

Page 3: ...d all instructions Failure to follow the warnings and instructions may result in electric shock fire and or serious injury Save all warnings and instructions for future reference 1 Be familiar with th...

Page 4: ...e and may cause damage to the eyes or skin It may be toxic if swallowed Starting up the tool 360 012858 1 Make sure that there are no children or other people within a working range of 15 meters 50 ft...

Page 5: ...tter and with less likelihood of a risk of injury at the rate for which it was designed Maintenance instructions 1 The condition of the cutting tool protective devices must be checked before commencin...

Page 6: ...rdous material is required Please also observe possibly more detailed national regulations Tape or mask off open contacts and pack up the battery in such a manner that it cannot move around in the pac...

Page 7: ...7 PARTS DESCRIPTION 1 2 3 4 5 6 Battery cartridge Indication lamp Switch trigger Front grip Guard 7 8 Clamping nut Lock grip Nylon cutting head 1 2 3 4 5 6 7 8 013641...

Page 8: ...the tool causing injury to you or someone around you Do not install the battery cartridge forcibly If the cartridge does not slide in easily it is not being inserted correctly Battery protection syste...

Page 9: ...button forward and pull the switch trigger Release the switch trigger to stop Indication lamp 1 012441 Running the tool allows the indication lamp to show the battery cartridge capacity status When t...

Page 10: ...WARNING Always be sure that the tool is switched off and battery cartridge is removed before carrying out any work on the tool Failure to switch off and remove the battery cartridge may result in ser...

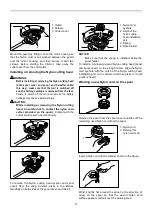
Page 11: ...ve the Nylon cutting head spool and spool cover from the string trimmer press in the latches forcefully on both sides of the spool cover and raise it 1 2 3 4 012440 NOTICE Make sure that the spring is...

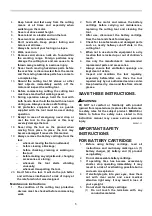
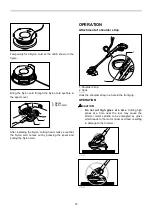
Page 12: ...by pressing the spool and pulling the Nylon cord OPERATION Attachment of shoulder strap 1 2 012395 Hook the shoulder strap in a hole in the front grip OPERATION CAUTION Do not cut high grass at a tim...

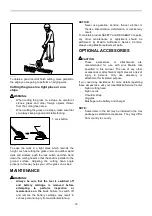
Page 13: ...titled Installing or removing the Nylon cutting head and Winding a new Nylon cord on the spool Using the tip of the Nylon cord during operation brings the best result of operation and therefore it is...

Page 14: ...n or maintenance on the tool Failure to switch off and remove the battery cartridge may result in serious personal injury from accidental start up NOTICE Never use gasoline benzine thinner alcohol or...

Page 15: ...15...

Page 16: ...16 www makita com Makita Jan Baptist Vinkstraat 2 3070 Belgium Makita Corporation Anjo Aichi Japan 885314D222...

Reviews: