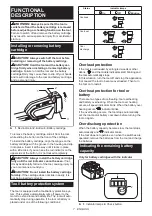
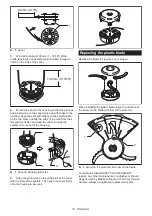
background image

9 ENGLISH

Indicator

Mode

Rotation speed

Auto

4,000 - 6,000 min

-1

High

6,000 min

-1

Medium

5,000 min

-1

Low

4,000 min

-1

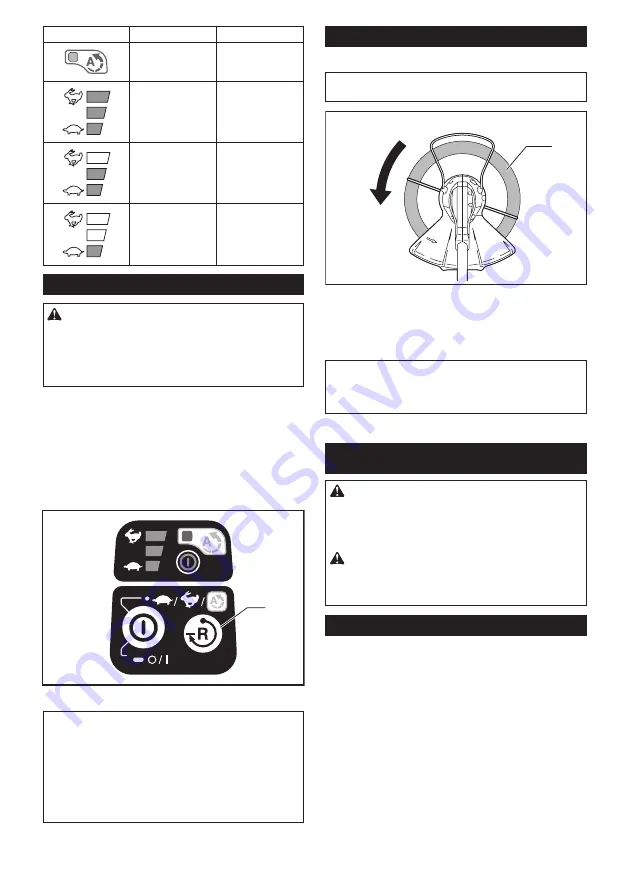
Reverse button for debris removal

WARNING:


Switch off the tool and remove 

the battery cartridge before you remove entan-

gled weeds or debris which the reverse rotation 

function can not remove.

 Failure to switch off and 

remove the battery cartridge may result in serious 

personal injury from accidental start-up.

This tool has a reverse button to change the direction of 

rotation. It is only for removing weeds and debris entan-

gled in the tool.

To reverse the rotation, tap the reverse button and pull 

the trigger when the tool’s head is stopped. The power 

lamp starts blinking, and the tool's head rotates in 

reverse direction when you pull the switch trigger.

To return to regular rotation, release the trigger and wait 

until the tool's head stops.
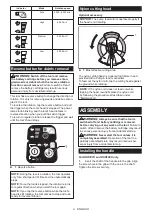
1

►    

1.

 Reverse button

NOTE:

 During the reverse rotation, the tool operates 

only for a short period of time and then automatically 

stops.

NOTE:

 Once the tool is stopped, the rotation returns 

to regular direction when you start the tool again.

NOTE:

 If you tap the reverse button while the tool's 

head is still rotating, the tool comes to stop and to be 

ready for reverse rotation.
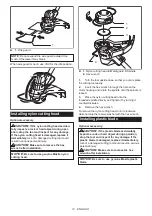
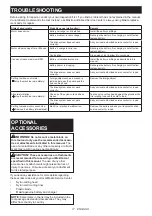
Nylon cutting head

Optional accessory

NOTICE:

 The bump feed will not operate properly if 

the head is not rotating.
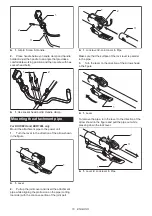
1

►    

1.

 Most effective cutting area

The nylon cutting head is a dual string trimmer head 

provided with a bump & feed mechanism.

To feed out the nylon cord, tap the cutting head against 

the ground while rotating.

NOTE:

 If the nylon cord does not feed out while 

tapping the head, rewind/replace the nylon cord 

by following the procedures described under 

“Maintenance”.

ASSEMBLY

WARNING:


Always be sure that the tool is 

switched off and battery cartridge is removed 

before carrying out any work on the tool.

 Failure to 

switch off and remove the battery cartridge may result 

in serious personal injury from accidental start-up.

WARNING:


Never start the tool unless it is 

completely assembled.

 Operation of the tool in a 

partially assembled state may result in serious per-

sonal injury from accidental start-up.

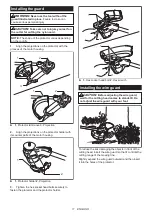
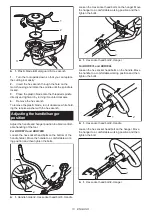
Installing the handle

For DUR187U and DUR188U only

1.


Insert the shaft of the handle into the grip. Align 

the screw hole in the grip with the one in the shaft. 

Tighten the screw securely.

Summary of Contents for DUR187U

Page 1: ...INSTRUCTION MANUAL Cordless Grass Trimmer DUR187U DUR187L DUR188U DUR188L ENGLISH Original instructions Read before use ...

Page 2: ...distance at least 15 m Wear a helmet goggles and ear protection Wear protective gloves Wear sturdy boots with nonslip soles Steeltoed safety boots are recommended Do not expose to moisture Top permissible tool speed Never use metal blade Ni MH Li ion Only for EU countries Do not dispose of electric equipment or battery pack together with household waste material In observance of the European Direc...

Page 3: ...ir 2 When using the tool always wear sturdy shoes with a non slip sole This protects against injuries and ensures a good footing 3 Wear protective glasses or goggles Electrical and battery safety 1 Avoid dangerous environment Don t use the tool in damp or wet locations or expose it to rain Water entering the tool will increase the risk of electric shock 2 Recharge only with the charger specified b...

Page 4: ...the tool may become damaged if moved in this manner 16 Always remove the battery cartridge from the tool whenever leaving the tool unattended before clearing a blockage before checking cleaning or working on the tool before making any adjustments chang ing accessories or storing whenever the tool starts vibrating unusually whenever transporting the tool 17 Don t force the tool It will do the job b...

Page 5: ...equirement on pack aging and labeling must be observed For preparation of the item being shipped consult ing an expert for hazardous material is required Please also observe possibly more detailed national regulations Tape or mask off open contacts and pack up the battery in such a manner that it cannot move around in the packaging 11 Follow your local regulations relating to dis posal of battery ...

Page 6: ... Hanger 5 Handle 6 Protector cutting tool guard 7 Wire guard 8 Lock lever DUR188U and DUR188L only 9 Joint cover DUR188U and DUR188L only 10 Cap DUR188U and DUR188L only 11 Speed indicator 12 Auto speed control indicator 13 Power lamp 14 Main power button 15 Reverse button 16 Shoulder harness The shape of the protector varies depending on the country ...

Page 7: ...und you CAUTION Do not install the battery cartridge forcibly If the cartridge does not slide in easily it is not being inserted correctly Tool battery protection system The tool is equipped with a tool battery protection sys tem This system automatically cuts off power to the motor to extend tool and battery life The tool will auto matically stop during operation if the tool or battery is placed ...

Page 8: ...sonal injury CAUTION Never put your finger on the switch when carrying The tool may start uninten tionally and cause injury Press and hold the main power button for some sec onds to turn on the tool To turn off the tool press and hold the main power button again 1 1 Main power button To prevent the switch trigger from being accidentally pulled a lock off lever is provided To start the tool grasp t...

Page 9: ...ction when you start the tool again NOTE If you tap the reverse button while the tool s head is still rotating the tool comes to stop and to be ready for reverse rotation Nylon cutting head Optional accessory NOTICE The bump feed will not operate properly if the head is not rotating 1 1 Most effective cutting area The nylon cutting head is a dual string trimmer head provided with a bump feed mecha...

Page 10: ... the direction of the arrow shown in the figure 1 1 Lever 2 Pull up the joint cover and insert the attachment pipe while aligning the protrusion on the pipe cutting tool side with the concave portion of the joint part 2 1 3 1 Lock lever 2 Joint cover 3 Pipe Make sure that the surface of the lock lever is parallel to the pipe 3 Turn the lever to the direction of the arrow shown in the figure 1 1 Le...

Page 11: ...ions on the protector holder with its counter parts of the motor housing 1 2 1 Protector holder 2 Projection 3 Tighten the hex socket head bolts securely to fasten the protector and the protector holder 1 2 1 2 1 Hex socket head bolt 2 Hex wrench Installing the wire guard CAUTION Before adjusting the wire guard wait for the cutting head comes to standstill Do not adjust the wire guard with your fo...

Page 12: ...Hex wrench 1 Turn the tool upside down so that you can replace the cutting tool easily 2 Insert the hex wrench through the hole on the motor housing and rotate the spindle until the spindle is locked 3 Place the nylon cutting head onto the threaded spindle directly and tighten it by turning it counterclockwise 4 Remove the hex wrench To remove the nylon cutting head turn it clockwise while holding...

Page 13: ...ain confort able handling of the tool For DUR187U and DUR188U Loosen the hex socket head bolts on the bottom of the handle holder Move the handle to a comfortable work ing position and then tighten the bolts 1 2 3 1 Handle holder 2 Hex socket head bolt 3 Handle Loosen the Hex socket head bolts on the hanger Move the hanger to a comfortable working position and then tighten the bolts 1 2 1 Hex sock...

Page 14: ...to be deflected toward you or anyone in the work vicinity Failure to keep control of the tool could result in serious injury to the bystander and the operator WARNING To avoid accident leave more than 15m 50 ft distance between operators when two or more oper ators work in one area Also arrange a person to observe the distance between operators If someone or an animal enter the working area immedi...

Page 15: ...lon cord WARNING Use nylon cord with diameter specified in SPECIFICATIONS only Never use heavier line metal wire rope or the like Use rec ommended nylon cord only otherwise it may cause damage to the tool and result in serious personal injury WARNING Make sure that the cover of the nylon cutting head is secured to the housing properly as described below Failure to properly secure the cover may cau...

Page 16: ...gh the eyelets to come out of the housing 2 1 3 1 Spool 2 Housing 3 Eyelet 5 Align the protrusion on the underside of the cover with the slots of the eyelets Then push the cover firmly onto the housing to secure it Replacing the plastic blade Replace the blade if it is worn out or broken When installing the plastic blade align the direction of the arrow on the blade with that of the protector 1 2 ...

Page 17: ...the nylon cutting head Remove the foreign object The drive system does not work correctly Ask your local authorized service center for repair Abnormal vibration stop the machine immediately One end of the nylon cord has been broken Tap the nylon cutting head against the ground while it is rotating to cause the cord to feed The drive system does not work correctly Ask your local authorized service ...

Page 18: ...18 ...

Page 19: ...19 ...

Page 20: ...Makita Corporation www makita com 885546C5 EN 20170206 ...

Reviews: